This tutorial will guide you through the process of setting up a web server on a Raspberry Pi Pico W using MicroPython while also configuring it as a soft access point. To begin, we'll explore how to use the Pico W as a soft access point in SoftAP mode, enabling devices to connect to our board directly without the need for a traditional wireless router. Ultimately, we'll demonstrate the creation of a sample web server that can be accessed by devices connected to this access point.
Prerequisites
Prior to commencing this tutorial, it's essential to ensure that you have a solid foundation in Python 3, with the latest version installed on your system. Additionally, you should have Raspberry Pi Pico W configured with MicroPython and an operational Integrated Development Environment (IDE) for our programming tasks. We will adhere to the Thonny IDE, as we did in our introductory guide. If you haven't had the chance to review our previous tutorial, you can access it here: [insert link].
Soft Access Point Introduction
A Soft AP, or “software-enabled access point,” is a term used to describe a wireless access point created through software on a Raspberry Pi Pico W. This type of access point, often referred to as a “virtual router,” utilizes software to establish a wireless network without the need for a physical wired connection. This absence of wired network connectivity is the reason behind its name, “SoftAP.”

Station Mode vs Soft AP Mode
To establish a web server using the Raspberry Pi Pico W, you have the option to utilize either soft access point mode or station mode, as outlined below:
Raspberry Pi Pico W in Station Mode
In this configuration, the Raspberry Pi Pico W board establishes a connection with your Wi-Fi network via a router. Consequently, the router serves as the intermediary for communication between the web client (web browser) and the Raspberry Pi Pico W (web server). The Raspberry Pi Pico W boards obtain their IP addresses from the Wi-Fi router. This IP address enables web clients to access the web server over the existing local network.
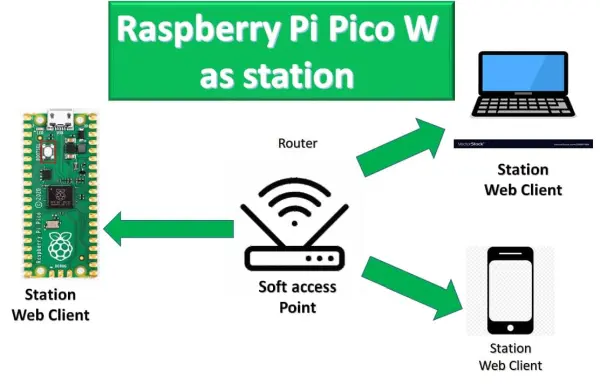
In our prior web server undertakings involving the Raspberry Pi Pico W board, we established a connection between these boards by employing a router, allowing them to access the local network. In this scenario, the Pico W module functioned as a station client, while the router was configured as an access point, as depicted in the accompanying diagram:
Raspberry Pi Pico W in Soft Access Point Mode
In this operational state, the Raspberry Pi Pico W establishes an autonomous wireless Wi-Fi network that resembles your current Wi-Fi router. In this configuration, there is no requirement to link the Raspberry Pi Pico W to an external Wi-Fi network. Instead, any user seeking access to the web server must initially connect to this independent wireless Wi-Fi network. This network has the capacity to accommodate connections from up to five devices simultaneously.
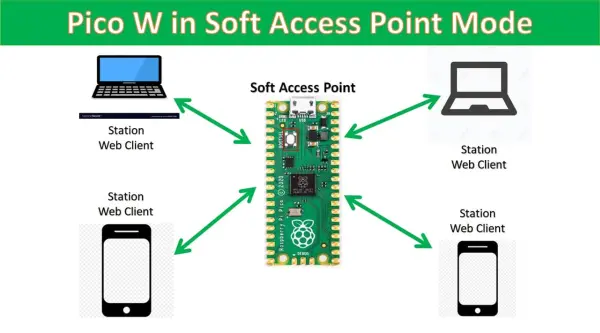
In this instance, we'll delve into utilizing the Raspberry Pi Pico W as an Access Point. Leveraging SoftAP mode offers a notable benefit, as it eliminates the need for a traditional network router. When we configure the Raspberry Pi Pico W as an Access Point, essentially, we transform it into a hotspot. Consequently, all Wi-Fi-enabled devices in close proximity, such as smartphones, laptops, or personal computers (PCs), can seamlessly connect to our board without the necessity of a router.
MicroPython API to Set Raspberry Pi Pico W as an Access Point
MicroPython includes a network interface module that offers two distinct Wi-Fi interface options. One is designed for station mode, enabling the Raspberry Pi Pico W to connect to a router, while the other is meant for access point mode, allowing other devices to connect to the SSID broadcasted by the Raspberry Pi Pico W. Given our intention to operate the Pico W in soft access point mode, we will make use of the access point mode interface. To achieve this, we instantiate an object of this type using the following code: `network.WLAN(network.AP_IF)`.
ap = network.WLAN(network.AP_IF)The network.WLAN() is used to create a.WLAN network interface object.
Supported interfaces are:
network.STA_IF (station mode)
network.AP_IF (Soft access point mode)
After that, activate the access point by passing the “True” argument to the ap.active() method. Here ‘ap’ is an instance of the object which we created in the last step. We will use the same instance to access all methods of network class.
ap .active(True)We declare two variables to store the name and password for the access point network of the Raspberry Pi Pico W. These variables contain the credentials for the SoftAP network.
ssid= ‘Enter_Acess_Point_Name_Here' password = ‘Enter_Acess_Point_Passoword_Here'
The config() function is used to configure with a given ssid and password.
ap.config(essid=ssid,password=password)
In short, the following MicroPython script set up softAP mode:
ap = network.WLAN(network.AP_IF)
ap.config(essid=ssid, password=password)
ap.active(True)
Raspberry Pi Pico W Access point Web Server using MicroPython
This section is dedicated to demonstrating how to utilize the Raspberry Pi Pico W in Soft Access Point mode, enabling us to establish a “Microcontrollerlab” web server. We will accomplish this by guiding you through the process of configuring the Raspberry Pi Pico W as a soft access point and providing a basic illustration of a web server setup.
MicroPython Script
Within your Thonny IDE, initiate a new file and enter the subsequent code, saving it as “main.py.” This SoftAP web server will display the message “Welcome to microcontrollerslab!” on a web page.
try:
import usocket as socket #importing socket
except:
import socket
import network #importing network
import gc
gc.collect()
ssid = ‘RPI_PICO_AP' #Set access point name
password = ‘12345678' #Set your access point password
ap = network.WLAN(network.AP_IF)
ap.config(essid=ssid, password=password)
ap.active(True) #activating
while ap.active() == False:
pass
print(‘Connection is successful')
print(ap.ifconfig())
def web_page():
html = “””<html><head><meta name=”viewport” content=”width=device-width, initial-scale=1″></head>
<body><h1>Welcome to microcontrollerslab!</h1></body></html>”””
return html
s = socket.socket(socket.AF_INET, socket.SOCK_STREAM) #creating socket object
s.bind((”, 80))
s.listen(5)
while True:
conn, addr = s.accept()
print(‘Got a connection from %s' % str(addr))
request = conn.recv(1024)
print(‘Content = %s' % str(request))
response = web_page()
conn.send(response)
conn.close()
How Code Works
Setting up the Wi-fi & password
To initiate the process, establish the access point's name and password within the MicroPython code to facilitate the connection of other devices to the Raspberry Pi Pico W. You have the flexibility to modify the “ssid” and “password” to align with your preferences. In our example, we have configured them as “RPI_PICO_AP” for the access point name and an 8-digit numerical password.
ssid = ‘RPI_PICO_AP' #Set access point name
password = ‘12345678' #Set your access point password
Creating an Access point
Next, we'll establish an access point using a MicroPython script. This process involves configuring a Raspberry Pi Pico W board as an access point to which other devices can connect. To accomplish this, we will choose the access point (AP) network interface. We'll instantiate this object through the AP interface, which we'll refer to as “network.AP_IF.” The “network.WLAN()” function is employed to generate a network interface object, specifically “network.AP_IF” in our scenario.
ap = network.WLAN(network.AP_IF)
To enable softAP mode, simply pass “True” as an argument to the “ap.active()” method.
ap.active(True) #activating
The purpose of the config() function is to set up the configuration by specifying both an SSID and a password.
ap.config(essid=ssid, password=password)
The subsequent lines verify the activation status of the Access Point (AP). If the AP is not activated, it will halt without proceeding to the subsequent step. However, if the AP is active, it will exhibit the IP address of the softAP.
while ap.active() == False:
pass
print(‘Connection is successful')
print(ap.ifconfig())
Creating a Web page
We are going to create a web page that will show the message “Welcome to microcontrollerslab!”
def web_page():
html = “””<html><head><meta name=”viewport” content=”width=device-width, initial-scale=1″></head>
<body><h1>Welcome to microcontrollerslab!</h1></body></html>”””
return html
Socket Server
To handle incoming web client requests, establish a socket server on the Raspberry Pi Pico W by utilizing the MicroPython socket API. We will begin by initializing our socket server with the “socket.socket()” function. This function requires two arguments: the first one being the socket family and the second specifying the socket type. Subsequently, we'll create a socket object named ‘s' and set the first parameter to AF_INET for the transport mechanism, and the second parameter as SOCK_STREAM, which denotes the socket type.
s = socket.socket(socket.AF_INET, socket.SOCK_STREAM)
Subsequently, we will associate the socket with both an IP address and a designated port number. This linkage is established through the utilization of the bind() method. In our specific scenario, we will provide an empty string followed by '80' as arguments to the bind() function. The empty string represents the Raspberry Pi Pico W board's default IP address, while '80' designates the port number designated for the web servers on the Raspberry Pi Pico W.
s.bind(('', 80))Then, we will be creating a listening socket to receive requests from the web clients.
s.listen(5)The accept() method approves the connection whenever a web client initiates a request.
conn,addr=s.accept()We'll assign the reference of the “web_page()” function to a variable named ‘response.' Subsequently, we'll transmit the web page content to a socket client using the “send()” method, specifying ‘response' as the parameter. Finally, to terminate the connection, we'll utilize the “close()” method. It's essential to note that all of these actions are taking place within an endless “while” loop.
response = web_page()
conn.send(response)
conn.close()
To access a comprehensive guide on setting up a socket server with MicroPython and the Raspberry Pi Pico W, please refer to our previously published article:
Soft Access Point Web Server Demo
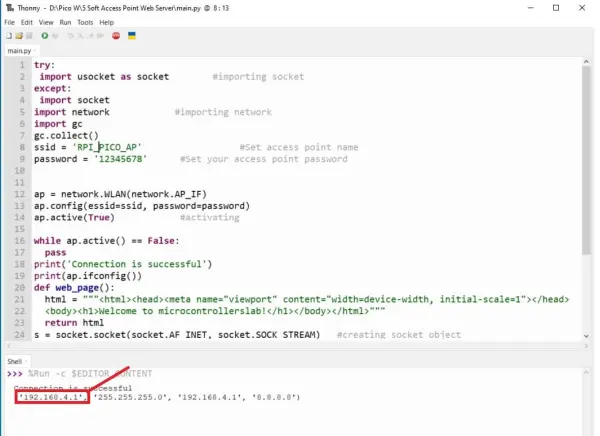
To evaluate the MicroPython web server code for SoftAP, simply click the play button within the Thonny IDE, and you will observe the subsequent IP address displayed in the Thonny IDE's shell console:

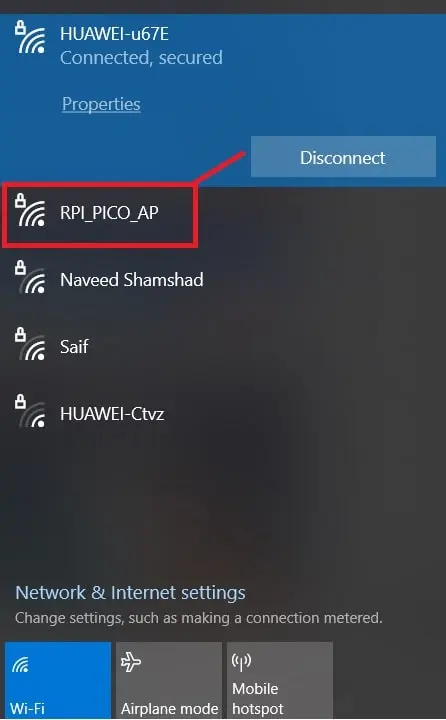
This implies that the Raspberry Pi Pico W board has been configured as an access point and is currently broadcasting the “RPI_PICO_AP” SSID. Please make a note of this IP address, as it will be essential for accessing the web page via a web browser.
Next, establish a connection with the soft access point using either your desktop computer or mobile phone. To do this, access the Wi-Fi settings on your mobile device, and you'll find “RPI_PICO_AP” listed as an available wireless network.