The idea of this project is to move the whole Raspberry terminal to the world of SMS communication.
This is a very good application in case there is no 5G/4G/3G coverage – but only GSM coverage for phone calls and SMSs.
Even better, it is not necessary to use a tariff plan with mobile data, requiring regular monthly payments. You may simply get a prepaid SIM card for calls and SMS only.
This approach differs from the others in that we do not redefine the message commands, but have full access to the terminal – literally, which leads to many new possibilities!
For this purpose we will use AT commands, which we will send via serial port to the SIM module, via Python script, with no need of other library installations.
Supplies

For this project, you will need:
- Any Raspberry model which supports Raspberry Pi OS (Raspbian)
- For the purpose of this tutorial I will use Raspberry Pi 4 B
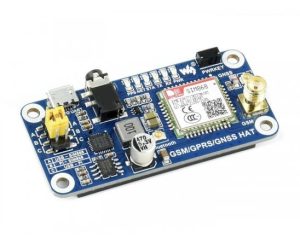
- Any GSM / 3G / 4G Hat which supports serial commands
- For the purpose of this tutorial I will use Waveshare GSM/GPRS/GNSS HAT
How you will power the Raspberry and whether there will be additional features is entirely up to you.
Step 1: Connecting the Hat & Installing Raspberry Pi OS

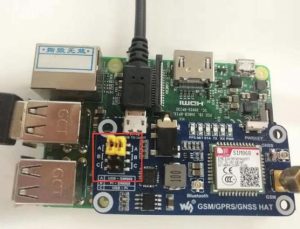
Most HATs can be connected in two ways: via USB or via UART interface. This usually does not make much difference, only the serial port is different – /dev/ttyS0|1 with UART and /dev/ttyUSB0|1|2|3 with USB.
Make sure you place the jumpers in the correct position, depending on what connection you will use.
Then download raspberry pi imager from this link: https://www.raspberrypi.com/software/
You can install any version of the Raspberry Pi OS (Lite/Normal/Full) you want into the SD card.
Put the Micro SD into the Raspberry slot and boot it on!
Note for UART:
You will need to enable Hardware Serial.
Type sudo raspi-config, go to Interface Options, then select Serial and choose Yes. After that, reboot the Raspberry.
Step 2: AT Commands
Before starting typing the Python script, you can try the commands that we will send to the HAT by installing minicom:
sudo apt-get install minicom
Then open minicom and select the port you will use:
minicom -D /dev/ttyUSB0
If you are using UART interface – /dev/ttyS0 is the serial port of Raspberry 4B, 3B and 3B+, for Raspberry 2B or Zero use /dev/ttyAMA0 and if you are using USB connection the port is /dev/ttyUSB0, as in the example.
Pro Tip: To exit from minicom press Ctrl + A, after that Q and select Yes.
1) Type “AT” and press Enter, to get the status of the SIM module. You should receive OK as an answer.
If you receive an Error, quit from minicom and enter again.
2) Another command that we will use in our Python script is “AT+CREG?“. When you type it in minicom you should receive +CREG: 0, 1 and if the second parameter (after the comma) is 1 (or 5), the network is registered successfully.
3) “AT+CMGF=1” will be used just to set the SMS to Text mode. We don't need to get in deep with this command.
4) Send a SMS to the SIM card's number while you are inside minicom.
You will see notification like +CMTI: “SM”,17, where the last number indicates the index of the received message.
In this scenario the index of the message is 17, and we can read it by typing “AT+CMGR=17”
You will get something like CMGR: “REC UNREAD”‘, ‘”Your phone number“‘, ‘””‘, ‘”22/02/24', '17:13:13+08″\r\nHello World\r\n\r\nOK\r\n'
Please keep in mind that all phone numbers should be starting with +country_code
5) Last command that we will use is to send SMS from Raspberry to our phone number.
Type AT+CMGS=”Your phone number“ and click Enter. After that, type the message you want to send. When you are done, press Ctrl + Z.
After few seconds you should receive the message on your phone.
Step 3: The Python Script

The whole code is literally 55 lines (including the empty ones)!
We need to import the following modules:
import serial # For the Serial communication with the SIM module
import time # For some delays
import re # To extract the data from the answers
import subprocess # To send the commands to the shell
First, we will introduce some variables and start the serial communication:
ser = serial.Serial("/dev/ttyUSB0",115200)


my_phone_number = "+..."


check_network_registration = "AT+CREG?\r\n".encode() # Command 2) from the step aboce
set_in_text_mode = "AT+CMGF=1\r\n".encode() # Command 3) from the step above
read_message_at_position =  "AT+CMGR=" # Command 4) from the step above
send_message = "AT+CMGS=\"" + my_phone_number + "\"\n" # Command 5) from the step above
And then, we will start by checking the network registration and preparing our global data variable:
ser.write(check_network_registration)
ser.flushInput()
data = ''
All that remains is to listen to the messages from the SIM module and act depending on them.
Step 4: Listening to the SIM Module
We will create a forever loop, which can be closed by the keyboard input:
try:
    while True:
    .....code....
except KeyboardInterrupt:
    if ser != None:
        ser.close()
Next, in the loop we will prepare our data and print it:
while ser.inWaiting() > 0:
  data = ser.read(ser.inWaiting()).decode('utf-8')
  time.sleep(0.0001)
  if data != "":
    print(data)
If the data is not empty, we have the following possibilities:
1) After sending the command for the network registration:
 if "CREG: 0,1" in data: # If Second parameter is 1 means it is registered successfully
  print("Network Is Registered")
  ser.write(set_in_text_mode)
2) If we receive a new message notification:
if "SM" in data: # Notification that new message is received
  message_index = items = re.findall("\"SM\",([0-9]*)", data)
  print("New Message Is Received in Index: " + message_index[0])
  ser.write((read_message_at_position + message_index[0] + "\r\n").encode())
3) To read the message and extract the data we need:
if "REC UNREAD" in data:
  message_parts = data.split(",")
  print(message_parts)
4) Here we should check if the message is from the trusted number:
if message_parts[1].replace("\"", "") == my_phone_number: # Check if the message is from trusted number
  print("Message is from my phone number")
5) After that we extract the message and pass it to the shell by subprocess module and saving the output:
message = str(message_parts[4]).split("\n")[1].replace('\r', '')

print("Command received: " + str(message))
shell_command_result = subprocess.check_output(str(message), shell=True) # Send the command to the shell
6) And lastly, we send the output by the shell back to the phone number:
print("Result: " + shell_command_result.decode('utf-8'))
ser.write((send_message + shell_command_result.decode('utf-8')[:160] + "\x1A").encode())
Note here the “\x1A”. It is used instead Ctrl + Z, because \n is used for new line, as shown above in step 2)
Of course, you can download the Python file from here. Make sure that you change the Serial port and input your phone number with + prefix.
Step 5: Test It Out and Start the Script on Boot

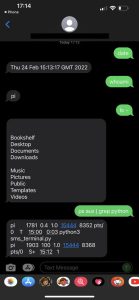
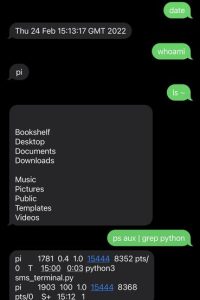
You can run other python scripts, restart the Raspberry, turning on and off relays and all you can imagine.
To Start the script on Boot:
Copy the script in your home folder and edit rc.local file:
sudo nano /etc/rc.local
On the bottom of the script, before exit 0, add the following line:
sudo python /home/pi/sms_shell.py &
Reboot and test it out!
Source: Remote Control of Raspberry Pi Via SMS (RPi SMS Shell)


