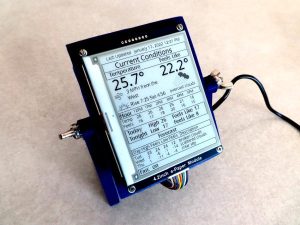
I created this project to turn an air purifier on and off based on the current weather. Mine depends on temperature, wind speed and direction. Any weather information could be used in your project. IFTTT ( If This Then That) applets are called to turn the smart plug on and off. Other smart items could be controlled with easy Python program changes and additions.
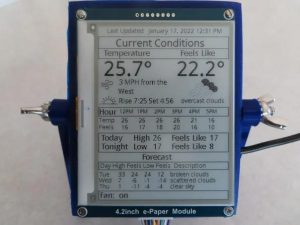
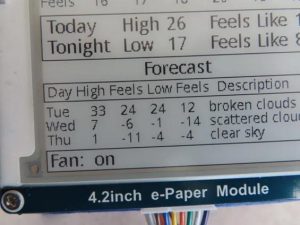
The 4.2 inch weather display is an added bonus!
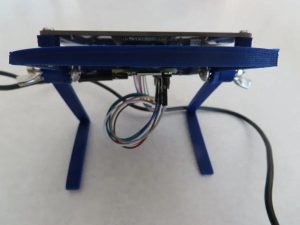
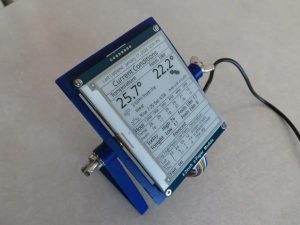
This project only requires five items, some bolts, and an optional 3D printed frame. The screen can be tilted up and down to make it easy to read. I like my open frame but the whole system could be enclosed.
Supplies
Computer
Raspberry Pi Zero W
I repurposed an original Zero when a different project ran much better on a Zero 2 W. The original Zero is enough for this project.
Unfortunately, the original Zero is in short supply right now and I see some insane prices. I have also seen a Zero 2 W in stock for less. Of course it will work just as well and is interchangeable with the original in projects, and with improved performance!
Raspberry Pi Header
A header attached to Zero is required for connecting the screen module. You can solder on your own header or try to find a Zero WH with an already attached header. This is the only soldering required!
Memory Card
Any quality microSDHC with 32GB or more will work.
E-Paper Display Module
On Amazon it's described as “Waveshare 4.2inch E-Ink Display Module Communicating via SPI Interface 400×300 Resolution E-Paper with Embedded Controller for Raspberry Pi”. It's important to get this version with the built-in controller for the Raspberry Pi SPI interface. It can be found here.
Smart Items
Anything you can control with IFTTT. The list is extensive. Check it out here. I am using a wireless smart plug made by TP-Link. You can also adapt the program to control multiple items.
Step 1: Set Up Zero
First install the Raspberry Pi Linux operating system on your Pi Zero. I used this link for a headless install.
After the SD card is loaded remove it from your other computer and insert it into your Zero. Turn the Zero on.
Connect to the Zero using your favorite SSH software. I use Putty. If you have trouble finding your Zero you can check your local router to record the IP of the wireless connection and use that.
Sign in to your new system with the default user and password.
User pi
Password raspberry
Change your password. If you have, or will have, more than one Raspberry Pi, change the host name from “raspberry” to a new value in two files. Then reboot.
passwd

sudo nano /etc/hostname
sudo nano /etc/hosts
With a new host name the software reboot may fail at this point, so turn the power off and back on.
Restart your putty session. Sign in as pi with your new password.
Update your system. This will take a while!
sudo apt update
sudo apt upgrade -y
sudo apt autoremove -y
Step 2: Install Required Software
Install the following required software.
sudo pip3 install pytz
sudo apt-get install imagemagick
Step 3: Install E-Paper Screen
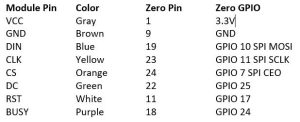
The screen should arrive with a wired plug. Properly orient the plug and carefully but forcefully plug it in to the module. Attach the module wires to the Zero pins listed above. The wire colors may be subject to change, so always match the label on the module to the corresponding Zero connection.
The following installation directions are copied from this webpage.
I've been told that the BCM2835 libraries are up to 1.71 now. Be sure to change the 1.60 references below to the version you download.
I also added a copy statement to fix a path problem with “import waveshare_epd” in the python program.
sudo raspi-config
Interface Options > SPI > Yes
Install BCM2835 libraries
wget http://www.airspayce.com/mikem/bcm2835/bcm2835-1.60.tar.gztar zxvf bcm2835-1.60.tar.gz
cd bcm2835-1.60/
sudo ./configure
sudo make
sudo make check
sudo make install
Install WiringPi libraries
sudo apt-get install wiringpi
wget https://project-downloads.drogon.net/wiringpi-latest.deb
sudo dpkg -i wiringpi-latest.deb
gpio -v
Install Python3 libraries
sudo apt-get update
sudo apt-get install python3-pip
sudo apt-get install python3-pil
sudo apt-get install python3-numpy
sudo pip3 install RPi.GPIO
sudo pip3 install spidev
Download Demos
sudo git clone https://github.com/waveshare/e-Paper
Test
cd ~/bcm2835-1.60/e-Paper/RaspberryPi_JetsonNano
cd python/examples
sudo python3 epd_4in2_test.py
If everything went well you should see multiple test screens display one after another.
For easier access I copied some of these files to the home directory.
cd ~/bcm2835-1.60/e-Paper/RaspberryPi_JetsonNano/python
cp -r pic ~/pic
cp -r lib ~/lib
(added 1/25/2022 for import statement)
cd ~
cp -r lib/waveshare_epd waveshare_epd
Step 4: Sign Up With Open Weather Map
I am using Open Weather Map and their One Call API. The information returned is documented on the API page. A free account will allow you up to 1,000 requests a day.
Go here to set up a free account. Enter your username, email, password and create your new account. Go to your email system to confirm your address.
Sign in here. Click API Keys, fill in a new name (such as PiKey) and click Generate.
Save your new key to be used in the Python program!
Step 5: Create Your IFTTT Applets
Create Your First Applet
You can use any other names but be sure to change it in the Python program.
Sign in > click “Create” > click “If This Add” Add button > search for “WebHooks” > click it > click “Receive a Web Request” > name it “TurnFanOff” > click “Create Trigger”
Now click “Then That” Add button > In my case I searched for “Kasa” and clicked on “TP-Link Kasa” > select actionTurn Off > select your device from the dropdown > click “Create Action” > click “Continue” > click “Finish”
You have created your first applet! Note the URL for it.
Create Your Second Applet
Do the same thing but for the On function (“TurnFanOn”).
Test
Test your applets by sending them requests.
https://maker.ifttt.com/trigger/TurnOnFan/with/key/<your key>
Your device should turn on and you should receive this response:
“Congratulations! You've fired the TurnOnFan event.”
https://maker.ifttt.com/trigger/TurnOffFan/with/key/<your key>
Your device should turn off and you should receive this response:
“Congratulations! You've fired the TurnOffFan event”
Step 6: Install Programs
Save the images above as “sunrisesunset.bmp” and “wind.bmp” and copy them into the /home/pi/pic directory. I like to use FileZilla for transferring files.
Download the getweather.py program from below and copy it to /home/pi.
While in pi's home directory you can edit your program with this command.
sudo nano getweather.py
Change the following lines to your own information before running the program.
Line 238 YOUR_FAN_ON_ITFFF_URL
Line 270 YOUR_FAN_OFF_ITFFF_URL
Paste in the URLs you used to test your ITFFF applets.
Line 299 YOUR_LATITUDE
Line 299 YOUR_LONGITUDE
Right click anywhere on Google Maps to find your latitude and longitude.
Line 299 YOUR_API_ID
This is the API key you saved from Open Weather Map.
Once the substitutions have been made you can run the program.
sudo python3 getweather.py
The on and off conditions for my smart plug are hard coded in the program. You can change and add code to meet your own requirements.
For debugging purposes liberally sprinkle print statements in your program and try again.
2/1/2022
I have been told sunrise and sunset times are off. Maker drdelete suggests “deleted “- (3660 * 6) from both def convert_time and def convert_hour sections, lines 29 & 33, to make sunrise and sunset display correctly.” And in line 51 insert your own timezone. Thank you for the feedback!
3/7/2022
Its has been reported by Mike37 that e-screens can have a ghosting problem. I don't see it on mine and its has been running continuous since before publication. But I have added a sleep command to the program to avoid this. Thank you for the feedback!
Step 7: Auto-start
Once you are happy with your program, create the following file so the program will automatically start on power up or reboot.
sudo nano /lib/systemd/system/weather.service
Add the following lines.
01/27/2022 Thanks to kb4jhu I fixed the first two lines.
03/18/2022 Fabri54 suggested and tested a couple of other changes I have made.
[Unit]
Description=Start Weather

[Service]
Environment=XAUTHORITY=/home/pi/.Xauthority
ExecStart=/bin/bash -c '/usr/bin/python3 /home/pi/getweather.py > /home/pi/weather.log 2>&1'
Restart=always
RestartSec=10s
KillMode=process
TimeoutSec=infinity

[Install]
WantedBy=multi-user.target
Restart systemctl. Reboot or power down and up.
sudo systemctl daemon-reload
sudo systemctl enable weather.service
sudo reboot
The program should merrily startup on its own this time.
Step 8: Breaking In
Sometimes you want to stop the auto-started program to make changes. First find its process number.
ps -U pi
Then in the command below insert the process number (PID) from the systemd entry at the top of the list.
sudo kill -9 PID
Now start the program manually as above.
Step 9: 3D Prints
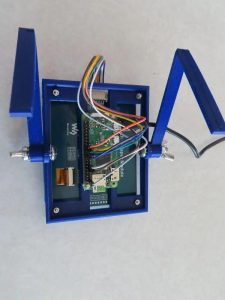
I designed the components in Tinkercad and printed them on a $300 printer. A drill was required to clean out the tiny holes. Print two legs. Attach the Zero before attaching the e-paper module and use the spacers.
Step 10: Conclusion
I tried to make this project easy to build and the coding easy to read, understand and change. Once you have the basics running, feel free to go crazy with your changes!


