
Control Your AC Lamp with Raspberry Pi Telegram controlled Home Automation project
Home automation has emerged as a crucial aspect of IoT applications, enabling individuals to manage household devices remotely via smartphones and the internet. Previously, we explored multiple methods to control AC appliances via smartphones in our IoT Home Automation Tutorials, such as utilizing Telegram to control appliances with NodeMCU. Now, we're introducing a new approach, substituting NodeMCU with Raspberry Pi to facilitate smartphone-controlled appliance management. This IoT project(Raspberry Pi Telegram controlled Home Automation project) focuses on controlling an AC lamp by sending a text message through the Telegram application, utilizing Raspberry Pi as the central control unit.
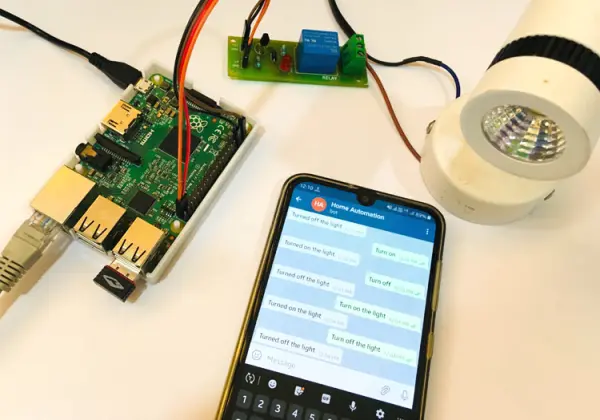
Components Required
- Raspberry Pi
- Lamp
- Jumper wires
- Telegram Application
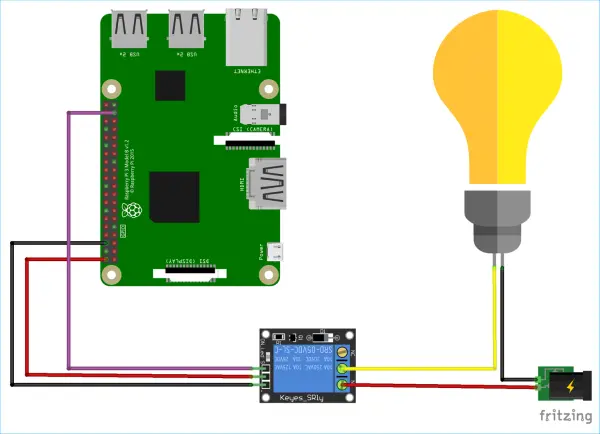
Circuit Diagram for Raspberry Pi Telegram controlled Home Automation project
Circuit diagram for this Raspberry Pi Telegram controlled Home Automation project is given below:
Code Explanation
To construct this Raspberry Pi and Python-based project, two essential libraries must be installed: one for Telegram and another for utilizing the GPIO pins of the Raspberry Pi. To initiate the installation of these libraries, access the terminal and input the specified commands. It's crucial to update the Raspberry Pi before proceeding with the library installations.
sudo apt-get update
sudo apt-get install Rpi.GPIO
sudo pip install telepot
The conclusion of this tutorial includes a complete Python code along with a functional video. Within this section, we will elaborate on several crucial aspects of the program.
To begin, let's initiate by importing all the essential libraries required for the code.
import time
import RPi.GPIO as GPIO
import telepot
from telepot.loop import MessageLoop
The GPIO pin 26 has been configured as an output pin to control the relay's state. At the start, the relay is set to “0” to ensure the Lamp remains switched off.
bulb = 26
GPIO.setmode(GPIO.BCM)
GPIO.setwarnings(False)
GPIO.setup(bulb, GPIO.OUT)
GPIO.output(bulb, 0)
A function named “action” is established to respond when a user sends a message to the Telegram bot. Each message includes a specific chat ID and command, allowing the bot to interact with the user. This function verifies whether the received command contains the string “on” or “off.” If the command contains “on,” it switches the relay state to “1” to activate the lamp. Conversely, if the command includes “off,” it sets the relay state to “0” to deactivate the lamp.
def action(msg):
    chat_id = msg['chat']['id']
    command = msg['text']
    print 'Received: %s' % command

    if 'on' in command:
        message = "Turned on the light"
        GPIO.output(bulb, 1)
        telegram_bot.sendMessage (chat_id, message)

    if 'off' in command:
        message = "Turned off the light"
        GPIO.output(bulb, 0)
        telegram_bot.sendMessage (chat_id, message)
The following code utilizes the unique token number acquired during bot creation to establish a connection between the Telegram bot and Raspberry Pi. Upon successful connection, it displays a message confirming that the system is prepared to receive commands.
telegram_bot = telepot.Bot(66****885:A*G-X**dTYdSCt******aCQPCk***SL**b4')
print (telegram_bot.getMe())
MessageLoop(telegram_bot, action).run_as_thread()
print 'Send the command to turn on or off the light...'
Testing the Telegram controlled Home Appliances
Connect the relay's data pin to GPIO pin 26 on the Raspberry Pi as depicted in the circuit diagram provided. Ensure the AC-powered lamp is appropriately connected to the relay.
Next, generate a new file on the Raspberry Pi with the “.py” extension. Paste the code provided at the conclusion of the tutorial into this newly created file. Save the file.
Subsequently, access the Raspberry Pi's terminal and execute the file using the command below: [insert command here]
python file_name.py
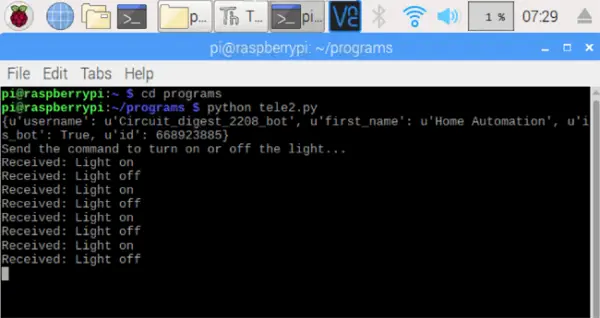
Ensure to modify the directory to where your Python file is located before running the Python code. The terminal will display the output in a manner similar to what is depicted in the screenshot provided below.

Presently, the Telegram bot and Raspberry Pi have successfully connected, enabling us to transmit commands to the Telegram bot for controlling the light. You can experiment with activating or deactivating the lamp by sending text messages to the Telegram bot, following the guidelines depicted in the accompanying screenshot.
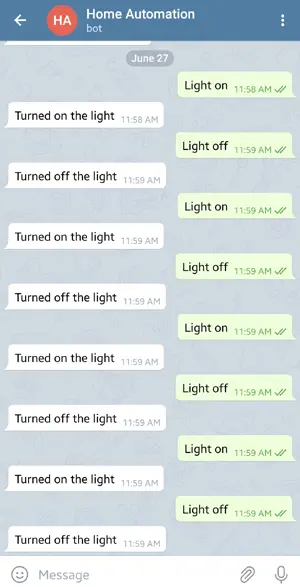
You will be able to observe the commands sent to the bot in the terminal of the Raspberry Pi.
Find the complete program and demonstration Video below. Also check other IoT Home Automation Projects.
import time
import RPi.GPIO as GPIO
import telepot
from telepot.loop import MessageLoop
bulb = 26
GPIO.setmode(GPIO.BCM)
GPIO.setwarnings(False)
GPIO.setup(bulb, GPIO.OUT)
GPIO.output(bulb, 0)
def action(msg):
chat_id = msg[‘chat'][‘id']
command = msg[‘text']
print ‘Received: %s' % command
if ‘on' in command:
message = “Turned on the light”
GPIO.output(bulb, 1)
telegram_bot.sendMessage (chat_id, message)
if ‘off' in command:
message = “Turned off the light”
GPIO.output(bulb, 0)
telegram_bot.sendMessage (chat_id, message)
telegram_bot = telepot.Bot(‘668923885:AAG-XHddTYdSCta8vvoiaCQPCk8toSLXpb4')
print (telegram_bot.getMe())
MessageLoop(telegram_bot, action).run_as_thread()
print ‘Send the command to turn on or off the light…'
while 1:
time.sleep(10)