
This project illustrates the configuration of a Raspberry Pi as a surveillance camera system capable of capturing photo snapshots and sending them to mobile phones via MMS text messages. The process is initiated by a GPIO alarm input. In my Python application, I utilize a magnetic door sensor to activate the alarm, but various sensors or events can be configured to prompt the Raspberry Pi to capture the snapshot and dispatch the message. To transmit the MMS text messages, I employ a service named Twilio, chosen for its straightforward Python SDK for developers and its free trial mode.
Setup Raspberry Security Camera System
Here are the things that need to be done to setup this project.
1. Establish a Twilio Account
2. Deploy Apache Web Server
3. Implement Python Code Installation
4. Integrate Pi Camera & Wire Door Sensor
5. Configure Static IP Address Allocation
6. Arrange Port Forwarding
7. Set Up Dynamic DNS (if desired)
8. Execute Code to Receive MMS Messages
9. Implement Alarm Code Activation at Boot Time
10. Launch the Alarm Code Automatically Upon Startup
After initiating this project, I received positive feedback on Reddit. /u/kurashu89 proposed utilizing the imgur API instead of hosting images on an Apache web server instance, offering several advantages:
1. Eliminates the necessity to configure a web server and conserve additional memory resources on the Raspberry Pi.
2. Removes the requirement for the Raspberry Pi to maintain a static LAN IP address.
3. Eliminates the need for port forwarding.
4. Eliminates concerns regarding DDNS (Dynamic Domain Name System).
However, if you opt to utilize imgur for capturing snapshots, an additional step is necessary: setting up an imgur account and registering a developer application. Consequently, by choosing this method, you can bypass steps 2, 5, 6, and 7 outlined earlier and instead install the alternative imgur source code provided herein.
Setup Twilio Account
Twilio simplifies the process of sending SMS/MMS messages by handling connections with various mobile providers. With a straightforward Python API/SDK, software developers can request message transmission, leaving Twilio to manage the logistics. To initiate a trial account, Twilio mandates two steps: 1) verification of the desired message recipient's phone number, and 2) inclusion of “Sent from a Twilio Trial account” in trial messages. It appears that the service is free for usage as long as the monthly message count stays below 250.
To commence, sign up for a complimentary Twilio account through this link. During registration, verify the phone number to which you intend to send messages. Once verified, Twilio will allocate an account phone number sharing the same area code as the verified number. This designated number will be responsible for sending MMS messages on your behalf.
Proceed by clicking “Get Started,” then navigate to “Your Account.” Upon login, locate the Account SID and Auth Token fields at the top of the screen. To access the Auth Token, click the lock icon preceding the field. Remember to jot down both values, as they will be necessary for the subsequent Python code implementation.

Beneath these fields, you'll find your Twilio phone number. You'll require this number during the setup of the Raspberry Pi camera application as well.
Install Apache Web Server
You might be wondering about the necessity of installing the Apache web server on your Raspberry Pi for this particular project. Here's the reason: To enable the Twilio service to send photos via MMS messages, it requires access to the photo through a URL on the internet. The Twilio SDK will fetch the photo captured by your Raspberry Pi camera using a URL provided by the Apache web server running on your RPi.
If you haven't set up Apache on your Raspberry Pi yet, you can find instructions on the RaspberryPi.org website by clicking here.
Apache typically sets /var/www/ as the DocumentRoot, which indicates the directory where the web server searches for files to serve. My Python application assumes that you're utilizing the default “/var/www” DocumentRoot. However, if that's not the case, it's alright; you'll just need to adjust the APACHE_DOC_ROOT variable in the code accordingly.
Install Python Code
Prior to installing the Python script, it is essential to set up the Twilio SDK on your Raspberry Pi. You can obtain the Twilio Python SDK by downloading it from the provided link. Detailed installation instructions are available on the respective page for your convenience.
Apache Method
Below is the Python application I've developed using Apache for creating a security camera system. The code's comments provide clear explanations of its functionality. Your task will involve adjusting only the CONSTANT variables specified at the beginning of the application.
#!/usr/bin/python

# this Python application turns a Raspberry Pi into a security camera system
# it requires that you have a Pi camera installed and an Apache web server running on your Pi

# Written by Mike Haldas
# Detailed documentation about this project here: http://www.cctvcamerapros.com/RPi-Camera-Alarm-MMS
# Email me at [email protected] if you have questions
# You can also reach me @haldas on twitter or +Mike Haldas on Google+
# If you make any improvements to this code or use it in a cool way, please let me know

import time
import picamera
import RPi.GPIO as GPIO
from twilio.rest import TwilioRestClient

# define the GPIO port you will use for the door sensor
SENSOR = 19

# number of seconds to delay between alarm and snapshot
# number of seconds to wait for the person to enter the room after triggering the sensor
DELAY = 0
#setup GPIO using Broadcom SOC channel numbering
GPIO.setmode(GPIO.BCM)

# set to pull-up (normally closed position for a door sensor)
GPIO.setup(SENSOR, GPIO.IN, pull_up_down=GPIO.PUD_UP)

# put your Twilio credentials here
ACCOUNT_SID = "ADD_Twilio_AccountSID_HERE"
AUTH_TOKEN = "ADD_Twilio_AuthToken_HERE"

# make sure to use format with +1 for USA #s. E.G +12463338910
TO_PHONE = "ADD_PHONE_#_TO_SEND_TO_HERE"
FROM_PHONE = "ADD_TWillio_ASSIGNED_#_HERE"

# text message to send with photo
TXT_MSG = "Door Alarm Triggered!"

# host or IP address of Raspberry Pi: port number. E.G 50.184.192.93:80 or domain.com:9000
HOSTNAME = "mydomain.com:9000"

# we are using the default apache document root. Make sure to leave the trailing slash on the end!
APACHE_DOC_ROOT = "/var/www/"

# name and dimentsions of snapshot image
IMG = "snap.jpg"
IMG_WIDTH = 800
IMG_HEIGHT = 600

# initalize the Twilio client
client = TwilioRestClient(ACCOUNT_SID, AUTH_TOKEN)

try:
        # setup an indefinite loop that looks for the door sensor to be opened
        while True:

                GPIO.wait_for_edge(SENSOR, GPIO.RISING)
                print("Door Opened!\n")
                time.sleep(DELAY)
                with picamera.PiCamera() as camera:
                        camera.resolution = (IMG_WIDTH, IMG_HEIGHT)
                        camera.capture(APACHE_DOC_ROOT + IMG)

                client.messages.create(
                        to=TO_PHONE,
                        from_=FROM_PHONE,
                        body=TXT_MSG,
                        media_url="http://" + HOSTNAME + "/" + IMG,
                )
finally:
        GPIO.cleanup() # ensures a clean exit
Imgur Method
This version of the system utilizes Imgur instead of Apache (though I understand the need to merge both into a single code base, which I'll likely do later).
#!/usr/bin/python

# this Python application turns a Raspberry Pi into a security camera system
# it requires that you have a Pi camera installed and an imgur account setup
# you also need to create an imgur application
# Written by Mike Haldas
# Detailed documentation about this project here: http://www.cctvcamerapros.com/Pi-Alarm-MMS
# Email me at [email protected] if you have questions
# You can also reach me @haldas on twitter or +Mike Haldas on Google+
# If you make any improvements to this code or use it in a cool way, please let me know

import re
import pyimgur
import time
import picamera
import RPi.GPIO as GPIO
from twilio.rest import TwilioRestClient

# define the GPIO port you will use for the door sensor
SENSOR = 19

# number of seconds to delay between alarm and snapshot
# in case you want to wait a second or two for the person to enter the room after triggering the sensor
DELAY = 5

#setup GPIO using Broadcom SOC channel numbering
GPIO.setmode(GPIO.BCM)

# set to pull-up (normally closed position for a door sensor)
GPIO.setup(SENSOR, GPIO.IN, pull_up_down=GPIO.PUD_UP)

# put your Twilio credentials here
ACCOUNT_SID = "AC0fd"
AUTH_TOKEN = "f98e1"

# make sure to use format with +1 for USA #s. E.G +12463338910
TO_PHONE = "+15555555444"
FROM_PHONE = "+155555534333"

# text message to send with photo
TXT_MSG = "Door Alarm Triggered!"

# directory to save the snapshot in
IMAGE_DIR = "/var/www/"

# imgur client setup
CLIENT_ID = "5c2"

# name and dimentsions of snapshot image
IMG = "snap.jpg"
IMG_WIDTH = 800
IMG_HEIGHT = 600

# initalize the Twilio client
client = TwilioRestClient(ACCOUNT_SID, AUTH_TOKEN)

# initialize imgur client
im = pyimgur.Imgur(CLIENT_ID)

try:
	# setup an indefinite loop that looks for the door sensor to be opened
	while True:

		GPIO.wait_for_edge(SENSOR, GPIO.RISING)
		print("Door Opened!\n")
		time.sleep(DELAY)
		with picamera.PiCamera() as camera:
			camera.resolution = (IMG_WIDTH, IMG_HEIGHT)
			camera.capture(IMAGE_DIR + IMG)

		uploaded_image = im.upload_image(IMAGE_DIR + IMG, title=TXT_MSG)
		client.messages.create(
			to=TO_PHONE,
			from_=FROM_PHONE,
			body=TXT_MSG,
			media_url=uploaded_image.link,
		)
finally:
	GPIO.cleanup() # ensures a clean exit
1. Begin by installing the pyimgur.py library with the following command:
“`bash
sudo pip install pyimgur
“`
2. Next, download the source code to your Raspberry Pi. If your RPi is already connected to the Internet, use this command to retrieve the source code:
“`bash
wget https://videos.cctvcamerapros.com/downloads/python/mms-alarm.py
“`
3. Now, open the mms-alarm.py application in an editor of your choice on your Raspberry Pi.
4. Modify the following variable values in the code:
– SENSOR: Keep this value as 19 if you are using GPIO 19. Otherwise, adjust it accordingly.
– DELAY: Currently set to zero. Adjust this if you need a delay between the alarm sensor triggering and the camera taking a picture.
– ACCOUNT_SID: Replace this with the value from your Twilio account.
– AUTH_TOKEN: Replace this with the value from your Twilio account.
– TO_PHONE: Set this to the phone number where you want your Raspberry Pi to send the MMS message. Ensure it's verified in your Twilio account setup.
– FROM_PHONE: Set this to the phone number Twilio assigned to you during account setup.
– TXT_MSG: Customize the text message to be sent along with the photo taken by your RPi.
– CLIENT_ID: (For imgur code only) This is the imgur Client ID assigned to the app you registered.
– HOSTNAME (not used for imgur): Set this to the public IP address (or DDNS hostname) of your Raspberry Pi along with the port number for forwarding. LAN IP addresses (starting with 192. or 10.) won't work as Twilio needs remote access over the Internet.
– APACHE_DOC_ROOT (not used for imgur): If you installed Apache with the default DocumentRoot, no changes are needed.
– IMG_DIR (For imgur code only): Specify the location where you want the snapshot saved on your RPi.
– IMG: This is the name of the photo to be saved. Change it if you prefer a different name. Note that this image will be overwritten each time the alarm triggers.
– IMG_WIDTH and IMG_HEIGHT: The default size is 800 x 600. Adjust as needed.
5. Save the file after making these changes.
Install Camera & Door Sensor
I won't detail the installation process for a Raspberry Pi camera in this project since there are numerous online resources, including articles and videos, readily available to guide you through it. Simply search for “install Raspberry Pi camera” on Google if you haven't set up yours yet.
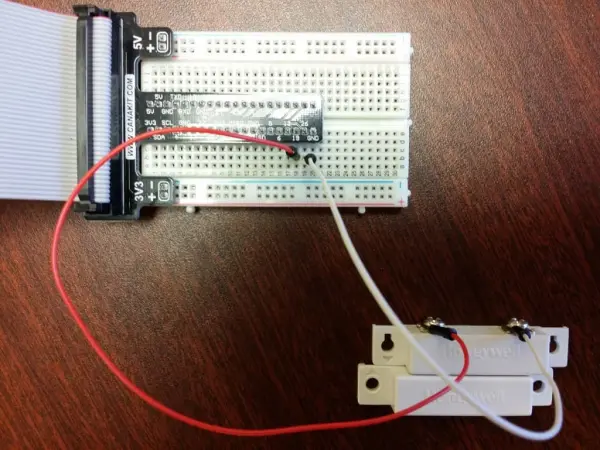
As for the door sensor wiring, it's quite straightforward. Any magnetic door sensor will suffice; I personally use a Honeywell sensor. Connect one of the sensor terminals to GPIO pin 19 of your Raspberry Pi, or select another GPIO pin according to your preference. The provided mms-alarm.py code is configured for GPIO 19, so if you opt for a different pin, ensure you update the SENSOR variable accordingly. Connect the other sensor terminal to a ground (GND) port on your Pi. Below, you can view my wiring setup. Although I'm employing a breadboard, which might be considered excessive for such a simple project, I find it convenient to use.
Setup Static LAN IP Address (DHCP Reservation)
To streamline your setup and avoid potential headaches, consider assigning a static LAN IP address to your Raspberry Pi. I suggest accomplishing this by allocating an IP address reservation within your router settings. This method tends to offer the most reliability, and many routers include a feature for IP reservation. The exact steps will vary depending on your router brand and model. For instance, if you have a D-Link router, here are some instructions. While the specifics may differ, the core concepts remain consistent across router makes and models. You can search online for guidance tailored to your router, using terms like “Linksys IP reservation” or “Linksys DHCP reservation”. Simply substitute “Linksys” with your router's manufacturer and model.
Setup Port Forwarding
When the Python application communicates with the Twilio MMS service, it includes a parameter indicating the URL of the image located on your Raspberry Pi to send along with the message. Since Twilio accesses this URL remotely over the Internet, setting up port forwarding to the Apache web server on your RPi is essential.
Similar to setting up DHCP reservation as explained earlier, port forwarding shares the same concept but requires a distinct setup process depending on your router's specifications.
By default, Apache web servers operate on port 80. To gain a better understanding of port forwarding, consider watching the provided video. In this scenario, envision replacing the IP camera with your Raspberry Pi and the computer depicted on the left side of the network diagram with the Twilio service. This will help you grasp how port forwarding functions within this project.
You can locate port forwarding instructions for various popular router manufacturers online. If you cannot find instructions for your specific make and model, perform a Google search for assistance.
Dynamic DNS Setup (DDNS)
If the Internet connection at your Raspberry Pi's location lacks a static IP address, consider setting up a Dynamic DNS (DDNS) account. You can access explanations and setup guidance for certain routers here. Should you opt for DDNS, ensure to incorporate your DDNS hostname into the HOSTNAME variable within the mms-alarm.py application. However, if your Internet connection utilizes a static IP, DDNS setup is unnecessary, and you can directly use the IP address of your Internet gateway in the HOSTNAME variable.
For assistance in locating your Internet IP address and verifying correct port forwarding setup, utilize this online port forward checker tool. This tool conveniently displays your Internet IP address alongside facilitating port forward validation.
Run Alarm Code / Get MMS Message
You have the option to test the project by manually launching the Python application. Once you've verified its functionality, you might consider configuring it to start automatically when your Raspberry Pi boots up.
To manually start the application, navigate to its directory and execute the following command:
“`bash
sudo python mms-alarm.py
“`
Upon opening the door (triggering the alarm sensor), the message “Door Opened!” will be displayed on the screen. Shortly after, you'll receive an MMS message containing the photo captured by your Pi camera. Here's an example of what mine looks like.
Startup Alarm Application on Boot
If you intend to deploy this project in practical scenarios, you'll likely want the alarm code to initiate upon booting up your Raspberry Pi. To achieve this, you can incorporate a startup command into the rc.local file on your RPi, which can typically be found in either /etc or /etc/rc.d.
Begin by navigating to the /etc directory to check if your rc.local file resides there. If it's not located there, navigate to /etc/rc.d.
Proceed to modify the rc.local file using your preferred text editor. Insert the following line before the last line in the file, which typically reads “exit 0”:
“`bash
python /home/pi/alarm.py &
“`
After saving the changes, reboot your Raspberry Pi and subsequently test the alarm application by triggering it, such as by opening a door.