
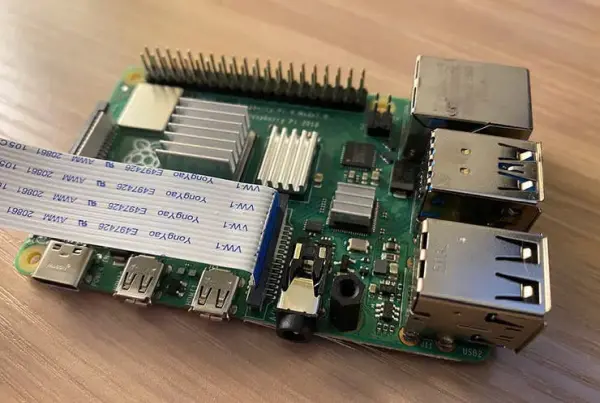
Step #1: Connect everything
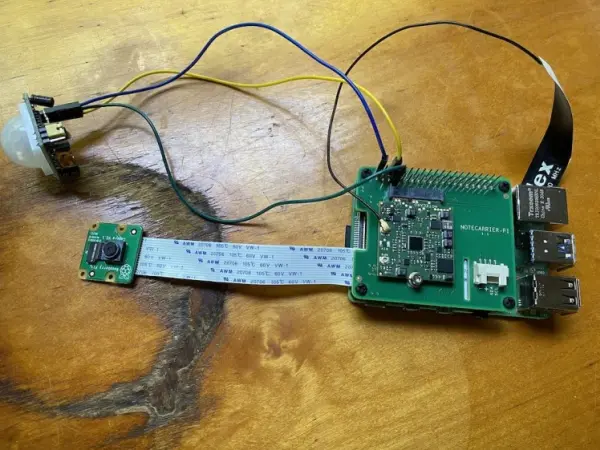
To begin, let's discuss the process of connecting the required components for this project. The setup consists of a Raspberry Pi 4, a PIR motion sensor used for motion detection, a Raspberry Pi Camera for capturing images, and a Blues Wireless Raspberry Pi Starter Kit providing wireless cellular connectivity. Here is an illustration depicting the arrangement of these components when they are properly connected.

If you intend to set up this system, begin by establishing a connection between the Pi Camera and the Pi Camera slot on the Raspberry Pi.
Now that all the connections are in place, it's time to begin coding.
INTERESTING MOLE FACT #2: Surprising, right? Did you expect another fun fact? Well, here's one: The star-nosed mole, our previous friend, is one of only two creatures on Earth capable of smelling underwater. It achieves this remarkable feat by exhaling air bubbles and then inhaling them back through its nose. Quite intriguing, isn't it?
Step #2: Detect motion
Addressing motion detection was my initial challenge as it serves as the catalyst for subsequent actions. Additionally, the machine learning algorithm I employ (which we'll delve into in step 4) demands considerable processing power. Therefore, I aimed to execute this process solely when an animal is likely present in the image.
Here is the Python code that I ultimately implemented.
#!/bin/sh
# Shell script to create a movie of security camera footage (front porch camera)
# Needs a modified rename script from here: <a href=”http://www.volkerschatz.com/unix/uware/rename.html
#”>http://www.volkerschatz.com/unix/uware/rename.html
#</a> Armin Hinterwirth, 2014-2015
import RPi.GPIO as GPIO
pir_sensor_pin = 4
GPIO.setmode(GPIO.BCM)
GPIO.setup(pir_sensor_pin, GPIO.IN)
def main():
while True:
sensor_state = GPIO.input(pir_sensor_pin)
if sensor_state == GPIO.HIGH:
print(‘Motion detected')
time.sleep(5)
main()
The concept behind this approach involves periodically examining the status of the motion sensor by monitoring the corresponding GPIO pin of the Raspberry Pi every 5 seconds. If the pin is set to a high state, it indicates that motion has been detected by the sensor. In the provided code snippet, a simple debugging string is printed when motion is detected. However, in subsequent sections, we will explore how to utilize motion detection as a trigger for more captivating actions.
If you intend to set up this system yourself, you can proceed by saving the provided code into a new Python file on your Raspberry Pi, such as “pest.py,” and execute it using the command “python3 pest.py.” If everything is functioning correctly, you should observe the output “Motion detected” in your terminal when you wave your hand in front of the sensor.
Please note that the specific code you need to use may vary depending on the type of sensor you are utilizing and the GPIO pin to which it is connected. To determine the appropriate pin configuration using the Python GPIO API, you can refer to the mentioned article as a helpful resource.
With the motion sensing code in place, we can now progress to the next logical step, which involves exploring how to utilize the Pi Camera.
To perform image analysis with machine learning, you first require an image. Fortunately, the Raspberry Pi comes equipped with a widely-used camera module that functions excellently and has extensive documentation.
NOTE: If you are unfamiliar with using the Pi camera, ensure that you enable the camera functionality on your Raspberry Pi before proceeding.
Below is the code I utilized to capture a picture:
import os
import picamera
import time
def get_image_name():
path, dirs, files = next(os.walk(‘images'))
file_count = len(files)
return ‘images/' + str(file_count + 1) + ‘.jpg'
def take_picture():
image_name = get_image_name()
camera = picamera.PiCamera()
camera.resolution = (400, 400)
camera.rotation = 180
camera.start_preview()
time.sleep(2)
camera.capture(image_name)
camera.stop_preview()
camera.close()
return image_name
take_picture()
By using this code, you can capture an image using the Pi camera module and save it as a file. Remember to adjust the resolution according to your requirements.
def get_image_name():
path, dirs, files = next(os.walk(‘images'))
file_count = len(files)
return ‘images/' + str(file_count + 1) + ‘.jpg'
The provided code assigns a name to the captured image based on the number of images currently present in the “images” directory. This approach results in a file structure that follows the pattern shown below:
└── images
    ├── 1.jpg
    ├── 2.jpg
    ├── 3.jpg
    └── etc...
Each image file is named incrementally to maintain a sequential order based on the number of images stored in the “images” directory.
def take_picture():
  image_name = get_image_name()
  camera = picamera.PiCamera()
  camera.resolution = (400, 400)
  camera.rotation = 180
  camera.start_preview()
  time.sleep(2)
  camera.capture(image_name)
  camera.stop_preview()
  camera.close()
  return image_name
The line camera.rotation = 180 is responsible for flipping the captured image upside down. In my setup, I had installed the camera in my yard upside down, so you can remove that line if you have installed everything correctly.
The time.sleep(2) line introduces a two-second delay before capturing the image. This delay allows the camera to adjust to the surrounding light conditions, as recommended in the Pi Camera's documentation.
It is important to include camera.close() if you plan on capturing multiple photos within your program. Neglecting to include this line can result in an error that may not provide clear guidance on how to resolve the issue.
Finally, at the end of the take_picture function, it returns the name of the captured image. This returned image name will be useful in the next step, where we will check if the photo contains an animal. Here's how the main function would look like with the addition of the take_picture call:
def main():
  while True:
    sensor_state = GPIO.input(pir_sensor_pin)
    if sensor_state == GPIO.HIGH:
      image_name = take_picture()
      // determine if the photo contains an animal
time.sleep(5)
main()
By incorporating the take_picture function into the main function, we can access the returned image name and use it for further analysis of the image to determine if it contains an animal.
FUN MOLE FACT #3: Moles can dig up to 18 feet in one hour. And they appear to be attempting that in my yard.
Step #4: Analyze the picture with machine learning
Image classification is a widely used application of machine learning, focusing on the task of analyzing an image and determining its contents or identifying the objects present within it.

The image classification process relies on the utilization of a model, which is a file that has been trained to recognize specific patterns. Creating such a file can be done through platforms like Edge Impulse, or you can find pre-trained models on platforms like TensorFlow.
In the context of this project, the ideal model would be capable of identifying common yard animals such as squirrels, chipmunks, raccoons, skunks, and others. However, I was unable to locate a pre-existing model for this purpose (if you know of one, please let me know in the comments). While building my own model was an option, it required a substantial collection of rodent images, which I didn't have readily available. Gathering a sufficient number of images from the internet proved to be a challenging task.
Ultimately, I opted to utilize a project called CameraTraps developed by Microsoft. Within CameraTraps, there is a model called the MegaDetector, which not only boasts an impressive name but also possesses the capability to detect animals and humans in still images.

CameraTraps, while highly effective, poses a significant challenge for Raspberry Pi devices due to its extensive capability of detecting various animal species. Running the detector on a Raspberry Pi is possible, and I will demonstrate how shortly. However, it's important to note that processing individual photos using the MegaDetector can take around 1 to 2 minutes, which may not be suitable for real-time applications. If you intend to utilize the MegaDetector, it might be advisable to capture images on the Pi and perform the actual processing on a more powerful system. In my case, I opted to keep everything running on the Pi for simplicity.
To set up the MegaDetector on your own, begin by following the setup instructions provided by MegaDetector. This process involves downloading the latest model file (.pb) and installing the necessary dependencies using pip.
Next, you can use the following code to execute the detector itself. Feel free to experiment with the confidence_threshold, but I have set it relatively low (60%) to capture any animal-like detections, especially during initial testing.
from pathlib import Path
from run_tf_detector_batch import load_and_run_detector_batch
# This just gets a reference to the MegaDetector’s model (.pb) file
model = ‘./md_v4.1.0'
model = ”.join([str(f) for f in Path(‘.').rglob(‘*.pb')])
def process_image(file_name):
# This runs the detector itself and tosses the output in an
# output.json file.
return load_and_run_detector_batch(
model_file=model,
image_file_names=[file_name],
checkpoint_path='./output.json'
confidence_threshold=0.6,
)
The load_and_run_detector_batch function provides an array of images, allowing for the processing of multiple images simultaneously. Each image in the array contains an array itself, consisting of the objects detected by the MegaDetector.
{
 "images": [
  {
   "file": "images/1.jpg",
   "max_detection_conf": 0.971,
   "detections": [
    {
     "category": "1",
     "conf": 0.971,
     "bbox": [
      0.3231,
      0.004868,
      0.6683,
      0.3121
     ]
    }
   ]
  }
 ]
Therefore, we require a code snippet to parse the JSON data and determine whether the MegaDetector has identified an animal. Here is an example of such code:
def is_animal_image(ml_result):
  for detection in ml_result['detections']:
    # A detection of '1' is an animal ('2' is a human)
    if detection['category'] == '1':
      return True
  return False
To consolidate all the components, when we zoom out to our main function, the updated code would appear as follows:
def main():
  while True:
    sensor_state = GPIO.input(pir_sensor_pin)
    if sensor_state == GPIO.HIGH:
      image_name = take_picture()

      # This is the new stuff that processes the image from
      # the camera. If the image does not contain an animal,
      # delete the image.
      ml_result = process_image(image_name)[0]
      if is_animal_image(ml_result):
        print('Animal detected!')
      else:
        print('No animal detected')
        os.remove(image_name)

    time.sleep(5)

main()
And now, we have an algorithm that can detect motion, capture pictures, and analyze them to identify animals. It's quite impressive!
However, there's one last coding aspect I'd like to address, which is notifications. I wanted to be notified whenever the camera detected an animal so that I could rush out and try to see it myself. Let's explore how to implement this functionality.
First, you'll need to set up a notification system of your choice. This could be an email notification, a message to a mobile device, or any other method that suits your preferences. Once you have your notification system in place, you can integrate it into the code.
Step #5: Send notifications
When I started this project, I had the intention of sending notifications whenever I detected an animal. However, I faced a challenge because the areas I wanted to monitor were not in close proximity to my home, which meant that relying on my home WiFi for sending notifications was not a viable option.
To overcome this hurdle, I decided to utilize the Notecard from Blues Wireless. The Notecard provides a convenient way to transmit data over cellular networks, eliminating the need for a WiFi connection to send HTTP requests. (I should mention that I now work at Blues, and it's because of the exciting products we're developing!)
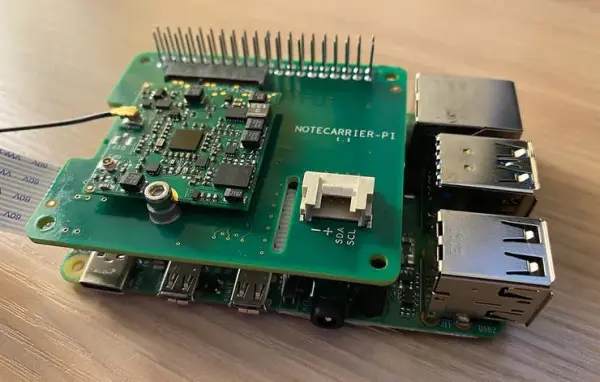
As a quick reminder from step #1, the Notecard, along with its Notecarrier, is a hardware component that can be easily attached on top of the Raspberry Pi for seamless integration.

If you're interested in trying out the Notecard, begin by following the quickstart tutorial provided by Blues Wireless. This tutorial will guide you through the essentials and assist you in setting up a Notehub account, which serves as the default destination for the data transmitted by the Notecard.
Furthermore, Blues offers a comprehensive guide on routing Notehub data to Twilio, which is the solution I utilized for my project. If you wish to follow along, start by following the steps outlined in the Blues tutorial. It will walk you through creating a Twilio account and configuring everything accordingly. Once you've completed these steps, you can utilize the following Python code to establish a connection with the Notecard and send notifications using Twilio.
import keys
import notecard

# Replace this with your own Notehub project UID
notehub_uid = 'com.blues.tvantoll:pestcontrol'
port = I2C('/dev/i2c-1')
card = notecard.OpenI2C(port, 0, 0)

def init_notecard():
  req = {'req': 'hub.set'}
  req['product'] = notehub_uid
  req['mode'] = 'continuous'
  req['sync'] = True
  res = card.Transaction(req)
  print(res)

def send_to_notehub():
  req = {'req': 'note.add'}
  req['file'] = 'twilio.qo'
  req['sync'] = True
  req['body'] = {
    'body': 'Spotted an animal!',
    'from': keys.sms_from,
    'to': keys.sms_to,
  }
  res = card.Transaction(req)
  print(res)
The Notecard operates by sending JSON commands, which enhances the readability of the code. In this scenario, you perform some initial setup and then define two functions. The first function initializes the Notecard, while the second function sends a straightforward “note” to Notehub. It is this note that triggers Notehub to route the data to Twilio and subsequently send a text message.
If we revisit the main function that we have been constructing throughout this article, it now appears as follows.
def main():
  # One time initialization of the Notecard
  init_notecard()

  while True:
    sensor_state = GPIO.input(pir_sensor_pin)
    if sensor_state == GPIO.HIGH:
      image_name = take_picture()
      ml_result = process_image(image_name)[0]
      if is_animal_image(ml_result):
        # Send myself a text message when the detector finds an animal
        send_to_notehub()
        print('Animal detected!')
      else:
        print('No animal detected')
        os.remove(image_name)

    time.sleep(5)

main()
And with that, we have completed the coding portion of our project, which you can find on GitHub for reference.
At this stage, we have a functioning setup that can detect motion, capture an image when motion is detected, analyze the image using our machine learning algorithm, and send a text message notification when an animal is detected in the photo. Now that the code is prepared, it's time to put our project into action.
Step #6: Place outdoors
Since the Raspberry Pi and its camera are not waterproof, I decided to create a protective enclosure for my hardware, even though it might not have the most aesthetically pleasing design.
The fact that it might be a bit clunky became quite relevant in this case, as the final product I ended up building is not going to win me a position on Apple's design team anytime soon.
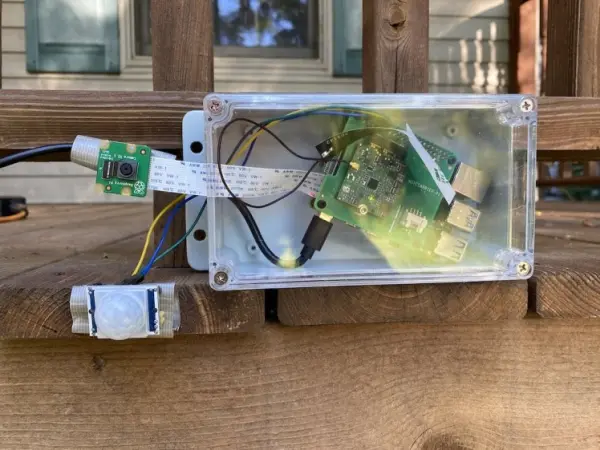
The main component of the protective enclosure is an Awclub ABS Plastic Junction Box, which effectively holds the Raspberry Pi. I had to drill a hole in the top of the box to allow for the power cord to connect to the Pi.
To secure the Pi Camera and motion sensor, I used duct tape to attach them to my deck initially and later to various other surfaces in my yard. Surprisingly, the tape provided a reliable hold. While I would prefer a solution that protects the camera while maintaining optimal picture quality in the long run, this setup sufficed for my simple needs.
For power, I used the standard USB-C cable for the Raspberry Pi and a series of extension cords. Although I could have used batteries, the current resource-intensive machine learning algorithm led me to ensure that the Pi remained constantly charged, despite the inconvenience of the cords.
Here's an interesting fact about moles: They have the ability to immobilize worms and insects by injecting them with saliva that contains a toxin. They then store these paralyzed prey in underground chambers for later consumption.
Step #7: Run it
The final step of this project is to execute the code itself. During the testing phase, I would SSH into my Pi and manually run the main.py file.
python3 main.pyAlthough running the code manually through SSH worked, it would stop when my SSH session disconnected, which is not ideal for a process meant to run continuously. To address this issue, I utilized the Linux command ‘nohup', which allows running a command in a manner that ignores the signal sent by the Pi's OS when an SSH session disconnects.
nohup python3 main.pyAfter setting everything up, I was able to relax and wait. It took a couple of hours, but eventually, I spotted my first subject.