
Over the weekend I sat down and built a small Raspberry Pi cluster consisting of 4 nodes. I used three Raspberry Pi 2 boards for compute nodes and an original Model B for the head node. I wanted the cluster — more commonly known as a ‘bramble’ — to be as compact as possible, with just two cables coming out, one for power and the other for network. I made use of a USB hub to power the boards, and a small Ethernet switch which I could hack to be also be powered from the USB hub rather from a separate wall wart.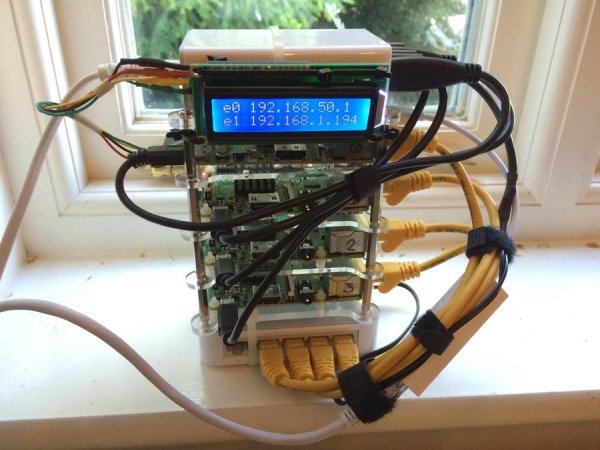
It’s hardly the biggest cluster built from Raspberry Pi boards, as far as I know the 120 Pi cluster built by the folks at Resin.io is still the biggest built, although since it’s actually 5 independent 24-node clusters, possibly the 66-board bramble built by GCHQ still takes the title.
However, even with just 4 nodes my pocket cluster is big enough for what I want, which is as a testbed for some distributed computing work I’m doing. The small cluster sitting on my desk lets me test code out before deploying jobs to the much more extensive, and expensive, cluster I’m using for grunt work on the project.
Building the Hardware
Putting together a cluster this size is actually pretty easy, after all I could just have had a pile of boards and a tangle of wires in the corner of my office and be done with it. But, inspired by a recent case build, I wanted to make my cluster as compact as possible, but I didn’t really have time to head down to my local FabLab and design an enclosure. Instead I just wanted to order all the appropriate bits and pieces and then bolt them together. Not amazingly Maker-y I know, but the cluster was a means to an end, not the project itself.
Since I had enough Raspberry Pi boards kicking around my office already, the first thing I needed was an enclosure to hold them.
The enclosure I finally settled on was a four board stackable ‘dog bone’ case that I picked up on Amazon, although if you’re willing to wait a little bit there are plenty of similar cases on AliExpress that can be had for much less. It shipped overnight and I had it the next day; it was the only thing I bought to build the cluster as I had everything else on the shelf.
The USB hub I used was the thing that actually inspired me to do the build in the first place: It’s a 5-port hub from Anker and has coincidentally about the same footprint as the Raspberry Pi itself. With five ports, there’s one port for each of my four Raspberry Pi boards, and a final port left over to power an Ethernet switch for the cluster.
My choice of Ethernet switch was entirely driven by two factors, size and voltage. I wanted it to more-or-less have the same footprint as Raspberry Pi, but I also desperately wanted it to be powered from my USB hub. So it had to take a 5V supply.
I couldn’t find a switch that was powered directly from USB, however I did find a couple on my shelves that were about the right size, and crucially could be driven using a 5V supply. That did however mean hacking a Frankenstein cable together.
The first step is to carefully snip off the end of the 5V supply cable, making sure to label which of the two wires corresponded to the two wires left attached to the power brick. Stripping off the ends of the wires you can plug the brick into the wall and use a volt meter to measure which of the two wires is +5V and which is GND.
Then snip off the end of the USB cable and carefully, as the wires inside the cable are small and delicate, strip back the cover to reveal the wires. You’re looking for the red and black wires, the others carry data. You can just cut them off, you won’t need them.
Soldering the two end of the cables together — joining the +5V to +5V, and the GND to GND — and then covering each individual wire, as well as the join itself, with some shrink wrap gives me the Frankenstein cable I need to power the Ethernet switch from the last available port of my USB hub.
After searching through my stack of spare cables to find the shortest USB and Ethernet cables possible, sticking the cluster together at this point came down to cable ties and velcro.
After tying everything together I added a Blinkstick for status notification, alongside a small 64GB USB flash drive for shared storage across the cluster, filling the two USB ports of the head node.
For more detail: A 4-node Raspberry Pi cluster