
Introduction
In this blog entry I will demonstrate how one can access the Raspberry Pi’s GPIO in C++. There are two approaches to accomplish this. The first is to directly manipulate the Raspberry Pi’s GPIO’s registers much like one would do when programming a microcontroller without an operating system (OS) or a memory management unit (approach using mmap). The advantage of this approach is that because the OS (Linux) is being completely bypassed, the GPIO pins can toggle very fast. Bypassing the OS however means that if two processes (instances of a programs) are trying to access the same physical GPIO registers at the same time, a unsafe resource conflict can happen. Examples of this approach to GPIO coding can be found here.
The second approach is the “Linux approach” (sysfs). Linux already has a built-in driver for safely accessing the GPIOs. It basically views each property of each GPIO pin as a file. This is the preferred method of GPIO access. One disadvantage of this approach is that it tends to make for slower (but safer) GPIO pin toggling. Example code for this approach can be found here, and a wiki on how to access GPIO signals using this approach can he found here. This approach will be used in this tutorial. The file accesses will be wrapped in a C++ class to make GPIO access easy and foolproof (sort of).
Setting up the test hardware
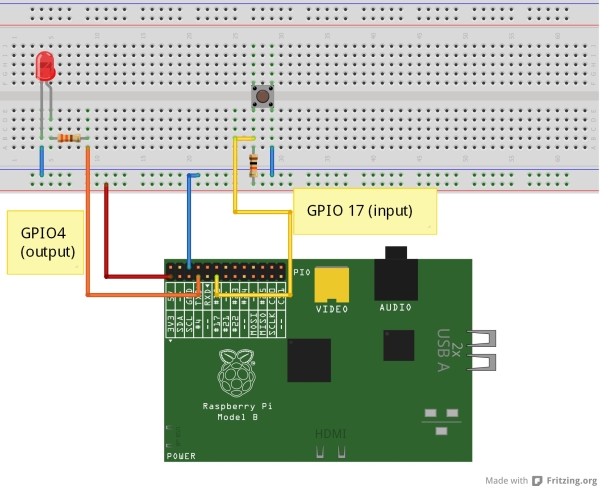
In order to test our GPIO access program we will need to connect the GPIO pins to actual hardware components. I decided to to use GPIO pin 4 as an output pin that turns on an LED and GPIO pin 17 as an input pin that reads the state of a pushbutton. A connection diagram is provided in Figure 1.
GPIO4 is connected to an LED via a 330Ohm current limiting resistor. GPIO17 is connected to a 10KOhm pull-up resistor and a push-button. An unpressed pushbutton will cause the voltage on GPIO17 to be 3.3V. When the button is pressed, the voltage of GPIO17 will be 0V.
The connections between the Raspberry Pi and the other parts can be made via Male-to Female jumper wires or via one of Adafruit’s Pi cobbler kits (ver1 or ver2).
Accessing GPIO From the Terminal
- When using the Linux (sysfs) way to access GPIO, we must ensure that we’re logged in as root:
pi@raspberrypi ~ $ sudo -i |
- we then must “export the pin” in question. For example to use pins GPIO4 & 17 we must first export them by writing the GPIO pin numbers to the file “/sys/class/gpio/export” as follows:
root@raspberrypi:~# echo "4" > /sys/class/gpio/exportroot@raspberrypi:~# echo "17" > /sys/class/gpio/export |
The next step is to set pin 4 as output and pin 17 as input. This is achieved by writing “out” into the “/sys/class/gpio/gpio4/direction” file and writing “in” into the “/sys/class/gpio/gpio17/direction” file as follows:
root@raspberrypi:~# echo "out" > /sys/class/gpio/gpio4/directionroot@raspberrypi:~# echo "in" > /sys/class/gpio/gpio17/direction |
To set the output GPIO4 pin high and therefore cause the LED to light-up, we need to write a “1” to the “/sys/class/gpio/gpio4/value” file:
root@raspberrypi:~# echo "1" > /sys/class/gpio/gpio4/value |
To clear the output GPIO4 pin to low and therefore cause the LED to turn off we need to write a “0” to the “/sys/class/gpio/gpio4/value” file:
root@raspberrypi:~# echo "0" > /sys/class/gpio/gpio4/value |
To read the state of the input pin GPIO17, we need to read the “/sys/class/gpio/gpio17/value” file. This will return either a “0” if the pin is connected to 0V or a “1” if the pin is connected to 3.3V:
root@raspberrypi:~#cat /sys/class/gpio/gpio17/value |
And finally, when we’re done with the GPIO pins we must unexport them by writing the GPIO pin numbers to the “/sys/class/gpio/unexport” file!
root@raspberrypi:~#echo "4" > /sys/class/gpio/unexportroot@raspberrypi:~#echo "17" > /sys/class/gpio/unexport |
Notice how the sysfs approach reduces the problem of GPIO access to reading and writing files! This is by the way the norm for Linux. All I/O access (serial ports, console, printers e.t.c.) involves reading to and writing from files. The next step will be to perform the same functions in C++!
Writing a GPIO C++ Class
The goal of the GPIOClass class is to enable the control of a single GPIO pin. The class was designed so that the GPIO pin number must be passed to the GPIOClass object when its created via an overloaded constructor. The “GPIOClass.h” header file is provided below
|
1
2
3
4
5
6
7
8
9
10
11
12
13
14
15
16
17
18
19
20
21
22
23
24
25
|
#ifndef GPIO_CLASS_H#define GPIO_CLASS_H#include <string>using namespace std;/* GPIO Class * Purpose: Each object instantiated from this class will control a GPIO pin * The GPIO pin number must be passed to the overloaded class constructor */class GPIOClass{public: GPIOClass(); // create a GPIO object that controls GPIO4 (default GPIOClass(string x); // create a GPIO object that controls GPIOx, where x is passed to this constructor int export_gpio(); // exports GPIO int unexport_gpio(); // unexport GPIO int setdir_gpio(string dir); // Set GPIO Direction int setval_gpio(string val); // Set GPIO Value (putput pins) int getval_gpio(string& val); // Get GPIO Value (input/ output pins) string get_gpionum(); // return the GPIO number associated with the instance of an objectprivate: string gpionum; // GPIO number associated with the instance of an object};#endif |
Each GPIOClass object has member functions that enable us to export/unexport GPIO pins, set the direction of the GPIO pins as well as set and get the value of the GPIO pins. The GPIOClass object has one private variable which is the GPIO pin number. The implementation of these member functions are provided below “GPIOClass.cpp”:
|
1
2
3
4
5
6
7
8
9
10
11
12
13
14
15
16
17
18
19
20
21
22
23
24
25
26
27
28
29
30
31
32
33
34
35
36
37
38
39
40
41
42
43
44
45
46
47
48
49
50
51
52
53
54
55
56
57
58
59
60
61
62
63
64
65
66
67
68
69
70
71
72
73
74
75
76
77
78
79
80
81
82
83
84
85
86
87
88
89
90
91
92
93
94
95
96
97
98
99
100
101
|
#include <fstream>#include <string>#include <iostream>#include <sstream>#include "GPIOClass.h"using namespace std;GPIOClass::GPIOClass(){ this->gpionum = "4"; //GPIO4 is default}GPIOClass::GPIOClass(string gnum){ this->gpionum = gnum; //Instatiate GPIOClass object for GPIO pin number "gnum"}int GPIOClass::export_gpio(){ string export_str = "/sys/class/gpio/export"; ofstream exportgpio(export_str.c_str()); // Open "export" file. Convert C++ string to C string. Required for all Linux pathnames if (exportgpio < 0){ cout << " OPERATION FAILED: Unable to export GPIO"<< this->gpionum <<" ."<< endl; return -1; } exportgpio << this->gpionum ; //write GPIO number to export exportgpio.close(); //close export file return 0;}int GPIOClass::unexport_gpio(){ string unexport_str = "/sys/class/gpio/unexport"; ofstream unexportgpio(unexport_str.c_str()); //Open unexport file if (unexportgpio < 0){ cout << " OPERATION FAILED: Unable to unexport GPIO"<< this->gpionum <<" ."<< endl; return -1; } unexportgpio << this->gpionum ; //write GPIO number to unexport unexportgpio.close(); //close unexport file return 0;}int GPIOClass::setdir_gpio(string dir){ string setdir_str ="/sys/class/gpio/gpio" + this->gpionum + "/direction"; ofstream setdirgpio(setdir_str.c_str()); // open direction file for gpio if (setdirgpio < 0){ cout << " OPERATION FAILED: Unable to set direction of GPIO"<< this->gpionum <<" ."<< endl; return -1; } setdirgpio << dir; //write direction to direction file setdirgpio.close(); // close direction file return 0;}int GPIOClass::setval_gpio(string val){ string setval_str = "/sys/class/gpio/gpio" + this->gpionum + "/value"; ofstream setvalgpio(setval_str.c_str()); // open value file for gpio if (setvalgpio < 0){ cout << " OPERATION FAILED: Unable to set the value of GPIO"<< this->gpionum <<" ."<< endl; return -1; } setvalgpio << val ;//write value to value file setvalgpio.close();// close value file return 0;}int GPIOClass::getval_gpio(string& val){ string getval_str = "/sys/class/gpio/gpio" + this->gpionum + "/value"; ifstream getvalgpio(getval_str.c_str());// open value file for gpio if (getvalgpio < 0){ cout << " OPERATION FAILED: Unable to get value of GPIO"<< this->gpionum <<" ."<< endl; return -1; } getvalgpio >> val ; //read gpio value if(val != "0") val = "1"; else val = "0"; getvalgpio.close(); //close the value file return 0;}string GPIOClass::get_gpionum(){return this->gpionum;} |
In order to open and close files in C++, the ifstream/ofstream classes where used. Even though the C++ string class was used, the C++ strings had to be converted into C strings since pathnames in Linux can only be interpreted as C strings. The GPIOClass is pretty self explanatory. It is also very basic I intend to clean in up a bit in the future, but for now it will have to do.