| Hardware components: | ||||||
 |
|
× | 1 | |||
 |
|
× | 1 | |||
 |
|
× | 1 | |||
|
× | 1 | ||||
 |
|
× | 1 | |||
 |
|
× | 1 | |||
| Software apps and online services: | ||||||
 |
|
|||||
 |
|
|||||
STORY
If you are like me, you want instant alerts of the many things your hardware might be doing. Your dryer being done with the clothes, your pool or spa being at a certain temperature, your basement being filled up with water (ouch!), your garage door being opened for a long time, any other event you might think of can be sent to your phone.
One way of achieving this is via the use of push notifications. This is made very simple with the use of the Particle Cloud and a great app called Pushbullet.
Note: This article describes how to do this with a particle dev kit, but I believe other hardware, like a raspberry pi, could also use this mechanism by sending a rest call to the pushbullet API. Find the details below.
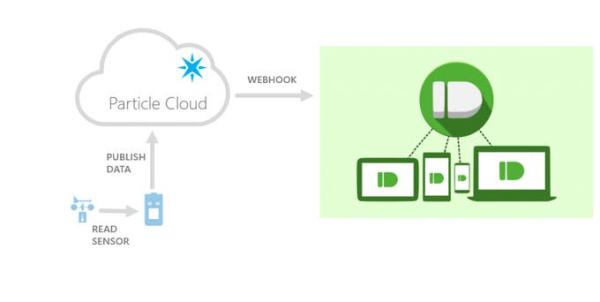
How it works
- the Particle dev kit will read some information, something important to you and your project (example: the temperature of your house)
- the firmware running in the Particle will publish a cloud event with this information
- this published cloud event in turn will get intercepted by a webhook living in the Particle cloud
- This webhook will push a notification to Pushbullet
- Pushbullet will, in turn, push this notification to our devices
The software
There are four steps that we need to accomplish:
- install the pushbullet app
- update the particle firmware – make your project publish some information
- configure the particle webhook
- upload the webhook to the particle cloud
Install the pushbullet app
Pay a visit to the pushbullet site, sign up for an account if you don't have one already and get your Pushbullet Access Token from the settings page.
Note: do not share this Pushbullet Access Token, since it grants access to your account!
Update the particle firmware
We need to add the following line of code in the particle's firmware:
Particle.publish(“pushbullet”, “Your clothes are dry”, 60, PRIVATE);
Of course, you can add there a variable for getting the temperature of your pool like this:
Particle.publish(“pushbullet”, “Your pool is at ” + String(pool_temperature) + ” degrees”, 60, PRIVATE);
or even knowing the status of your garage door:
Particle.publish(“pushbullet”, “Your garage door is ” + garage_status_string, 60, PRIVATE);
You can add there what is relevant to you and your project.
I can't help to notice that what we insist on calling firmware (a permanent software programmed into a read-only memory, according to Google, or the program that runs your particle) is today so easy to change that in reality is another piece of software.
Configure the particle webhook
We need to create a piece of software called a webhook and configure it to connect to pushbullet.
What is a webhook, after all? From particle's site:
Webhooks are a simple and flexible way for your devices to make requests to almost anything on the Internet. Webhooks listen for events from your devices. When you send a matching event, the hook will send a request to your web application with all the details!
If you are not familiar with webhooks or how they work, please head over particle's docs for a more in depth description.
Now back to our business. Download to your computer the webhook code (find it in the software section below) in a file named webhook.json.
Edit the webhook.json file just created and replace the Access Token in the Bearer field (you have to replace 123456789012345678901234567890 with your Pushbullet Access Token). Save and close the file.
Once the file is edited with the token, you are ready to upload this webhook to the Particle cloud.
Upload the webhook to the Particle cloud
Webhooks are configured via the particle CLI. If you don't have it installed already, please do so following the instructions here.
Once installed, open a console and type:
particle webhook create webhook.json
The output of that command would look like this:
Using settings from the file webhook.jsonSending webhook request { uri: ‘https://api.particle.io/v1/webhooks',method: ‘POST',json:{ eventName: ‘pushbullet',url: ‘https://api.pushbullet.com/v2/pushes',requestType: ‘POST',headers:{ Authorization: ‘Bearer 123456789012345678901234567890′,'Content-Type': ‘application/json' },json: { type: ‘note', title: ‘{{SPARK_EVENT_VALUE}}', body: ” },mydevices: true,event: ‘pushbullet',deviceid: undefined },headers: { Authorization: ‘Bearer skljhklasjhdfjklhasdkljfhklasjhdf' } }Successfully created webhook with ID 1234kljhl123h41234jklh
That means the webhook got configured correctly.
Note: once we are done with the webhook, there is no need anymore to keep the computer you are using on or connected to the internet, since the webhook does not execute in it nor it needs it to run. We just uploaded the webhook to the particles cloud, and it is this cloud that will take it from here.
Read More: Add push notifications to your hardware


