
Since joining the North Temperate Lakes (NTL) LTER site in 2014, I've witnessed a growing fascination among many individuals regarding the prospect of creating their own environmental sensors using Arduino or Raspberry Pi as the central computing unit. These devices are notably affordable, typically ranging from $20 to $30, and are much more user-friendly for non-engineers compared to the complex electronics and computers of the past decades. This phenomenon has led to the emergence of a “maker culture,” similar to hacker culture, where individuals without formal electronics training engage in building and experimenting with their own electronics and robotics.
The maker culture thrives as it creates a self-sustaining ecosystem. The purchase of parts fosters a supporting hardware economy, while the contributions of various individuals in developing open-source software and hardware consistently reduce the barriers for newcomers in terms of required skills and knowledge. This trend has notably attracted those interested in environmental sensing, particularly for citizen science initiatives.

Arduino and Raspberry Pi are fundamentally distinct entities. While Raspberry Pi functions as a compact PC with the size of a credit card and operates on a Linux-based OS, equipped with standard ports like those found in modern desktop computers, and it can be effortlessly linked to peripherals such as monitors, keyboards, Ethernet, and more. Its inception was driven by the aim of teaching programming to children and imparting a comprehensive comprehension of computer functionality.
On the contrary, Arduino represents a family of microcontroller boards, typically featuring only two ports: one for power and the other for programming. A microcontroller is a compact computer integrated onto a single chip, designed for relatively straightforward tasks. Everyday household devices like refrigerators, toasters, and TV remotes might contain a microcontroller, responsible for managing their respective functions. Unlike Raspberry Pi, Arduinos and microcontrollers lack a complete operating system; instead, their firmware executes and interprets the specific code they were programmed with, without the added complexity of an operating system. Arduinos and their derivatives are available in various sizes and capabilities from multiple vendors.
What makes both Arduino and Raspberry Pi popular in maker culture is their shared feature: The general-purpose input/output (GPIO) pins. These pins allow connections to other devices, including sensors, at a lower level of complexity than the typical plug-and-play experience associated with USB connections. The number of GPIO pins may vary, but they usually include positive voltage pins for power, ground pins, and a set of configurable pins for data communication or voltage sensing from external devices.
USB itself utilizes four pins (power, ground, and two for data) and has become widely adopted as a serial communications protocol. One might wonder why USB isn't the universal choice for all applications, given its simplicity. However, there are valid reasons for the coexistence of other communication methods.
Firstly, individual GPIO pins offer practical functionality, such as the ability to sense voltage from a thermistor as an input or provide a time-varying output voltage to control an LED's blinking.
Secondly, USB may not always be the most suitable option for managing a collection of sensors. Take, for example, the prevalent serial protocol used for sensors and devices interacting with Arduinos, known as I2C. This protocol allows up to 127 devices to communicate over just two wires. I2C achieves this by assigning each device a unique 7-bit address, and when the Arduino sends a command to a specific sensor, it includes that sensor's address to ensure other sensors on the bus remain inactive.
The widespread appeal of Arduino and Raspberry Pi can be attributed to their user-friendly programming approach. Arduino provides a freely available integrated development environment (IDE) and an extensive range of code libraries, catering to almost any conceivable device you may wish to connect. These libraries greatly simplify sensor configuration and serial communication intricacies, reducing your coding efforts to just a few lines. Additionally, when you purchase a sensor designed for Arduino usage, the vendor typically guides you to the corresponding library, further streamlining the programming process.
Arduinos utilize the C++ programming language, whereas Raspberry Pi's primary programming language is Python, and it comes with a free IDE as well. While coding skills are necessary, the presence of abundant libraries, tutorials, and example codes (often provided by the libraries themselves) has significantly simplified the programming process compared to the past.
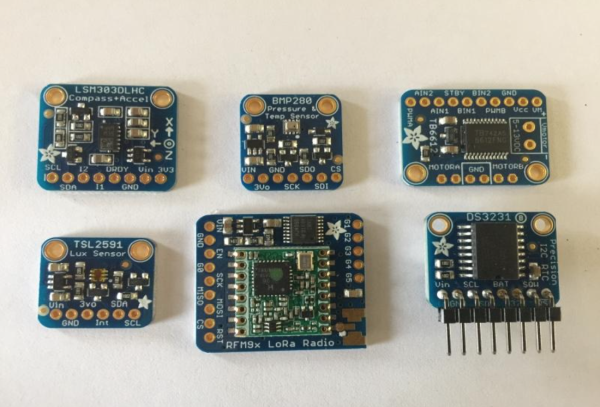
When it comes to purchasing Arduino compatible devices and components for my sensor projects, my go-to choice is Adafruit (adafruit.com). They offer a diverse selection of microcontroller main-boards, referred to as Feather, along with a variety of plug-in daughter-boards that boast an extensive range of capabilities. Moreover, Adafruit provides standalone printed circuit boards, known as breakout boards, housing raw sensors and other devices that can be seamlessly integrated with the microcontroller. In Figure 2, you can catch a glimpse of the impressive array of products they offer. Despite the many pins visible on these compact boards, most applications usually require only four of them: power, ground, and a couple for data transfer, while the rest are typically auxiliary features that most users may not require.
To utilize sensors in this configuration, soldering becomes a necessary process. Soldered pins and headers are used to establish connections between boards, and circuit boards may utilize jumper wires or traces. Nevertheless, a noteworthy trend emerging among breakout board manufacturers, including Adafruit, is the inclusion of jacks on certain boards. These jacks allow for standardized cable connections between the microcontroller and breakout boards, reducing the reliance on soldering. Additionally, a recent trend observed is the appearance of knockoff versions of breakout boards on platforms like Amazon, indicating a growing popularity of this electronic format.
It appears to have been crafted at home
Recently, someone inquired about the ability of Arduino hardware to endure the demanding conditions that environmental sensors often encounter. However, it's important to recognize that Arduino and Raspberry Pi, being basic electronic devices, lack protection against dust, dirt, or water, much like other unprotected electrical equipment. If you can visibly observe the electronics, it is likely not suitable for extended outdoor or underwater usage. Designing suitable packaging to make these electronics viable in such harsh environments presents a significant challenge and has been the source of many trial and error experiences in my endeavors.
The prevailing casing material for commercial aquatic sensors is a type of plastic known as Delrin or Delron, depending on the manufacturer. This material envelops the electronics and shields them from moisture with a snug-fitting cap and a rubber O-ring. Nevertheless, undertaking precision machining of plastic, even with access to a quality lathe, seems like more than I would prefer to handle. Instead, a satisfactory sensor case can be crafted using readily available plumbing parts from the local hardware store. By gluing PVC pipes and end caps together, a durable enclosure can be formed. Access to the interior of the pipe for data retrieval and battery replacement can be achieved using a union fitting that connects two open ends of the pipe. Wiring to connect external sensors outside the pipe presents a minor challenge, but applying epoxy, practice, and demonstrating utmost care against water infiltration can make the setup watertight. In fact, I had a conversation with a UCSB grad student during the last All-Scientists’ Meeting, who successfully utilized this approach for his sensors submerged in the Pacific Ocean at depths exceeding a thousand feet.
The operational temperature range of electronics represents a crucial characteristic. For commercial electronics utilized in home and office settings, the typical expected range is from 0°C to 70°C. On the opposite end, military-grade electronics can withstand extreme temperatures from -55°C to +125°C. In between these two extremes, there are other classifications such as industrial and automotive electronics. In the past, components designed to endure extreme temperatures commanded a premium price due to their limited application. However, the rapid expansion of automotive electronics, which operate within the range of -40°C to +125°C, over the last couple of decades has made the basic components used in these applications affordable and widely available. As a result, the rest of us have also benefited, as we now have access to these same basic parts, widely used in the automotive industry, at lower costs and with greater ease of availability.
Arduino boards, in their standard form, are designed to operate within a temperature range of -40°C to +70°C, rendering them potentially suitable for environment sensing tasks. However, it's crucial to ensure that all other components within your system can withstand the temperatures of the working environment. From my experience, batteries, especially lithium batteries, tend to be the vulnerable point when exposed to below-freezing temperatures.
On the other hand, Raspberry Pi's temperature range is specified as 0°C to +50°C, which is quite similar to that of a typical desktop PC. Consequently, this narrower range makes Raspberry Pi less ideal for environmental sensing in more challenging and extreme environments.
The advantages and disadvantages of Do-It-Yourself (DIY) sensors
I know a limnologist who has dedicated more than five years to developing his custom environmental sensor, and he anticipates spending a few more years to complete it. His primary motivation stems from the desire to break free from the high costs associated with specialized commercial sensors. Once his creation is finished, he intends to release it as open source, allowing others to benefit from his work.
The soaring prices of commercial sensors have piqued the interest of many individuals in exploring DIY approaches for environmental sensing. However, progress in this area has been relatively slow. One significant reason behind this sluggishness is the substantial time investment required for these DIY projects. Building your own sensor system solely because of the steep cost of commercial alternatives may not be a compelling enough reason to embark on such a venture, especially if you lack the necessary skills and have limited spare time.
In my perspective, there are two scenarios where DIY endeavors can prove beneficial. The first is when you aim to construct numerous simple sensor systems, such as temperature loggers, for purposes like citizen science or to cover a large geographical area effectively. The second scenario is when you require a specialized sensor that isn't commercially available. I am currently immersed in the latter case, where I am building sensors to automate the measurement of methane ebullition – the process of gas bubbling up from the bottom of a lake. Additionally, I am developing a separate sensor to measure gas exchange at the air-water interface of a waterbody.
Limnologists have pursued automation of these measurements for over a decade, but with limited success, typically in small quantities of one or two units. The ultimate goal is to design a user-friendly and straightforward solution accessible to most people, eliminating the need for specialized skills, and enabling wider adoption and implementation of these sensor systems.
Emerging open-source field research data collection platforms, like FieldKit (fieldkit.org), are striving to offer cost-effective environmental sensing solutions with reduced reliance on do-it-yourself approaches. We intend to test FieldKit at NTL for a couple of new sensor sites, as we believe they hold promise for advancing our data collection capabilities. It's worth monitoring the progress of these platforms and keeping an eye on their developments in the field of environmental sensing.
Source: ARDUINO VS RASPBERRY PI: A MAKER’S GUIDE TO ENVIRONMENTAL SENSORS