As with all DIY projects, one of the main hassles is the enclosure to put all of the hardware in. I wanted a quick solution – didn’t have the time to make something fancy. After a while I remembered that I’ve saved my Amazon Kindle Keyboard cardboard package. The quality of the cardboard is excellent and the construction is quite sturdy. After some measuring and layout prototyping I decided that it is quite good for this purpose so I began to work on my new NAS 🙂
The Hardware
After reviewing Raspberry Pi (model B) schematics and laying out my requirements I decided to power USB hard drive directly from the power supply unit. Raspberry Pi (model B) has 140 mA poly-fuse on each of the two USB ports while the current requirement of the USB hard drive is certainly higher. This particular USB hard drive (Transcend StoreJet 25M) has Toshiba MK5065GSX HDD inside and according to specifications it consumes 300 mA during read/write operations (and almost full 1 A during start-up!).
Anyway, it’s safe to say that a single USB hard drive will consume max. 500 mA in general (as that is the max. allowable current on standard USB port). I also plan to add second hard drive eventually, so I’ll be needing 1 A for USB hard drives alone. According to wiki, Raspberry Pi (model B) requires ~700 mA of current for active operation so, all in all, I’ll be needing at least 1.7 A of current (2 A optimal). Unfortunately, I didn’t have any spare 5 V DC power supply with stated current capabilities so I decided to purchase one. I found Mean Well RS-25-5 (5 V at 5 A) switching power supply at my local electronics shop. This is one really stable power supply. I adjusted it’s output voltage to 5.05 V while it was unloaded. After I’ve loaded it with Raspberry Pi and USB hard drive the voltage stayed on exactly the same level – quite nice.
On picture 1, a schematic of all the necessary connections is displayed. Of course, in order to supply power from my new power supply, I had to cut one end of the USB-Micro cable and attach power conductors (Vcc and GND) directly to V+ and V- of the power supply unit (respectively). The same goes for USB hard drive. USB hard drive also requires connections to the Raspberry Pi board – but only the data lines (D+ and D-).
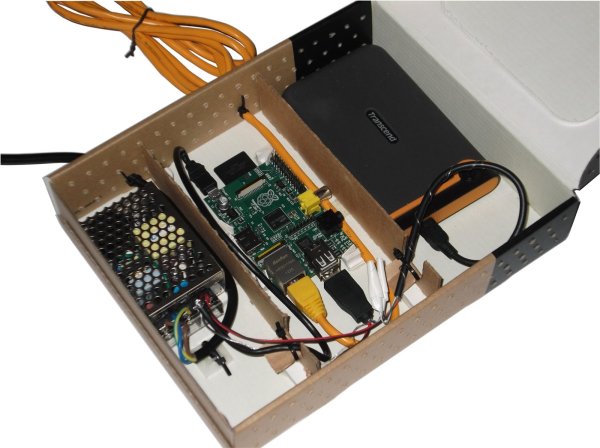
After a few days of sporadic “high-tech super-glue” cardboard modifications and quick electrical layout, the (almost) finished “device” can be seen on the following pictures. I say “almost” since I didn’t install power switch SW1 – quite frankly, I didn’t even remember to put it at the time I was assembling all this. I’m also thinking of adding soft turn-off mechanism (using Raspberry Pi’s GPIO) instead of SW1 – and will probably do that, we’ll see 🙂
The Software
I already had installed Raspbian “wheezy” on my SD card, so I continued with the configuration. I decided to set static IP address for Raspberry Pi (I chose 192.168.1.50). This can be done by editing /etc/network/interfaces on Raspberry Pi and adding following configuration:
|
1
2
3
4
|
iface eth0 inet static address 192.168.1.50 netmask 255.255.255.0 gateway 192.168.1.1 |
If the first line is already present (i.e. iface eth0 inet dhcp) then it should be replaced with the above configuration. After this, networking service should be restarted
pi@raspberrypi ~ $ sudo service networking restart |
SSH connection will be broken after this step. However, Raspberry Pi should be available on the new address (192.168.1.50).
Since I don’t like IP addresses (from aesthetic point of view) I added more aesthetically pleasing hostname to /etc/hosts on my working machine
|
1
|
192.168.1.50 rpi |
Yep, much better 😉
 ice
ice
Mounting the USB Hard Drive
First step in mounting the USB hard drive is finding it in /dev. One way to find out which device is your target device is with fdisk:
pi@raspberrypi ~ $ sudo fdisk -lDisk /dev/mmcblk0: 7822 MB, 7822376960 bytes4 heads, 16 sectors/track, 238720 cylinders, total 15278080 sectorsUnits = sectors of 1 * 512 = 512 bytesSector size (logical/physical): 512 bytes / 512 bytesI/O size (minimum/optimal): 512 bytes / 512 bytesDisk identifier: 0x000108cb Device Boot Start End Blocks Id System/dev/mmcblk0p1 8192 122879 57344 c W95 FAT32 (LBA)/dev/mmcblk0p2 122880 3788799 1832960 83 LinuxDisk /dev/sda: 500.1 GB, 500107862016 bytes255 heads, 63 sectors/track, 60801 cylinders, total 976773168 sectorsUnits = sectors of 1 * 512 = 512 bytesSector size (logical/physical): 512 bytes / 512 bytesI/O size (minimum/optimal): 512 bytes / 512 bytesDisk identifier: 0x4c153c12 Device Boot Start End Blocks Id System/dev/sda1 63 976768064 488384001 c W95 FAT32 (LBA)pi@raspberrypi ~ $ |
By looking at the disk sizes I could deduce which one is my USB drive – highlighted line Disk /dev/sda: 500.1 GB, 500107862016 bytes indicates that this is 500 GB hard drive. Since USB hard drives can be partitioned like any other, all partitions of this device are listed further down. This hard drive has only one partition /dev/sda1. In order to mount it I first had to create a mounting point. I did that by creating empty folder in /mnt:
pi@raspberrypi ~ $ sudo mkdir /mnt/drive1 |
Now, I can mount /dev/sda1 partition using mount:
pi@raspberrypi ~ $ sudo mount -o umask=0 /dev/sda1 /mnt/drive1 |
At this point I can access USB hard drive at /mnt/drive1:
pi@raspberrypi ~ $ ls -l /mnt/drive1total 576drwxrwxrwx 4 root root 32768 Oct 16 2011 BACKUPdrwxrwxrwx 7 root root 32768 Dec 9 2010 System Volume Informationdrwxrwxrwx 47 root root 32768 Nov 12 20:43 Videos |
Great, all is working 🙂
I now added this partition to /etc/fstab which will mount it at boot time (edited /etc/fstab on Raspberry Pi and added following line):