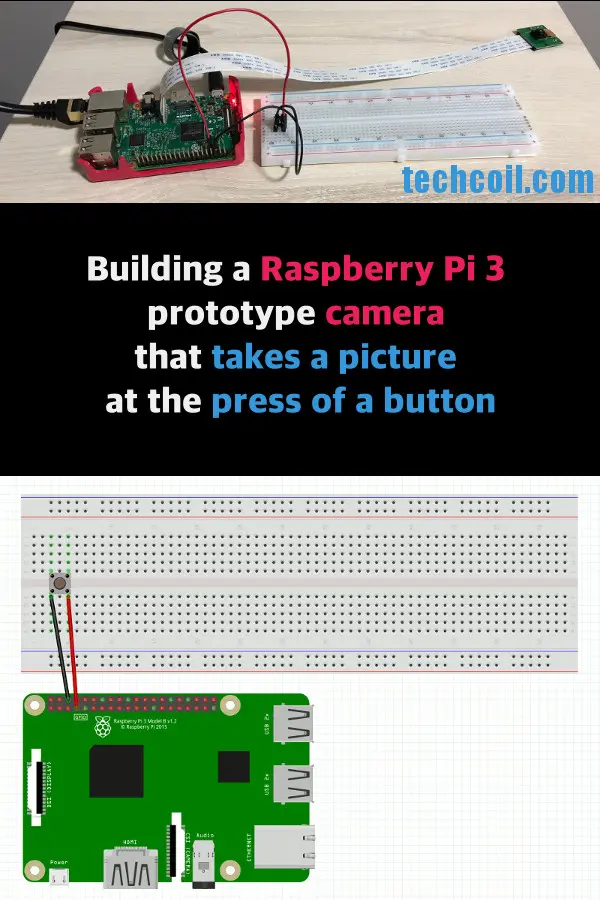
One interesting way to test the Raspberry Pi Camera on a Raspberry Pi 3 is by creating a prototype that captures a picture when a button is pressed. This activity allows us to gain hands-on experience in:
– Connecting a button to the GPIO ports of a Raspberry Pi.
– Setting up the camera using the CSI interface on a Raspberry Pi.
– Preparing an operating system, such as Raspbian Stretch Lite, for executing Raspberry Pi projects.
– Writing a Python 3 script that interacts with the GPIO ports and camera on a Raspberry Pi.
– Running the Python 3 script automatically when the Raspberry Pi powers on.
Considering these aspects, this post presents a detailed guide on constructing a Raspberry Pi 3 prototype camera that captures an image upon pressing a button.
Suggested bill of materials for this Raspberry Pi 3 project
If you are looking for a reference regarding the components you can purchase for your Raspberry Pi 3 project, here is a suggested bill of materials:
1. CanaKit Raspberry Pi 3 B+ (B Plus) with a 2.5A Power Supply (UL Listed)
2. Sandisk Ultra 32GB Micro SDHC UHS-I Card with Adapter
3. Raspberry Pi Camera Module V2 – 8 Megapixel, 1080p
4. A push button
5. Two male-to-female jumper wires
6. A breadboard from an electronic kit, such as the REXQualis Electronics Component Fun Kit
7. Optional: Official Raspberry Pi 3 Case in Red/White
These components should provide you with the necessary equipment to undertake your Raspberry Pi 3 project.
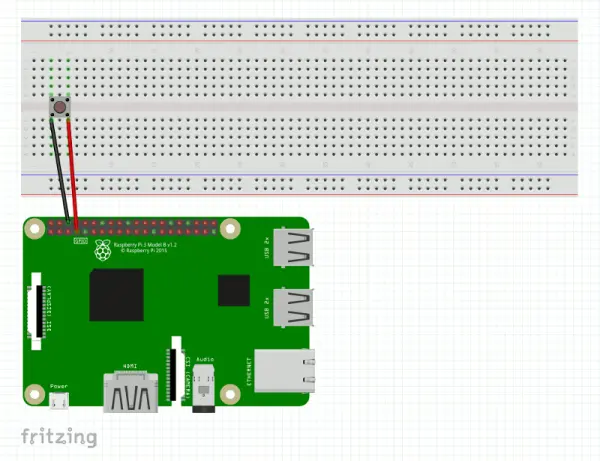
To facilitate this guide, we will utilize GPIO 4 and one of the ground pins on the Raspberry Pi 3 to detect button presses. The provided diagram illustrates the wiring setup of the push button to the Raspberry Pi 3 using a breadboard:
If you prefer to connect your push button to different GPIO pins on your Raspberry Pi 3, you can refer to various GPIO Pinout resources available to guide you through the process. These resources provide detailed information and diagrams to assist you in making the desired connections.
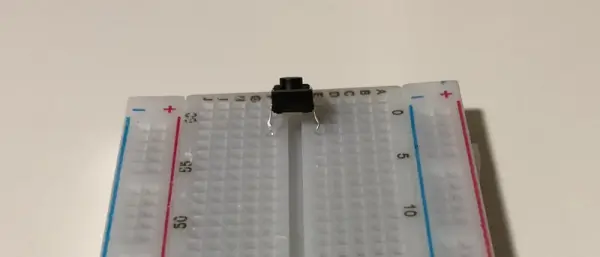
The following diagram shows a push button that is partially inserted:
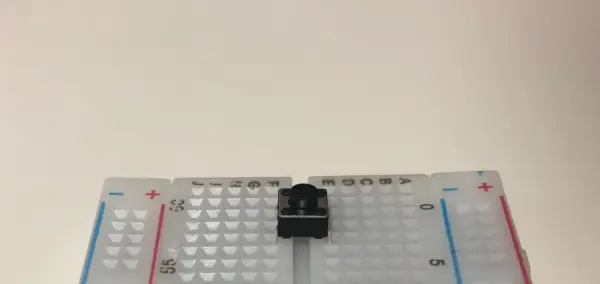
When inserting the push button onto the breadboard, ensure that the legs are positioned as shown in the following illustration. It is important to fully insert the push button into the breadboard before proceeding with the tutorial:
Connecting the Raspberry Pi Camera Module to your Raspberry Pi 3
Once you have successfully connected your push button to your Raspberry Pi 3, you can proceed to connect the Raspberry Pi Camera Module to your device.
After making the necessary connections between the Raspberry Pi Camera Module and your Raspberry Pi 3, your setup should resemble the following image:
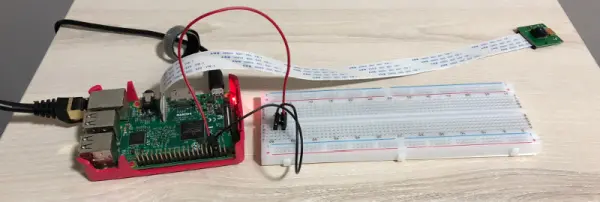
Once you have finished connecting the push button to your Raspberry Pi 3, proceed to connect the Raspberry Pi Camera Module to the device.
Once the Raspberry Pi Camera Module is properly connected to your Raspberry Pi 3, your setup should resemble the following image:
Setting up Raspbian Stretch Lite with SSH server enabled on your microSD card
After successfully connecting the camera and button to your Raspberry Pi 3, proceed with setting up Raspbian Stretch Lite on your microSD card. Make sure to enable the SSH server during the setup process. This will allow you to remotely access your Raspbian Stretch Lite via SSH, enabling further configurations as described in this post.
Starting the Raspbian Stretch Lite operating system
Subsequently, take one end of the RJ45 cable and connect it to the RJ45 port on the Raspberry Pi 3 board. Connect the other end of the cable to any available switch port on your home router. Following that, connect the micro USB power supply to the Raspberry Pi 3 board and plug it into a wall socket. Finally, switch on the power socket to provide power to the Raspberry Pi 3 board.
Getting into Raspbian Stretch Lite and updating it
Once you have booted up your Raspbian Stretch Lite, establish an SSH connection to your Raspberry Pi 3 using a computer connected to the same network.
Assuming your router has assigned the IP address 192.168.1.123 to your Raspberry Pi 3, you can use the following command in your terminal program to access Raspbian Stretch Lite:
“`
ssh [email protected]
“`
When prompted for a password, enter “raspberry”.
Once you have successfully logged into Raspbian Stretch Lite, execute the following command to update it:
“`
sudo apt-get update
“`
This command ensures that your Raspbian Stretch Lite installation is up to date.
Enabling the camera on Raspbian Stretch Lite
To utilize the camera on Raspbian Stretch Lite, it is necessary to enable it first. Please refer to the provided guide to enable the Raspberry Pi Camera on Raspbian Stretch Lite. This guide will provide you with the necessary steps to enable the camera functionality on your Raspbian Stretch Lite installation.
Installing Virtualenv on Raspbian Stretch Lite
Virtualenv is a tool that enables the creation of isolated environments within the same machine. This is particularly helpful when you need to run multiple applications with conflicting Python dependencies on your Raspberry Pi 3.
To ensure compatibility and the ability to try out other projects on the same Raspberry Pi 3, we will employ Virtualenv to create an environment for running our Python 3 script.
To install Virtualenv, execute the following command:
“`
sudo apt-get install virtualenv -y
“`
This command will install Virtualenv on your Raspberry Pi 3, allowing you to create isolated environments for your Python projects.
Installing Supervisor
To ensure that our Python 3 script initiates at boot time and continuously monitors button presses, we can utilize Supervisor. Supervisor aids in monitoring and controlling the process responsible for running our Python 3 script.
To install Supervisor, execute the following command:
“`
sudo apt-get install supervisor -y
“`
This command will install Supervisor on your Raspberry Pi 3, enabling you to effectively monitor and manage the process running your Python 3 script.
Coding a Python 3 script that interacts with the GPIO ports on a Raspberry Pi
After installing Supervisor, we can proceed to code a simple Python 3 script that will:
- Listen for button presses.
- Take a picture with the camera when the button is pressed.
Given these points, let's use nano to create a Python script at /home/pi/run.py:
|
1
|
nano /home/pi/run.py |
Once the editor starts, copy the following Python 3 codes into the editor:
|
1
2
3
4
5
6
7
8
9
10
11
12
13
14
15
16
17
18
|
from gpiozero import Buttonfrom picamera import PiCamerafrom signal import pauseimport timecamera = PiCamera()def take_picture_with_camera(): image_path = '/home/pi/images/image_%s.jpg' % int(round(time.time() * 1000)) camera.capture(image_path) print('Took photo')button = Button(4)button.when_pressed = take_picture_with_camerapause() |
After making the desired changes to the file, press Ctrl-X, followed by Y, to save the file.
Within the Python 3 script, we begin by importing the necessary libraries. Following that, we instantiate an instance of PiCamera, which facilitates interaction with the Raspberry Pi Camera module.
Python 3 codes to take picture with Raspberry Pi Camera
After creating an instance of PiCamera, we proceed to define a function called `take_picture_with_camera`. This function serves the purpose of capturing an image using the camera.
Within the `take_picture_with_camera` function, we utilize `time.time()` to generate a unique image path for saving the picture that the camera will capture. Then, we employ the `camera.capture(image_path)` method to take a picture using the camera and save the captured image to the specified `image_path`.
Following the function definition, we proceed to create an instance of `Button` that will monitor voltage changes on GPIO 4.
Once the button instance is created, we assign the `take_picture_with_camera` function to `button.when_pressed`. Consequently, whenever the push button is pressed, the `take_picture_with_camera` function will be called.
To prevent the Python 3 script from terminating, we utilize the `pause()` function, which pauses the execution and allows the script to continuously listen for button presses and capture pictures.
To run the Python 3 script, it is recommended to create a virtual environment. This allows for isolating the dependencies and ensuring that the script runs smoothly without conflicting with other Python projects.
To create a virtual environment, follow these steps:
1. Open a terminal window on your Raspberry Pi 3.
2. Navigate to the directory where you want to create the virtual environment.
3. Run the following command to create a virtual environment named “myenv” (you can replace “myenv” with your preferred name):
“`
virtualenv -p python3 myenv
“`
4. Activate the virtual environment by running the command:
“`
source myenv/bin/activate
“`
5. Once the virtual environment is activated, you can install the necessary dependencies for your Python 3 script using `pip`.
By creating a virtual environment, you can ensure a clean and isolated environment for running your Python 3 script without interfering with other projects or dependencies on your Raspberry Pi 3.
Testing your Python 3 script
After you had prepared the virtual environment for your Python 3 script, create the /home/pi/images folder:
|
1
|
mkdir /home/pi/images |
When the folder is created, run your Python script with the following commands:
|
1
2
|
cd /home/pipython run.py |
You will notice that after you ran the commands, the terminal pauses. In addition, the LED on the Raspberry Pi Camera lights up. This indicates that your Python 3 script is ready to listen for button presses.
Given that, whenever you press the push button, you will find an image being created inside the /home/pi/images folder.
Running the Python 3 script when your Raspberry Pi 3 powers on
When you want your Python 3 script to run whenever your Raspberry Pi 3 is turned on, you can depend on Supervisor. This section will show how you can to get Supervisor to run your Python 3 script whenever your Raspberry Pi 3 is turned on.
Firstly, let's create a shell script that will activate the virtual environment that we had created earlier and run our Python 3 script within that virtual environment.
To do so, we use nano to create a shell script at /home/pi/run.sh
|
1
|
nano /home/pi/run.sh |
Once the editor loads, write the following content into the editor:
|
1
2
3
4
|
!#/bin/bashsource ./rpi-cam-prototype-env/bin/activatepython run.pydeactivate |
After you had included the content, type Ctrl-X and then Y to save the file.
Afterwards, make the shell script executable by running the following command:
|
1
|
sudo chmod 744 /home/pi/run.sh |
To get Supervisor to start our Python 3 script so that we can take pictures with our Raspberry Pi 3 prototype, we first create a configuration file at /etc/supervisor/conf.d/rpi3-camera-prototype.conf:
|
1
|
sudo nano /etc/supervisor/conf.d/rpi3-camera-prototype.conf |
After nano loads, copy the following configuration codes into the editor:
|
1
2
3
4
5
6
7
8
9
|
[program:rpi3-camera-prototype]directory=/home/picommand=/bin/bash -E -c ./run.shautostart=trueautorestart=truestopsignal=INTstopasgroup=truekillasgroup=trueuser=pi |
Once you had written the configurations into the editor, run the following command to restart Supervisor:
|
1
|
sudo systemctl restart supervisor.service |
When Supervisor runs again, it will take the configurations that you had created earlier and run your Python 3 script.
With that, whenever you power on your Raspberry Pi 3, you will be able to take pictures with your Raspberry Pi camera by pushing the button.
Further enhancement: Perform image compression on the pictures from your Python 3 script
You might have observed that the images captured by your Raspberry Pi camera are quite large, each exceeding 150 KB in size.
If you are expanding the prototype to include the functionality of sending the pictures to a server endpoint, it may be beneficial to compress the images before transmission, especially when using your iPhone Personal WiFi hotspot to connect your Raspbian Stretch Lite.
In such cases, you can utilize the Python 3 library Pillow on Raspbian Stretch Lite to compress the JPEG images.
To keep this tutorial concise, I will leave it to you to explore how to modify the Python 3 script to incorporate image compression using Pillow.