Raspberry Pi is a collection of single-board computers that have gained popularity among DIY enthusiasts, hobbyists, and students. These boards were initially developed with the aim of promoting computer science education on a global scale. One key distinction between Arduino and Raspberry Pi is that Arduinos are microcontroller-based boards, whereas Raspberry Pi boards are microprocessor-based and capable of running an operating system (OS). In this tutorial, I will guide you through the process of setting up your Raspberry Pi by booting an OS disk image. Following that, I will illustrate how to utilize the GPIO (General Purpose Input/Output) to control an LED, making it flash on and off at one-second intervals.
Estimated Time to Complete: 45min.-1hr.
Parts and Equipment Needed
To get started with Raspberry Pi 3 Model B, you will need the following components and peripherals:
– Raspberry Pi 3 Model B board
– Micro SD Card
– Micro USB Cable
– Keyboard
– Mouse
– Monitor
– LED
– Resistor
– Breadboard
– Jumper Wires
– Computer with an Internet connection
These items are essential for setting up and utilizing the Raspberry Pi 3 Model B effectively.
Table of Contents
To begin the process of setting up your Raspberry Pi, you'll need to follow the steps outlined below:
1. Downloading NOOBS: Obtain the NOOBS (New Out Of the Box Software) package, which serves as an easy-to-use installation manager for operating systems on your Raspberry Pi.
2. Formatting the Micro SD Card (Optional): If needed, format the Micro SD card to ensure it is compatible with the Raspberry Pi and ready for the installation process.
3. First Boot and Installing Raspbian: Insert the Micro SD card into the Raspberry Pi and power it on. Follow the instructions provided by NOOBS to install the Raspbian operating system on your Raspberry Pi.
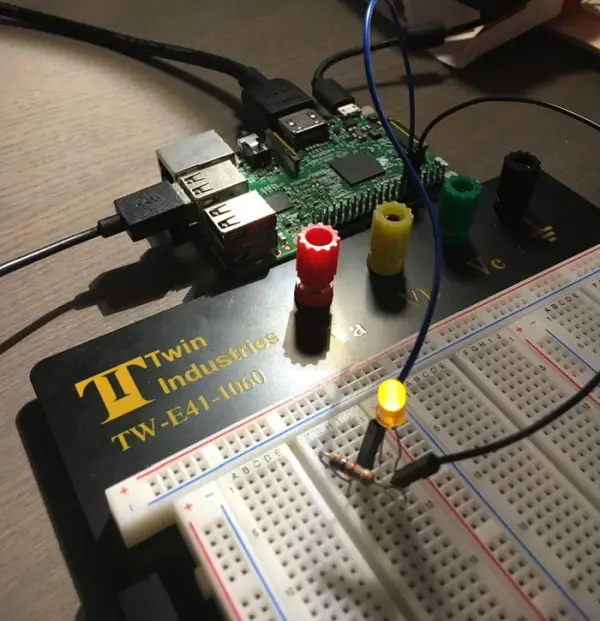
4. Building the Circuit: Set up the necessary hardware components, including the LED, resistor, breadboard, and jumper wires, to construct the circuit that will control the LED.
5. Flashing the LED: Implement the appropriate connections and configurations to make the LED flash on and off as desired.
6. Writing the Script: Create a script, such as LED_flash.py, using a programming language like Python. This script will contain the instructions to control the LED.
7. Running the Script: Execute the script on the Raspberry Pi to activate the LED and observe the desired flashing behavior.
Additionally, you may find an appendix section containing the LED_flash.py script, providing a reference for your convenience.
1) Setting Up Your Raspberry Pi: Downloading NOOBS
As mentioned earlier, Raspberry Pis are small computers capable of running an operating system. In this tutorial, I will guide you through the process of installing the Raspbian OS, which is a Linux-based operating system specifically designed and supported by the Raspberry Pi community.
To begin, you'll need to download the latest version of NOOBS (New Out Of Box Software) from the official Raspberry Pi website or using the link provided: https://www.raspberrypi.org/downloads/noobs/. NOOBS serves as an OS installer, enabling you to install various operating systems on your Raspberry Pi.
Note: If your micro SD card came pre-installed with NOOBS, you can skip the following two steps.
In the event that your micro SD card is new, it may require formatting. You can accomplish this task by using SD Card Formatter 4.0. It's important to note that this step is optional and may not be necessary if your micro SD card is already formatted correctly.
After installing NOOBS and formatting your SD card (if needed), you can proceed by copying all the extracted NOOBS files to the SD card. Ensure that you copy the individual files within the folder rather than copying the folder itself, as this may prevent NOOBS from booting correctly. Finally, safely remove the SD card from your computer and insert it into your Raspberry Pi to proceed with the installation process.
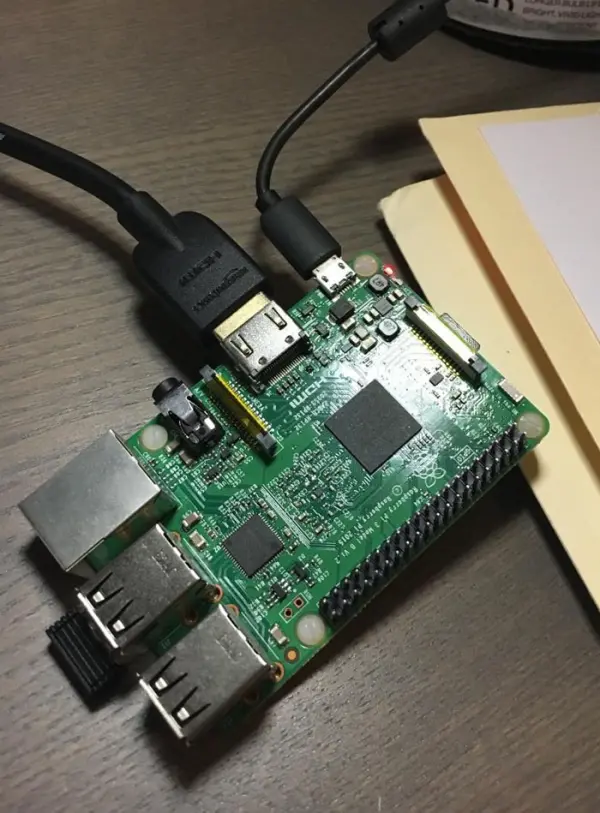
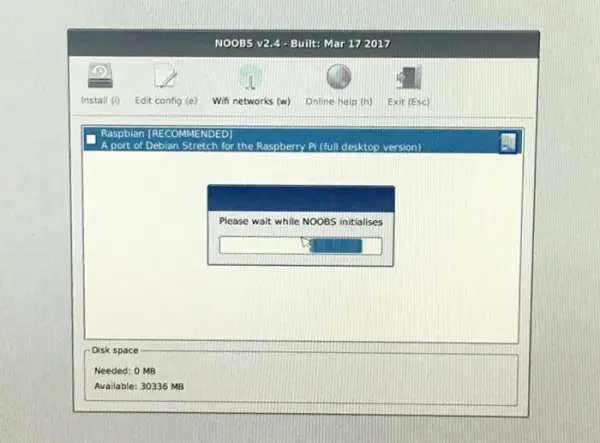
Now it's time to boot up your Raspberry Pi for the first time. Connect your keyboard, mouse, and monitor to the Raspberry Pi device, as shown in Figure 1: Raspberry Pi. Once everything is properly connected, plug in the USB cable to power on your Raspberry Pi. As it boots up, a window will appear on the screen, displaying the NOOBS initialization screen (Figure 2). This screen presents a list of available operating systems for installation.
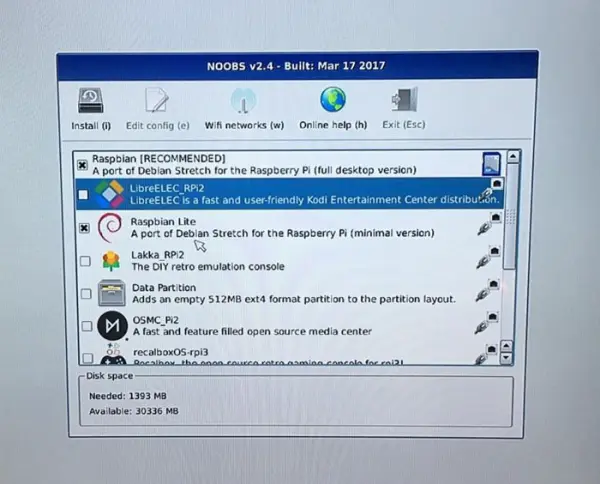
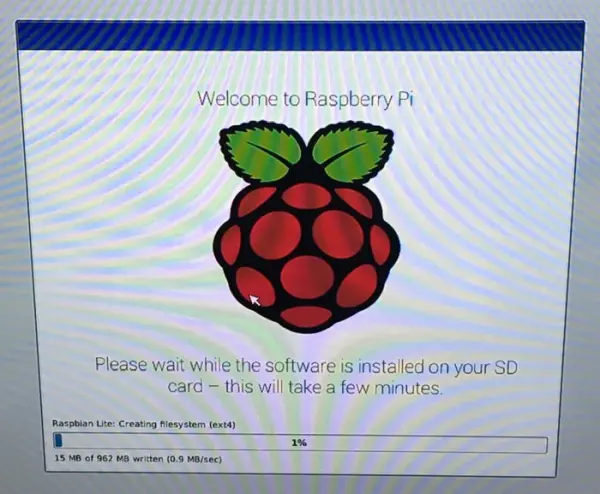
Since we aim to install Raspbian Lite, locate the checkbox next to Raspbian Lite in the list and select it. Then, click on the “Install” button (Figure 3: OS Install Selection (NOOBS)). The installation process for Raspbian Lite will begin. Please exercise patience, as it may take approximately 10 to 20 minutes to complete.
Once the installation is finished, you will be prompted to log in. The default login credentials for Raspbian are as follows: username: pi, password: raspberry. Please note that when typing the password, the characters will not be displayed on the screen for security purposes. Moving forward in this tutorial, we will be using the command line for further instructions and actions.
2) Building the Circuit
The circuit we are constructing is straightforward. For this purpose, I have utilized a breadboard, but you have the flexibility to solder the components together or create a shield using a protoboard for your Raspberry Pi. Before physically assembling the circuit, I prefer to create Fritzing schematics to visualize the connections and layout (Figure 5: Fritzing Schematic). Fritzing is an open-source software that allows for schematic capture and PCB routing. If you are interested in downloading Fritzing, you can find it at this link: http://fritzing.org/home/.
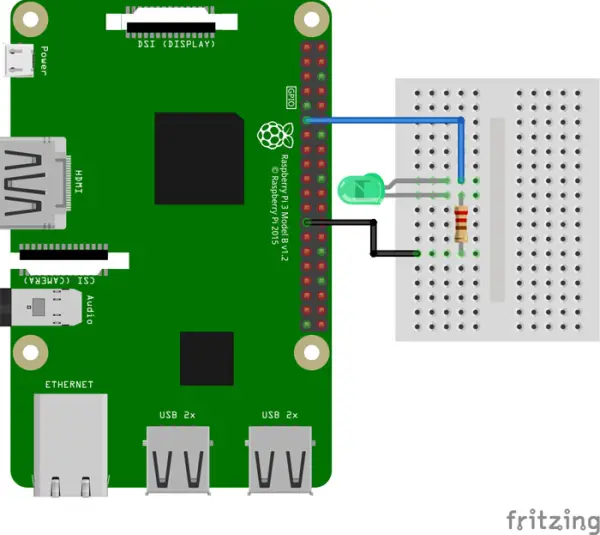
To establish the circuit, connect the LED and resistor in a series configuration between Pin 11 (GPIO17) and Pin 25 (Ground) on the Raspberry Pi. The resistor's purpose is to regulate the current flowing through the LED, and its value should be chosen appropriately based on the specific LED you are using to prevent damage. It is crucial to note that the longer lead of the LED is the positive terminal and should be connected to Pin 11 for proper functionality.
3) Writing the Code
To create the LED flashing effect, we will write a Python script and execute it. Python is an interpreted programming language widely used for various applications. While I won't delve into the intricacies of Python in this tutorial, I will demonstrate how to write a Python script on your Raspberry Pi and execute it. This knowledge can be applied to writing other Python scripts and utilizing the GPIO functionality of the Raspberry Pi. Before proceeding, ensure that your Raspberry Pi is connected to the internet.
The first step is to ensure that you have the latest version of RPi.GPIO installed. RPi.GPIO is a Python library specifically designed for controlling Raspberry Pi GPIO pins. To update to the latest version, execute the following two commands in the command line:
|
2
|
$ sudo apt–get update
$ sudo apt–get install python–rpi.gpio python3–rpi.gpio
|
After updating RPi.GPIO, the next step is to create a Python script file. In my case, I named it “LED_blink,” but you can choose any suitable name for your file. To create the script file, enter the following command in the command line:
$ nano LED_blink.py
Executing the command will open a new window for editing the script. You can copy the script provided in the appendix and paste it into the editor. Once you have pasted the script, make sure to save the file to retain your changes.
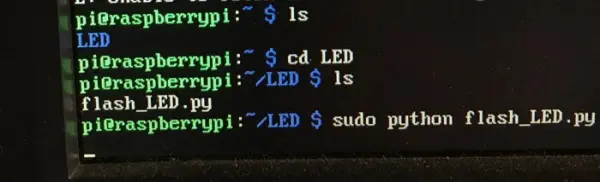
Now type the following command (Figure 6: Running the Script from Command Line):
At this point, your LED should begin flashing, alternating between an off state (Figure 6: LED Off) and an on state (Figure 7: LED On) with a frequency of one second. To stop the execution of the script, simply press “CTRL + C” on your keyboard.
Congratulations! Your Raspberry Pi is now successfully set up and operational. You can utilize it to run various scripts or applications according to your requirements.