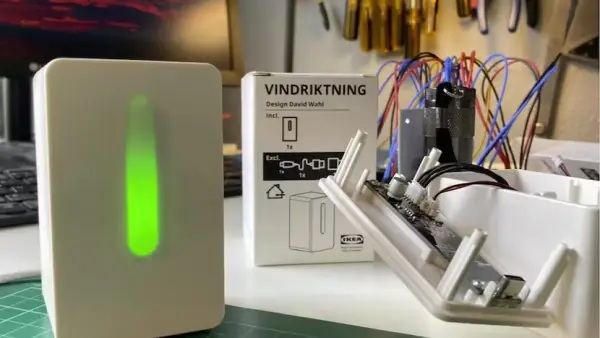
Using a Raspberry Pi Pico W to connect an IKEA air quality sensor to the internet.
Sometimes ordinary products can use a small upgrade in the form of a hack. Plus, adding a new feature can make the product more useful as well as add a bit of personalization to the device. That is exactly what Raspberry Pi's Alasdair Allan decided to do after drawing some inspiration from an Adafruit tweet demonstrating a hack on an IKEA Vindriktning air quality sensor. The sensor itself is a small and cheap unit that costs under $20. It is meant to be placed in a room of your house to measure air quality which is displayed through an LED light bar in three different colors – green is good, yellow is ok, and red is not good.
Unlike the Adafruit hack which utilizes a QT Py ESP32-S3 to read data from the Vindriktking’s PM1006 particle sensor, a Raspberry Pi Pico W is employed to connect the device to the internet. It turns out the air quality sensor is pretty simple. After opening the device one can find a blower, the PM1006 particle sensor, and a small PCB which the sensor attaches to and houses a Eastsoft microcontroller. The PCB also features circuitry for power management and the LED light bar control. Conveniently, a set of test points exist on the PCB that connect to the nets between the microcontroller and sensor communication routes. In addition, the UART communication protocol is used for the MCU to talk to the sensor.
Equipped with this knowledge, jumper wires were soldered to the test points which then connected to the corresponding UART pins on the Raspberry Pi Pico W. It was also decided to extend the capabilities of the Vindriktning by adding a BMP280 barometric pressure sensor. Although various breakout boards exist, in this hack an Adafruit breakout board was used. Care was taken when soldering the jumper wires from the sensors to the Pico to ensure there was not too much extra wire to work with when trying to put things back into the case. That covers all the hardware hacking needed in this instance, the next step was to put the software together.
Example code was pulled from various references such as David Stenwell’s BMP280 MicroPython library, Liz Clark’s CircuitPython example, and the user’s own tutorial on how to run a webserver on a Pico W. The full source code for the project can be found on GitHub. After loading the code and powering up the device, the Pico will grab an IP address from the network. Next, a user will only need to open a browser and head to the IP address of the Pico. If everything goes as planned, data should be shown in a JSON format. This hack demonstrates just one of the possibilities that can be done with the air quality sensor. Allan mentions that he has additional devices he plans on hacking as well. These will likely include adding different features such as temperature and humidity sensor capabilities.


