This tutorial is compatible with all Raspberry Pi models with 40 GPIO pins. It may also work with the older 26 GPIO pin models with some code modification. To complete this tutorial, you will first need to install Swift-Lite on your Raspberry Pi. Details for this are in tutorial 1.
In this tutorial, we will be using a HC-SR04 Ultrasonic unit, a 330 Ohm resistor, a 470 Ohm resistor, a breadboard and some jumpers wires to connect to the Pi's GPIO pins.
The HC-SR04
The HC-SR04 uses ultrasonic pulses to measure distance in a similar way to a bat. The unit sends out a pulse and then listens for an echo. By measuring the time taken for the echo to return, we can calculate the distance to the object that reflected the pulse.
There are 4 connections on the device.
- Power – This requires 5V
- Ground
- Trigger – We send a signal to this pin to start the pulse
- Echo – This pin outputs 5V for the duration of the pulse if detected.
Special Note
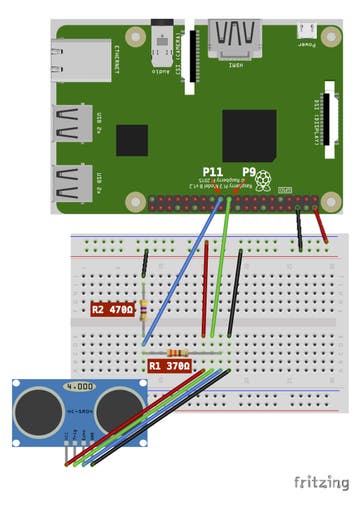
The Echo pin outputs 5V. This is higher than the 3.3V rated input of the Raspberry Pi's GPIO pins. To avoid damage to the Pi, we need to reduce the 5V to under 3.3V. This can be easily achieved by using 2 resistors as a voltage divider. By using the resistors shown in the connection diagram, we can reduce the voltage to about 3V.
Other resistors can be used to achieve the same effect by using the formula:
V out = V in * Resistor 1 / ( Resistor 1 + Resistor 2)
More info on voltage dividers here.
Connecting the Hardware
Use the attached diagram to connect all the components. Take care with the order of the resistors and placement of the echo return jumper wire.
The HC-SR04 will plug straight into the breadboard as shown in the photo.
The Swift Code
The Swift code consists of a main project file piCodeUltrasonics.swift, the GPIO module file piCodeGPIO.swift and another small module file piCodeTime.swift. The GPIO module file is the same file that we used in the previous tutorial – GPIO Getting Started.
piCodeTime.swift is a small utility file that uses DispatchTime to insert delay or pause into the program. This can be used the same way as sleep or usleep.
The Main Project File
1. Include the required module files and import main libraries.
// Created with PiCode for Swift 3.0
// A Swift-Lite project file
// type:project
// name:piCodeUltrasonics
// include:piCodeTime.swift
// include:piCodeGPIO.swift
import Glibc
import Foundation
import Dispatch
2. Detect board type and set up 2 GPIO pins, one for the “trigger” and one for the “echo“.
Read More: HC-SR04 Ultrasonic Measurement with Swift


