
How to set up InfluxDB 2 on a Raspberry Pi. A free and open-source time-series database is InfluxDB (TSDB).
This article provides instructions for installing InfluxDB 2 on a Raspberry Pi. InfluxDB is a free and open-source time-series database (TSDB) that is well-suited for storing sensor data with timestamps.
Sensor measurements like temperature, humidity etc. are typically recorded at regular intervals over a period of time. A TSDB allows querying and analyzing this time-stamped data across a specified timeframe. InfluxDB's lightweight Docker image makes it feasible to deploy on resource-constrained devices like the Raspberry Pi.

This setup enables collecting sensor readings from connected devices onto the local Raspberry Pi. With InfluxDB running onboard, the sensor measurements containing timestamps can be ingested continuously. Its time-series data model and query language facilitate exploring trends, aggregates and relationships in the readings over time.
By following the outlined steps, users can benefit from InfluxDB's features to store, process and retrieve their IoT sensor streams on a Raspberry Pi near the edge. This provides opportunities for local analytics and monitoring of sensor data while reducing network usage versus sending all the readings to the cloud.
The free tier of the InfluxDB cloud offering has some limitations that may not suit all use cases, such as data retention being capped at 30 days. To gain full control over your data, consider deploying InfluxDB locally on a device like the Raspberry Pi.
When installing InfluxDB on a Raspberry Pi, be mindful of the storage capacity of the MicroSD card used. The volume of time-series data that can be stored will ultimately be constrained by the storage space available on the Raspberry Pi.
Opt for a higher capacity MicroSD card to accommodate longer term storage needs if your IoT or sensor applications generate substantial amounts of timestamped metrics over time. A local InfluxDB instance on a Raspberry Pi gives you freedom over aspects like data durability, without restrictions tied to cloud-based plans.
However, be aware of storage management to ensure the MicroSD card does not get completely filled. This setup provides full autonomy but requires handling administrative tasks like backups, upgrades and failure recovery that come with self-managed on-premise deployments.
Prerequisites
MicroSD Card
The Raspberry Pi requires an external microSD card to store the operating system, as it lacks internal memory.
Install your chosen operating system (e.g. Raspberry Pi OS) on the microSD card.
I recommend using a class 10 microSD card with a minimum capacity of 16GB.
Raspberry Pi Model
Only the Raspberry Pi 3 and 4 models support a 64-bit architecture required to run InfluxDB 2.
Operating System
Install the 64-bit version of Raspberry Pi OS on your Raspberry Pi 3 or 4.
Other 64-bit operating systems like 64-bit Ubuntu are also compatible.
Setting Up Raspberry Pi OS (64-bit)
Install and configure the 64-bit version of Raspberry Pi OS on the microSD card.
This 64-bit OS is necessary to properly set up InfluxDB 2 on the Raspberry Pi.
In summary, to deploy InfluxDB 2 on a Raspberry Pi you will need: a class 10 microSD card of at least 16GB, and either a Raspberry Pi 3 or 4 configured with Raspberry Pi OS or another 64-bit Linux distribution.
Installing Raspberry Pi OS requires the following actions (64-bit).
Connect your computer to a microSD card using an SD card reader.
Visit the Raspberry Pi download page and select the Raspberry Pi Imager tool to flash an OS onto the microSD card.
Download and launch the Raspberry Pi Imager application.
Choose Raspberry Pi OS (64-bit) as the operating system from the options.
Select the microSD card to install the OS onto.
Optionally configure advanced settings like hostname, enabling SSH, WiFi credentials etc. by clicking the gear icon.
Set the timezone, country and save the configuration.
Click “Write” to start installing the OS onto the microSD card.
Wait patiently for the installation to complete.
Once done, remove the microSD card from your computer.
Insert the microSD card into the Raspberry Pi and power it on.
The Raspberry Pi will now boot with the installed OS.
This allows setting up a 64-bit Raspberry Pi OS environment on the microSD card to later install and run InfluxDB 2 on the Raspberry Pi hardware.
Installing InfluxDB 2 on Raspberry Pi Board.
To access and interact with the Raspberry Pi remotely, we'll use SSH (Secure Shell).
On Windows, an application like PuTTY can be used for SSH connectivity. On MacOS or Linux, the built-in Terminal can connect via SSH.
If you need help setting up the SSH connection, follow these steps:
Ensure your Raspberry Pi and computer are connected to the same network.
Identify the IP address of your Raspberry Pi.
On your computer, open PuTTY (Windows) or Terminal (MacOS/Linux).
Enter the Raspberry Pi IP address in the PuTTY/Terminal window.
Log in using the default username and password.
Once connected via SSH, you can issue commands remotely on the Raspberry Pi command line.
For example, to update the Raspberry Pi packages, copy this full command:
sudo apt update && sudo apt upgrade
Then right click and paste it into the PuTTY/Terminal window to run remotely on the Raspberry Pi.
This allows managing and interacting with the Raspberry Pi via SSH from your local computer.
wget -qO- https://repos.influxdata.com/influxdb.key | gpg --dearmor | sudo tee /etc/apt/trusted.gpg.d/influxdb.gpg > /dev/null
export DISTRIB_ID=$(lsb_release -si); export DISTRIB_CODENAME=$(lsb_release -sc)
echo "deb [signed-by=/etc/apt/trusted.gpg.d/influxdb.gpg] https://repos.influxdata.com/${DISTRIB_ID,,} ${DISTRIB_CODENAME} stable" | sudo tee /etc/apt/sources.list.d/influxdb.list > /dev/null

sudo apt-get update && sudo apt-get install influxdb2
During the package update process, additional packages may need to be installed. When prompted, type “Y” and press Enter/Return to accept the installation of these packages.
Once the update completes, the Terminal window will display something like the following:
[Output of package updates]
0 upgraded, 0 newly installed, 0 to remove and 0 not upgraded.
This indicates that the apt update and upgrade commands have finished executing. All available packages on the Raspberry Pi have now been updated to their latest versions.
By accepting the additional package installations via the “Y” response, the full upgrade brought all software up to date. You can now proceed with other configuration and installation steps, knowing the Raspberry Pi packages are fully synchronized.
To start InfluxDB as a background service at startup, type the following command.
sudo service influxdb startRun the next command to make sure InfluxDB is functioning as it should.
sudo service influxdb statusYou should purchase the following:
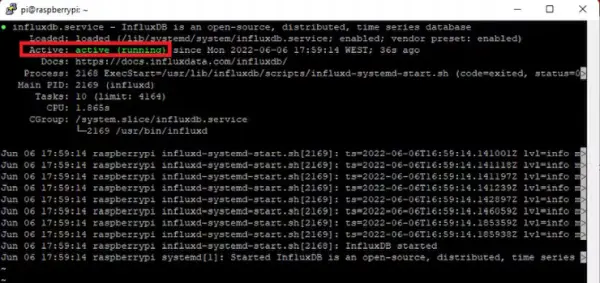
This indicates that InfluxDB is functioning effectively as a service.
Please take note that you may also wish to look at the official installation guidelines here.
Raspberry Pi InfluxDB Access
Find your Raspberry Pi's IP address by running hostname -I in the terminal.
Enter the IP address and port 8086 in a web browser, e.g. 192.168.1.106:8086.
On the InfluxDB homepage, click “Get Started”.
Create the first admin user, filling the form with a username, password and selecting your desired retention policy. Make a note of these credentials.
Click “Continue” to proceed to the Quick Start page.
Select “Quick Start” to access the Getting Started screen.
You've now connected to the InfluxDB application installed on your Raspberry Pi. The retention policy and admin user credentials you created will allow managing and exploring your time-series data.