Overview
Raspberry Pi is a line of single-board computers that has gained popularity among DIYers, hobbyists, and students. The Raspberry Pi series was created with the goal of promoting computer science education globally. One key distinction between Arduino and Raspberry Pi is that Arduinos are based on microcontrollers, whereas Raspberry Pi boards are based on microprocessors and are capable of running an operating system (OS). In this tutorial, I will guide you through the process of setting up your Raspberry Pi by booting an OS disk image. Additionally, I will demonstrate how to use the GPIO (General Purpose Input/Output) pins to control an LED, toggling it on and off every second.
Estimated Time to Complete: 45min.-1hr.
Parts and Equipment Needed
To get started with the Raspberry Pi setup, you will need the following components and equipment:
– Raspberry Pi 3 Model B (or a compatible model)
– Micro SD card (to install the operating system)
– Micro USB cable (for power supply)
– Keyboard
– Mouse
– Monitor or display
– LED
– Resistor
– Breadboard (for circuit connections)
– Jumper wires (to connect components)
– Computer with an internet connection (to download the necessary files and prepare the SD card)
Table of Contents
Setting up your Raspberry Pi involves the following steps:
1. Downloading NOOBS (New Out of the Box Software), which provides an easy way to install an operating system on your Pi.
2. Formatting the micro SD card (optional) to ensure it is ready for the OS installation.
3. Performing the first boot and installing the Raspbian operating system.
4. Building the circuit by connecting the LED, resistor, and necessary wires on the breadboard.
5. Flashing the LED on and off to test the circuit and verify its functionality.
6. Writing the Python script to control the LED.
7. Running the Python script to make the LED flash on and off according to the specified program.
Appendix: LED_flash.py (Python Script) provides the code for the LED flashing script.
1) Setting Up Your Raspberry Pi: Downloading NOOBS
As mentioned in the introduction, Raspberry Pis are small computers that utilize an operating system. In this tutorial, I will guide you through the installation process of Raspbian, which is a Linux-based operating system widely supported by the Raspberry Pi community.
To begin, you will need to download the latest version of NOOBS (New Out Of Box Software) from the official Raspberry Pi website at the following link: [https://www.raspberrypi.org/downloads/noobs/](https://www.raspberrypi.org/downloads/noobs/). NOOBS serves as an OS installer and enables you to install various operating systems on your Raspberry Pi.
If you have a new micro SD card, there is a possibility that you may need to format it. You can accomplish this by using the SD Card Formatter 4.0 tool. However, it's important to note that formatting the SD card is an optional step.
After you have successfully installed NOOBS and, if required, formatted your SD card, you can proceed to copy all the extracted NOOBS files to the SD card. Ensure that you copy all the individual files within the NOOBS folder and not just the folder itself. This is necessary to ensure proper booting of NOOBS. Once you have copied the files, safely remove the SD card from your computer and insert it into the SD card slot of your Raspberry Pi.
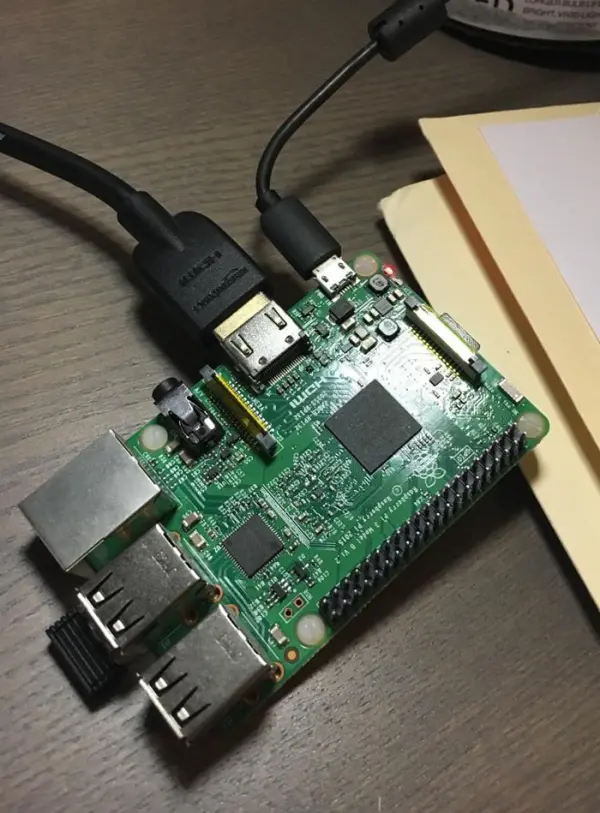
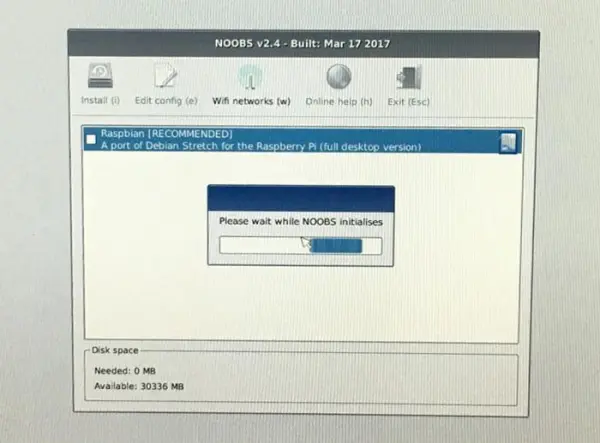
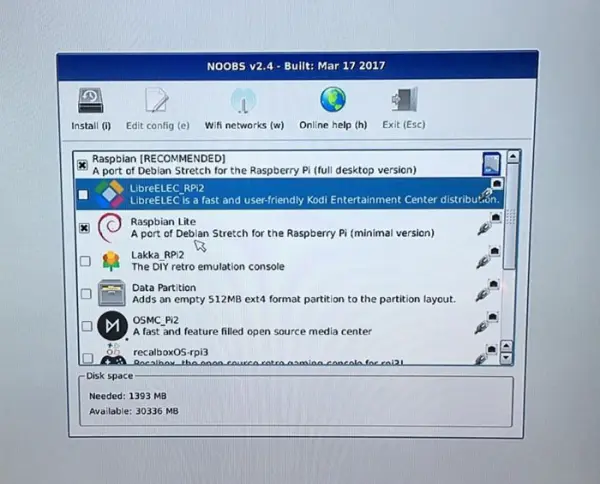
Now you are ready to boot your Raspberry Pi for the first time. Connect your keyboard, mouse, and monitor to your Raspberry Pi (refer to Figure 1: Raspberry Pi). Plug in the USB cable to provide power to your Raspberry Pi. The Pi will start to boot, and you will see a window appear (refer to Figure 2: NOOBS Initialization Screen). This window will display a list of different operating systems that you can install.
Since we want to install Raspbian Lite, check the box next to Raspbian Lite in the list and then click on the “Install” button (refer to Figure 3: OS Install Selection (NOOBS)). NOOBS will now begin the installation process for Raspbian Lite. Please be patient as this process may take around 10-20 minutes.
Once the installation is complete, you will be prompted to log in. The default login credentials for Raspbian are as follows:
– Username: pi
– Password: raspberry
Please note that when entering the password, the characters you type will not be displayed on the screen. From this point onward, the remaining steps in this tutorial will involve using the command line interface.

2) Building the Circuit
The circuit we are constructing is straightforward. In this tutorial, I am using a breadboard to assemble the circuit. However, you have the flexibility to solder the components together or create a custom shield using a protoboard for your Raspberry Pi.
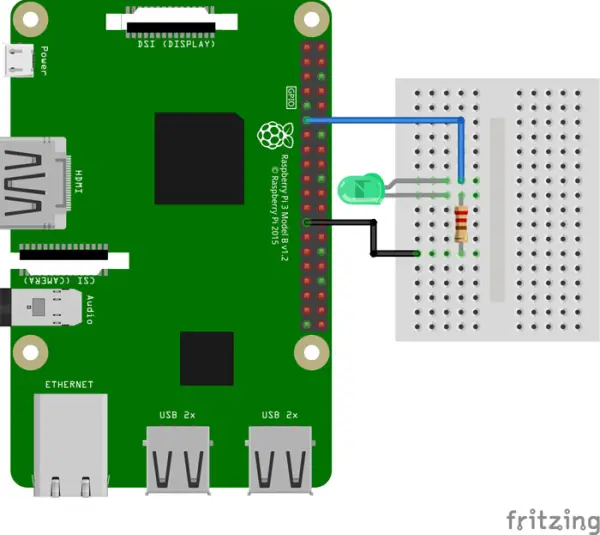
Before physically assembling the circuit, it can be helpful to create a schematic diagram using software like Fritzing (refer to Figure 5: Fritzing Schematic). Fritzing is an open-source software tool for creating schematic diagrams and PCB layouts. If you would like to download Fritzing, you can find it at the following link: [http://fritzing.org/home/](http://fritzing.org/home/).
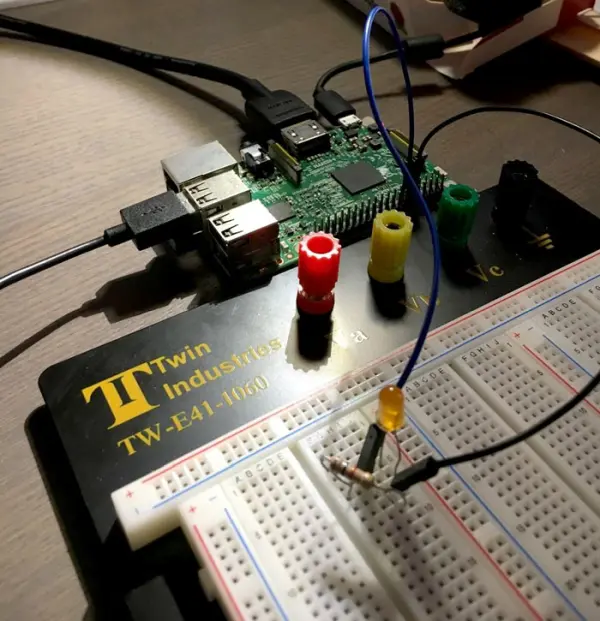
To create the circuit, connect the LED and resistor in series between Pin 11 (GPIO17) and Pin 25 (Ground) on the Raspberry Pi. The resistor serves the purpose of limiting the current flowing through the LED, so it should be chosen appropriately based on the specifications of your LED to avoid damaging it. It is crucial to note that the longer lead of the LED is the positive terminal and should be connected to Pin 11 for proper functionality.
3) Writing the Code
To achieve the LED flashing effect, we will write and execute a Python script. Python is an interpreted programming language. While this tutorial won't delve into the details of Python itself, I will demonstrate how to write a Python script on your Raspberry Pi and run it. This knowledge will enable you to create other Python scripts and utilize the GPIO pins on the Raspberry Pi effectively. Before proceeding, ensure that your Raspberry Pi is connected to the internet.
The initial step involves confirming that you have the latest version of RPi.GPIO installed. RPi.GPIO is a Python library utilized for controlling the GPIO pins of the Raspberry Pi. To update to the latest version, execute the following two commands in the command line:
|
1
2
|
$ sudo apt–get update
$ sudo apt–get install python–rpi.gpio python3–rpi.gpio
|
Once you’ve updated RPi.GPIO, you will make a Python script file. I named mine “LED_blink,” but feel to give it another name. To create the file, type the following in the command line:
|
1
|
$ nano LED_blink.py
|
This will take you to a new window for script editing. Copy the script I’ve placed in the appendix into the editor and save the file.
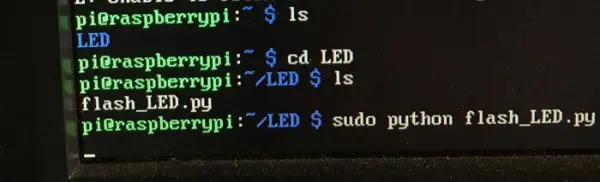
Next, enter the following command in the command line to run the script (refer to Figure 6: Running the Script from Command Line):
$ sudo python flash_LED.py
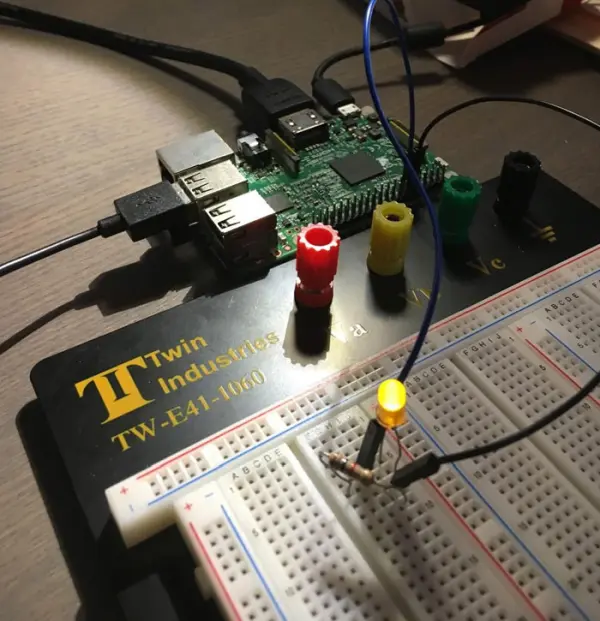
By executing this command, your LED should now begin flashing, with intervals of being off (refer to Figure 6: LED Off) and on (refer to Figure 7: LED On), repeating every second. To stop the script from running, simply press “CTRL + C” on your keyboard.
Congratulations! Your Raspberry Pi is now set up and operational. You can utilize it to execute scripts or run other applications according to your requirements.