An industrial IoT Gateway using Android Things. Part II: Modbus TCP/RTU implementation.
Story
About.
This is the continuation work on the Industrial IoT Gateway project using Android Things. Here you can find the Modbus implementation and further details. If you are not familiar with Modbus protocol, I suggest the technical documentation here as the right place to start. I have quite some interest in Modbus from long time ago, the first time I learn about Modbus was back in the day when I was working for an automation company, It happens that my boss wanted to have the EIA-232 port of an Allen Bradley SLC500 to have Modbus communications, the idea was to control a LED matrix display that operates using Modbus ASCII, it was for an automation fair and part of my initial training. At that time I did it by reading the specs and writing everything in Ladder Logic.
Part 2 will cover Modbus TCP and RTU implementations using Android Things and the Industrial HAT board for Raspberry Pi 3. For a better understanding of the hardware and introduction, please refer to Part 1.
Android Things and Be Smart Combination
I proceed as any good engineer would do when faced with a new project or task, that is, by looking for existing work to start with rather than trying to prove that you are smarter by working from scratch. With Android Things this is even more pleasant since there is a huge Java community backing up with open source projects, some of them even better than commercial products and since I am a big fan of open source projects you guess, I found a nice open source Java Modbus project called jamod. It's pretty good documented, though I couldn't find an integration guide for Android Studio project, so after an insomnia night I finally get it working but not exactly the way I wanted, so then another open source project shows up…
Modbus TCP
After reading a little bit about Jamod library, I decide that implementing Modbus TCP might be the right place to start, taking the easiest path to begin with allow me to make some progress and familiarize my self with the library. RTU is somehow harder in this case because the serial communications depend on the underlying hardware. Jamod uses RxTx Library, which is a native implementation using JNI, and so it makes necessary to port it for the Android Things running hardware. For some people it doesn't sound like a funny work to do, don't care this work covers it too!
I downloaded a snapshot of the Jamod library and after solving some little issues to integrate it under Android Studio, I could make work the TCP part of the library. My first example working code was pretty much what is explained here for a TCP Slave (Server). One difference is that I couldn't start the Slave on the Main Thread without creating an AsyncTask, the problem is explained somehow here. I end up doing this
modbusServerThread = new Thread(new Runnable() {
public void run(){
try {
listener = new ModbusTCPListener(3, InetAddress.getByName(“192.168.1.108”));
} catch (UnknownHostException e) {
e.printStackTrace();
}
listener.setPort(port);
listener.start();
}
});
modbusServerThread.start();
Another issue was that original example didn't specify the IP address when creating the ModbusTCPListener, since I am using the wired Ethernet and the Raspberry Pi 3 has also the WiFi interface, I was really not sure if the problem was about starting the slave at the wrong interface, anyway I didn't spend too much time on this after I discovered a problem that really concerns me.
Modbus Addressing
This is really important because there are many Modbus products out there and many addressing schemes that differ from the original modicom implementation. The problem is that the Modbus protocol per se allows you to have a custom addressing implementation which might require flexibility on our gateway.
What this has to be with jamod? You have to notice the way the library need to be used to define Modbus variables (COIL, REGISTER, etc), for example the following code
spi.addDigitalOut(new SimpleDigitalOut(true));
spi.addDigitalOut(new SimpleDigitalOut(false));
spi.addDigitalIn(new SimpleDigitalIn(false));
spi.addDigitalIn(new SimpleDigitalIn(true));
spi.addDigitalIn(new SimpleDigitalIn(false));
spi.addDigitalIn(new SimpleDigitalIn(true));
spi.addRegister(new SimpleRegister(251));
spi.addInputRegister(new SimpleInputRegister(45));
defines two Discrete Output Coils (address 1 and 2), four Discrete Input Registers (Addresses 1-4) a Holding Analog Output Register (Value 251 at address 1) and one Analog Input Register (value 45 at address 1).
What if I want my Holding Register start at address 500? It happens that I was not the first one to ask this question, so I found that there is a project called j2mod which seems to fix it in an elegant way. I soon realize the jamod was no longer active and new effort was made with j2mod to solve bugs and make improvements like the addressing.
To Port or Not to Port…
After thinking a little bit about the serial problem I was facing and because I really need Modbus RTU, the conclusion was that I need to port either the jamod or the j2mod Serial library to the Android Things Native library. It happens that j2mod uses jSerialComm Library but as an abstract implementation which somehow facilitate migrating to a native library as pointed here.
j2mod under android.
I could have follow a similar approach as my first attempt with jamod to use it in my Android Studio project since snapshots are available here. This time I need to modify the sources, so I end up looking for a good way to have a development environment that allows me to work on the serial port, preferable with the help of Android Studio. I am not very verse in android development so this one took me some time to figure out, and might exist a better solution (any feedback is welcome). I end up cloning the j2mod project, and my first attempt was to compile it using maven. It happen that after you compile and install, the local repository can be use by my Android Things project as the library, which sounds reasonable. Thou it needs a maven build using a console and no IDE. But it's also possible to convert the maven project (so far I know it's maven because it has the pom.xml) into a gradle, which I can try to import in Android Studio. Converting to gradle was simple as doing
gradle init
gradle build
To install on a ubuntu based system just do
sdk install gradle 4.3
So far I have been experiencing problems with building the tests under my debian box, so I disable the tests by doing
gradle build -x test
gradle install -x test
With maven my artifacts were installed on my local default repository path ~/.m2/repository which is defined in file settings.xml under the maven install directory, in my case something as somepath/apache-maven-3.5.2/conf/settings.xml
After the migration from gradle, my artifacts remain to install in same place, really don't know if this was part of the gradle migration or even where is defined, the good thing is that I imported the project using Android Studio and open a console to execute the above commands. Then on another Android Studio window with the Industrial Gateway project I did the following to include the j2mod library.
allprojects {
repositories {
mavenLocal()
}
}
under the project gradle
compile ‘com.ghgande:j2mod:2.3.7-SNAPSHOT'
Back to the example code from jamod, things change a little bit under j2mod, the example code previously seen can be rewritten and now it's possible first to define an arbitrary address for a Holding Register and second we don't need to manually create the Thread anymore.
try {
slave = ModbusSlaveFactory.createTCPSlave(port, 5);
} catch (ModbusException e) {
e.printStackTrace();
}
spi = new SimpleProcessImage(UNITID);
spi.addDigitalOut(new SimpleDigitalOut(true));
spi.addDigitalOut(new SimpleDigitalOut(false));
spi.addDigitalIn(new SimpleDigitalIn(false));
spi.addDigitalIn(new SimpleDigitalIn(true));
spi.addDigitalIn(new SimpleDigitalIn(false));
spi.addDigitalIn(new SimpleDigitalIn(true));
spi.addRegister(40001, new SimpleRegister(85));
spi.addRegister(new SimpleRegister(251));
spi.addInputRegister(new SimpleInputRegister(45));
spi.setRegister(40001, new SimpleRegister(205));
//3. Set the image on the coupler
ModbusCoupler.getReference().setProcessImage(spi);
ModbusCoupler.getReference().setMaster(false);
slave.addProcessImage(UNITID, spi);
try {
slave.open();
} catch (ModbusException e) {
e.printStackTrace();
}
Also notice we don't need to manually specify the server address anymore. An underlying thing I did at this stage was to set the log for j2mod, which might be good for debugging. Original code don't work out of the box under Android Studio, i.e. the function logger.debug(“some log”) do nothing. First I thought it might be related to a configuration such that it was been log to a file instead of Logcat, but then I found other folks with similar issues, the problem seems to be related to the internal function call isLoggable() that always returns false under android.
I fix it by using this fork of the standard slf4j-android logger. Including the following couple of lines to my MainActivity OnCreate Method.
HandroidLoggerAdapter.DEBUG = BuildConfig.DEBUG;
HandroidLoggerAdapter.APP_NAME = “Industrial IoT Gateway”;
Now the LogCat when program runs looks like this
D/LoopbackActivity: Industrial Gateway Created
D/Industrial IoT Gateway*: Creating TCP listener
D/Industrial IoT Gateway*: Running PoolThread
D/Industrial IoT Gateway*: Running PoolThread
D/Industrial IoT Gateway*: Thread[Thread-4,5,main]
D/Industrial IoT Gateway*: Running PoolThread
D/Industrial IoT Gateway*: Running PoolThread
D/Industrial IoT Gateway*: Thread[Thread-8,5,main]
D/Industrial IoT Gateway*: Thread[Thread-6,5,main]
D/Industrial IoT Gateway*: Running PoolThread
D/Industrial IoT Gateway*: Thread[Thread-7,5,main]
D/Industrial IoT Gateway*: Thread[Thread-5,5,main]
D/Industrial IoT Gateway*: Listening to ServerSocket[addr=::/::,localport=5002] (Port 5002)
The TCP test snippet is below
try {
slave = ModbusSlaveFactory.createTCPSlave(port, 5);
} catch (ModbusException e) {
e.printStackTrace();
}
spi = new SimpleProcessImage(UNITID);
spi.addDigitalOut(new SimpleDigitalOut(true));
spi.addDigitalOut(new SimpleDigitalOut(false));
spi.addDigitalIn(new SimpleDigitalIn(false));
spi.addDigitalIn(new SimpleDigitalIn(true));
spi.addDigitalIn(new SimpleDigitalIn(false));
spi.addDigitalIn(new SimpleDigitalIn(true));
spi.addRegister(40001, new SimpleRegister(85));
spi.addRegister(new SimpleRegister(251));
spi.addInputRegister(new SimpleInputRegister(45));
spi.setRegister(40001, new SimpleRegister(205));
spi.setRegister(40002, new SimpleRegister(26));
//3. Set the image on the coupler
ModbusCoupler.getReference().setProcessImage(spi);
ModbusCoupler.getReference().setMaster(false);
slave.addProcessImage(UNITID, spi);
try {
slave.open();
} catch (ModbusException e) {
e.printStackTrace();
}
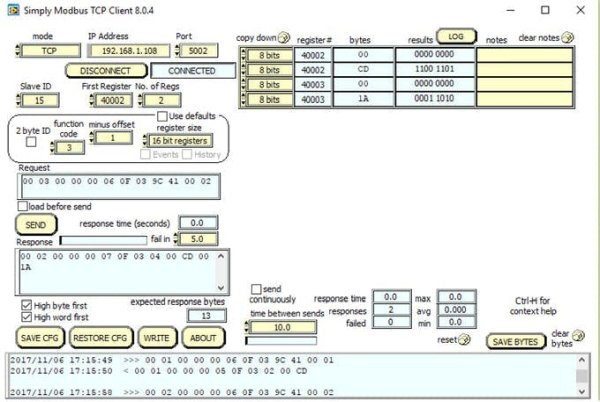
I am defining a couple of holding registers at address 40001, then I confirm my Modbus Server is working by using a demo software called Simply Modbus that allows me to do some requests before demo version refuse to work. Here is a screenshot that read the two values at 40001 and 40002, notice those are 16 bit values.
Modbus Over Serial Line
After setting up j2mod source with android, a working log and sacrifice some of my free weekend time I have Modbus over serial line working. To port from jSerialComm to the Android Things UART Peripheral I/O library a couple of files need modifications.
First SerialConnection.java that holds most of the implementation by overriding methods from AbstractSerialConnection.The open method becomes
@Override
public void open() throws IOException {
List<String> deviceList = mService.getUartDeviceList();
List<String> portList = mService.getGpioList();
if (deviceList.isEmpty()) {
logger.debug(“No UART port available on this device.”);
} else {
logger.debug(“List of available ports: “ + deviceList);
}
if (portList.isEmpty()) {
logger.debug(“No GPIO port available on this device.”);
} else {
logger.debug(“List of available ports: “ + portList);
}
parameters.setPortName(deviceList.get(0));
// get the Serial Port Mode – RS-232 or RS-485
rxSelGpio = mService.openGpio(“BCM27”);
rxSelGpio.setDirection(Gpio.DIRECTION_OUT_INITIALLY_HIGH);
rxSelGpio.setActiveType(Gpio.ACTIVE_HIGH);
rxSelGpio.setValue(true);
// this works for pi3 since first item is UART0
serialDevice = mService.openUartDevice(deviceList.get(0));
// Configure the UART
serialDevice.setBaudrate(parameters.getBaudRate());
serialDevice.setDataSize(parameters.getDatabits());
serialDevice.setParity(parameters.getParity());
serialDevice.setStopBits(parameters.getStopbits());
if (Modbus.SERIAL_ENCODING_ASCII.equals(parameters.getEncoding())) {
logger.debug(“ASCII ENCODING”);
transport = new ModbusASCIITransport();
}
else if (Modbus.SERIAL_ENCODING_RTU.equals(parameters.getEncoding())) {
logger.debug(“RTU ENCODING”);
transport = new ModbusRTUTransport();
}
else {
transport = new ModbusRTUTransport();
logger.warn(“Unknown transport encoding [{}] – reverting to RTU”, parameters.getEncoding());
}
transport.setEcho(parameters.isEcho());
transport.setTimeout(timeout);
// Open the input and output streams for the connection. If they won't
// open, close the port before throwing an exception.
transport.setCommPort(this);
}
The Android Things library has some differences with the original. For example there isn't method to check if data is available. In this case I notice that the usage was only in a method called clearInput() in ModbusSerialTransport.java, as far as I understand its used to flush the received serial buffer, in this case my workaround was to read from the serial port until it returns empty, below is the code.
void clearInput() throws IOException {
int len = 0;
while(commPort.bytesAvailable() > 0){
len += 1;
};
if (logger.isDebugEnabled()) {
logger.debug(“Clear input done”);
}
}
Another more important difference is the lack of a Timeout in the Android Things UART library, for example you specify it at configuration time when opening the port. When you do a read for certain number of bytes, the read call blocks until all bytes are received or a timeout expires. In this case Android Things read returns immediately, so you have to continuously poll for received data in order to replace the original library code. It was actually what I did since I was not willing to deal with callbacks which is a major paradigm change in how j2mod library already works. Here is the snippet to read.
@Override
public int readBytes(byte[] buffer, long bytesToRead) {
int index = 0;
byte[] tmpbuf = new byte[1];
int timeout = 3000;
try {
while(index < bytesToRead) {
if(serialDevice.read(tmpbuf, 1) > 0){
buffer[index] = tmpbuf[0];
index += 1;
continue;
}else{
try {
Thread.sleep(100);
}
catch (InterruptedException ex) {
logger.debug(“InterruptedException”);
}
timeout -= 100;
if(timeout <= 0)
break;
}
}
} catch (IOException e) {
logger.debug(“readBytes problem: {}”, e.getMessage());
}
return index;
}
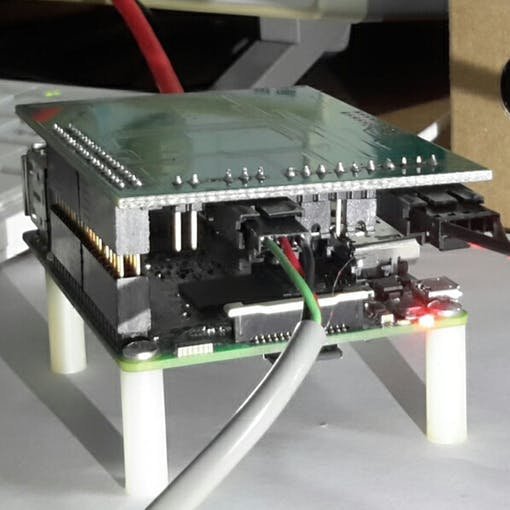
Another subtle detail is related more to the Pi Industrial Hat, because I wanted to have both RS-232 and RS-485 on the same board, I did the board in a flexible way. The jumpers to select the active serial mode are located at the PCB edge, near the power and serial connectors, so they can be accessible from the outside, that way you don't need to take pi and hat apart.
Here is a picture of how jumpers looks in place for RS232 configuration.
But in order to share the Rx lines at the Pi side, I use a 2 Input Non Inverter multiplexer, which I need to control with a GPIO, in this case GPIO27. If set to a high level the RS232 Rx is selected, a low level select the RS485 receiver. This is necessary since the transceiver are located towards the double row header, which is nearly impossible to access when boards are assembled. A test code that read two holding registers is shown below.
master = new ModbusSerialMaster(params);
try {
master.connect();
} catch (Exception e) {
logger.error(“Cannot connect to slave – %s”, e.getMessage());
}
try {
Register[] reg = new Register[1];
int addr = 1;
reg = master.readMultipleRegisters(1, addr, 2);
logger.debug(“Register at address {} = {}”, addr, reg);
} catch (ModbusException e) {
logger.error(“Cannot connect to slave – %s”, e.getMessage());
}
Here is the LogCat output
D/LoopbackActivity: Industrial Gateway Created
D/Industrial IoT Gateway*: List of available ports: [UART0, UART1]
D/Industrial IoT Gateway*: List of available ports: [BCM10, BCM11, BCM12, BCM13, BCM14, BCM15, BCM16, BCM17, BCM18, BCM19, BCM2, BCM20, BCM21, BCM22, BCM23, BCM24, BCM25, BCM26, BCM27, BCM3, BCM4, BCM5, BCM6, BCM7, BCM8, BCM9]
D/Industrial IoT Gateway*: RTU ENCODING
D/Industrial IoT Gateway*: Clear input done
D/Industrial IoT Gateway*: Sent: 01 03 00 01 00 02 95 CB
D/Industrial IoT Gateway*: Response: 01 03 04 00 2D 00 7E EA 1A
D/LoopbackActivity: Register at address 1 = [45, 126]
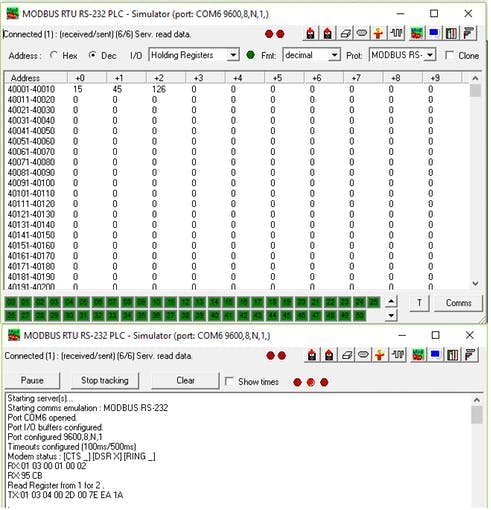
And here the ModSim simulator image on my windows box that shows the register definition and the TX/Rx bytes.
Real Hardware – Industrial Power Meter
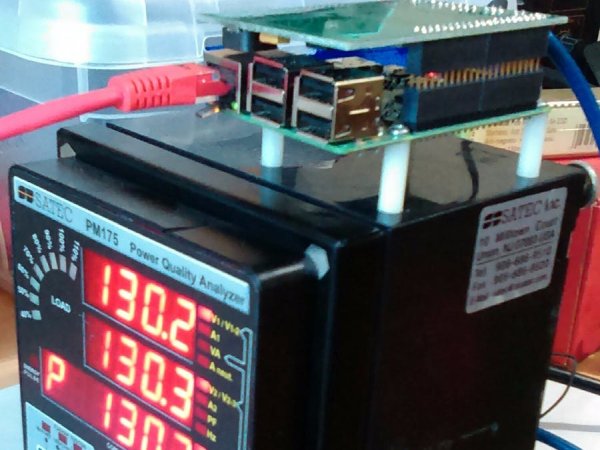
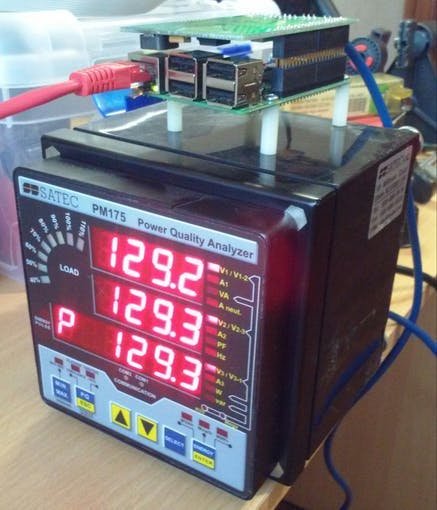
Simulator prove that serial RS-232 Modbus RTU is working, now we need to test with a real hardware. For this I have a SATEC power meter PM175, a standard unit that has Modbus serial interfaces. It has two COM ports, COM1 has RS-232 and RS-485 in a db-9 connector. COM2 is a Phoenix Contact terminal block connector with RS-485. To configure the Serial Port you must use a software from Satec or use the front panel, mine was already configured.
So far I have used RS-232 with simulator, I have an FTDI RS-485 converter to test with before attempting with the SATEC meter, but confident of my work I decide to go directly against the meter. Because I decide to use a two wire RS-485 for the Industrial Hat, which means is a half duplex, first thing I need to do is to control Tx and Rx to avoid enable both at the same time. For this the Industrial Hat connects Pi3 GPIO27 to the Receiver enable of RS-485 transceiver, also for Tx the GPIO22 is used to enable the Driver. Thi could have been done using a single GPIO, leaving the receiver always enable. Here is how it looks the setup.
For the tests I have wired the Satec meter as single-phase so all the three phase readings should be almost the same.
The short story about RS-485.
After some debugging I end up realizing that RS-485 using the two wire circuit was not possible with the current Android Library capabilities. The problem is that you need to enable the driver during transmission and at the same disable the receiver, after a modbus PDU frame has been sent, the master should disable the driver and enable the receiver. The process demand precise timing or synchronization because the other peer as soon as it process the request will try to respond and serial bus should be in an idle state for the slave to send the response without data corruption.
The problem I found was that the serial write command seems to buffer data, so it does not block, I realize this because I wrote a couple of helpers functions to enable and disable things as needed, i.e.
private void enableTransmit(){
try {
// disable receiver
rxSelGpio.setValue(true);
// enable driver
txSelGpio.setValue(true);
} catch (IOException e) {
e.printStackTrace();
}
}
private void enableReceive(){
try {
// disable driver
txSelGpio.setValue(false);
// enable receiver
rxSelGpio.setValue(false);
} catch (IOException e) {
e.printStackTrace();
}
}
Then during transmission only the driver is enable, the rest of the time it's safe to enable the receiver while driver is disable, the writeBytes becomes
@Override
public int writeBytes(byte[] buffer, long bytesToWrite) {
enableTransmit();
int n = 0;
try {
n = serialDevice.write(buffer, (int) bytesToWrite);
} catch (IOException e) {
logger.debug(“writeBytes problem: {}”, e.getMessage());
}
enableReceive(); // this will enable receiver and disable driver
return n;
}
As you can see by inspecting the code above, if the serial function write does not block, and so there is some data in buffer, the next instruction enableReceive will disable the driver making the request incomplete or bad for the slave.
I did some tests to add a short delay before the driver is disable, but in this case the problem is that the delay will vary with the message length which makes almost impossible to have a reliable operation, and the reason is because at the same time when the driver is disable the receiver is also enable.
I notice that without delay the serial stream never get to slave (pm175 meter), if delay is too long I never get response since probably the receiver was disable.
I tried to use the flush function of UART driver, thinking that flush might wait for serial tx data to complete or leave the buffer without success and without more documentation from Android close code it was not possible to know. Also I confirm all this because the PM175 meter has two LED for COM Port activity (COM1 and COM2), without delay before disable driver the COM2 port never blinks. With a large delay (5 ms i.e. enough for 8 chars at 19200) the COM port activity LED blinks but no response is received.For now it seems safe to rework the hardware for a 5 wire RS-485 instead of a three wire. But this is not the most common topology used for this buses.
Finally this issue here explain the above problem as result of Android Thing lacking features for the UART library.
Not All Is Lost…
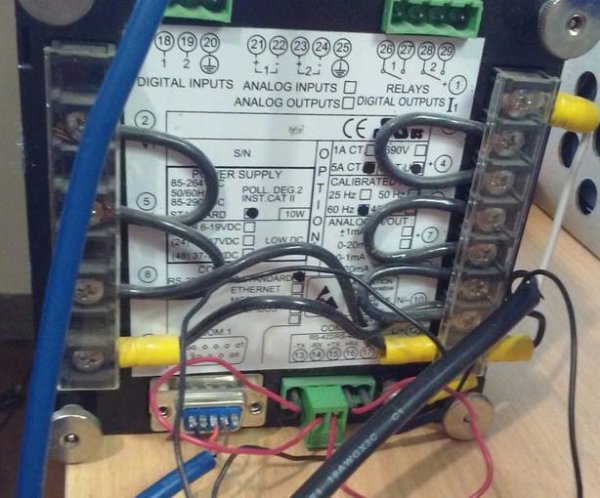
Since RS-232 don't suffer from that problem, I decide to test with it using COM1 of Satec meter. Here is how the wiring looks like.
The test function to read the voltage at the three phases is below.
ModbusSerialMaster master;
SerialParameters params = new SerialParameters();
params.setEncoding(Modbus.SERIAL_ENCODING_RTU);
params.setBaudRate(19200);
params.setParity(“none”);
master = new ModbusSerialMaster(params);
try {
master.connect();
} catch (Exception e) {
logger.error(“Cannot connect to slave – %s”, e.getMessage());
}
try {
int len = 3;
Register[] reg;
int addr = 256;
reg = master.readMultipleRegisters(1, addr, len);
logger.debug(“Register at address {} = {}”, addr, reg);
} catch (ModbusException e) {
logger.error(“Cannot connect to slave – %s”, e.getMessage());
}
My satec was configured with 19200, 8N1 for RTU. In that test snippet code I am reading three (3) Holding Registers (FC=3) from address 256. For details about modbus mapping go to Satec product web page, below is an extract form documentation that shows what is defines from address 256.
As you can notice the first three registers are the three phase voltages following by the three phase currents. I am not getting Current values since I haven't a current transformer at hand to wire it up. Nonetheless I can verify the voltage measurement. Here is the Logcat output of test snippet.
Read More Detail :Industrial IoT Gateway (Part II – Android Things-Based)


