
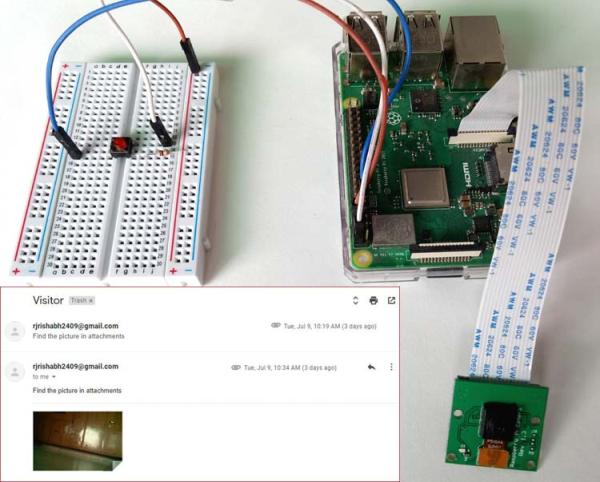
Nowadays, security is a major concern, and the market offers various surveillance and security systems. However, these systems can be expensive and sometimes present unresolved issues. In the past, we developed a surveillance camera capable of streaming live video to an IoT cloud. Today, we will introduce a cost-effective solution: a Raspberry Pi-based Smart Wi-Fi doorbell. This system is designed to send a picture of the visitor via email when the doorbell switch is pressed.
To capture the image, we utilize a PiCamera connected to the Raspberry Pi. Alternatively, if a PiCamera is unavailable, a USB webcam can be used as a substitute. This system is suitable for installation at the main entrance of your home or office, allowing you to monitor it from anywhere in the world via the internet.
Requirements
- Raspberry Pi with Raspbian OS Installed in it.
- Pi Camera or USB webcam
- Push button
- Jumper wires
In this tutorial, we will utilize SSH to access our Raspberry Pi from a laptop. If you have a monitor available, the setup process will be straightforward. However, if you don't have a monitor, you can either configure the Raspberry Pi in headless mode or use a VNC server to access the Raspberry Pi's desktop on your laptop.
Raspberry Pi is highly favored for developing IoT-based projects due to its comprehensive support for the Internet of Things. This palm-sized computer comes equipped with built-in features such as Wi-Fi, Bluetooth, USB ports, audio/video ports, HDMI ports, and a camera port. For a collection of Raspberry Pi-based IoT projects, please explore the available options here.
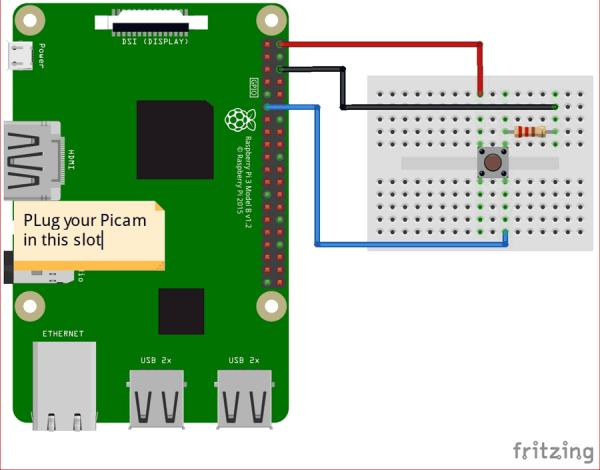
Connection Diagram
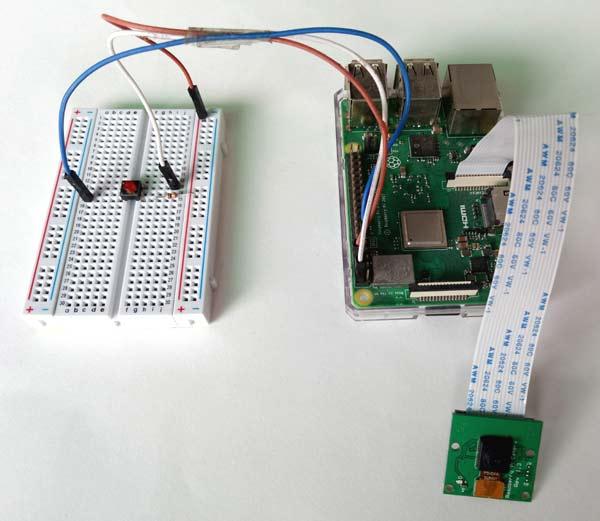
The circuit diagram for the Raspberry Pi Smart Doorbell is incredibly straightforward. All you need to do is connect a button to a GPIO pin and attach the Pi Camera to the designated camera slot.
Setup Pi Camera or USB webcam with Raspberry Pi
PiCamera:
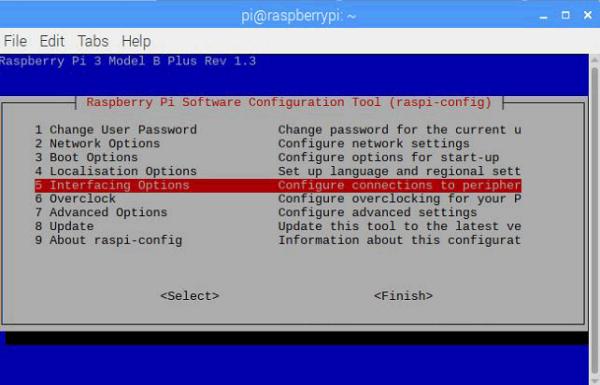
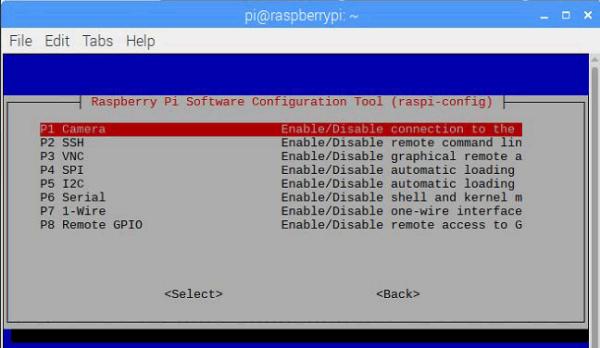
If you are using the Pi Camera, you will need to enable the camera interface through raspi-config. To do this, run the command “sudo raspi-config” and navigate to the Interfacing options.
2. Then select the Camera option and Enable it on the next window and restart the Pi.
3. Now, test the camera by capturing a photo using below command.
To capture an image using the Pi Camera, you can utilize the following command: “raspistill -o image.jpg”. If you successfully obtain an image in the Pi directory, you are good to proceed. Otherwise, please ensure that you check the camera strip and camera module for any issues.
USB cameras
If you are using a USB webcam, you will need to install certain packages to enable webcam functionalities. Execute the following command to install the necessary package:
sudo apt-get install fswebcam
To test the camera's functionality, you can capture a photo using the following command:
fswebcam image.jpg
You can use the above command as a replacement for the PiCamera functionality in the final code.
Now that the hardware setup is complete, it's time to install SMTP libraries and configure a Google account.
Installing SMTP on Raspberry Pi to send Emails
Simple Message Transfer Protocol (SMTP) is a communication protocol specifically designed for sending emails. It provides a convenient and straightforward solution for sending emails through command-line interfaces or Python scripts. To enable email functionality using SMTP on your Raspberry Pi, you will need to install certain libraries and packages.
Installing SMTP libraries
- In the new version of Raspbian, the SMTP library packages are typically already installed. However, to ensure that all packages are installed correctly, you can reinstall them. Start by updating and upgrading the Raspbian OS using the following commands:
sudo apt-get update
sudo apt-get upgrade

2. Now, install SMTP library packages using  following commands
sudo apt-get install ssmtp
sudo apt-get install mailutils
Modify Security Settings in Google Mail account
To enable the “Allow less secure apps” permission in your Google account, follow the steps below:
- Sign in to your Gmail account using your login credentials.
- Click on your profile picture, located in the top right corner of the page.
- From the drop-down menu, select “Google Account.”
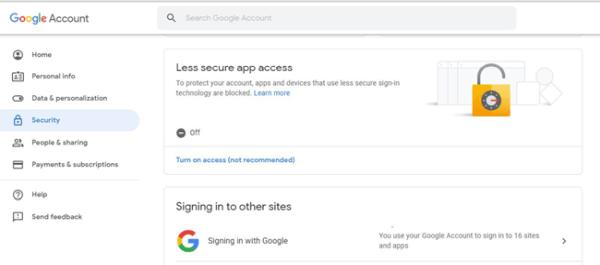
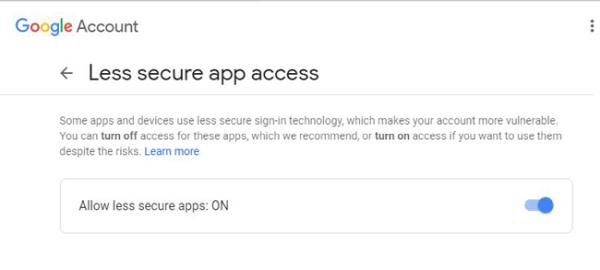
To enable this feature, click on the “Allow less secure apps” option.
Code and Explanation
To comprehend the code's functionality, we will explain the working of this Python script. Before we begin, here is a quick recap: the purpose of this script is to send an email with the photo of a visitor as an attachment whenever the doorbell switch is pressed. The Pi camera will capture the photo, which will then be sent to the homeowner via email.
- Open your preferred text editor on your Raspberry Pi and import the necessary libraries for the PiCamera, RPi GPIOs, SMTP, and time.
import os
import picamera
import RPi.GPIO as GPIO
import smtplib
from time import sleep
- Next, import all the modules required for sending emails. To compose an email with plain text, attachments, and subjects, we need a separate module that handles the creation of the entire email.
from email.MIMEMultipart import MIMEMultipart
from email.MIMEText import MIMEText
from email.MIMEBase import MIMEBase
from email import encoders
- Create variables to store your email address, the recipient's email address, and your password as shown below. Replace the placeholders with your actual email credentials:
sender = '[email protected]'
password = 'gmail password'
receiver = '[email protected]'
- To save the captured photos in a specific directory with different names, assign a folder path and a prefix name as follows:
dir = './visitors/'
prefix = 'photo'
- Set the pin mode and pin number to attach a push button that will act as the doorbell switch. This can be done using the following code:
GPIO.setwarnings(False)
GPIO.setmode(GPIO.BOARD)
GPIO.setup(15, GPIO.IN)
- Now, let's create a function to capture photos. Within this function, we will check if the specified directory exists. If it doesn't, we will create the directory. Here is the code:
def capture_img():
if not os.path.exists(dir):
        os.makedirs(dir)
Assign a file name and sort it using glob and find the largest ID of existing images and Start new images after this ID value.
 files = sorted(glob.glob(os.path.join(dir, prefix + '[0-9][0-9][0-9].jpg')))
 count = 0
Let's add code to grab the count from the last filename in the directory. This will help us generate unique names for each captured photo. Here's the code snippet:
if len(files) > 0:
     count = int(files[-1][-7:-4])+1
Let's add code to capture the photo, give it a unique name, and save it in the specified folder. Here's an updated version of the function:
filename = os.path.join(dir, prefix + '%03d.jpg' % count)
with picamera.PiCamera() as camera:
pic = camera.capture(filename)
7. Now, make another function to send mail. In this function we will attach subject, body and attachments and then send all the content to the receiver using SMTP.
def send_mail():
    msg = MIMEMultipart()
    msg['From'] = sender
    msg['To'] = receiver
    msg['Subject'] = New Visitor'
    body = 'Picture is Attached.'
    msg.attach(MIMEText(body, 'plain'))
    attachment = open(filename, 'rb')
..
..
    msg.attach(part)
    server = smtplib.SMTP('smtp.gmail.com', 587)
    server.starttls()
    server.login(sender, password)
    text = msg.as_string()
    server.sendmail(sender, receiver, text)
    server.quit()
- Finally, let's add code to read the push button value. When the value goes high, the Raspberry Pi will call the
capture_photos()function to capture the image of the visitor. It will then send an alert email with the picture of the visitor as an attachment using thesend_email()function. Here's the updated code:
This code continuously checks the state of the push button using a loop. When the button is pressed (logic depends on button type – HIGH or LOW), it captures the photo using capture_photos() and sends an email using send_email() with the captured photo as an attachment. The loop ensures that the Raspberry Pi constantly monitors the button state for any visitor interactions.
Testing the PiCamera Doorbell
After wiring the complete code, save the file with the .py extension. You can execute the script using the following command:
python filename.py
If there are no errors in the code, press the push button. After approximately 4-5 seconds, you should receive an email with the photo attached.
Code
import os
import glob
import picamera
import RPi.GPIO as GPIO
import smtplib
from time import sleep
from email.MIMEMultipart import MIMEMultipart
from email.MIMEText import MIMEText
from email.MIMEBase import MIMEBase
from email import encoders
sender = ‘[email protected]'
password = ‘********'
receiver = ‘[email protected]
DIR = ‘./Visitors/'
prefix = ‘image'
GPIO.setwarnings(False)
GPIO.setmode(GPIO.BOARD)
GPIO.setup(15, GPIO.IN)
def send_mail(filename):
msg = MIMEMultipart()
msg[‘From'] = sender
msg[‘To'] = receiver
msg[‘Subject'] = ‘Visitor'
body = ‘Find the picture in attachments'
msg.attach(MIMEText(body, ‘plain'))
attachment = open(filename, ‘rb')
part = MIMEBase(‘application', ‘octet-stream')
part.set_payload((attachment).read())
encoders.encode_base64(part)
part.add_header(‘Content-Disposition', ‘attachment; filename= %s' % filename)
msg.attach(part)
server = smtplib.SMTP(‘smtp.gmail.com', 587)
server.starttls()
server.login(sender, password)
text = msg.as_string()
server.sendmail(sender, receiver, text)
server.quit()
def capture_img():
print ‘Capturing’
if not os.path.exists(DIR):
os.makedirs(DIR)
files = sorted(glob.glob(os.path.join(DIR, prefix + ‘[0-9][0-9][0-9].jpg')))
count = 0
if len(files) > 0:
count = int(files[-1][-7:-4])+1
filename = os.path.join(DIR, prefix + ‘%03d.jpg' % count)
with picamera.PiCamera() as camera:
pic = camera.capture(filename)
send_mail(filename)
while True:
in = GPIO.input(11)
if in == 0:
print “Waiting”, i
sleep(0.4)
elif in == 1:
print “Captured->Sending”, i
capture_img()