
When my 5-year-old son started showing an interest in Space and Planets, I was prompted to start building him a spacecraft simulator. He also started asking questions about chemicals, so combining the two, I set him aboard a space shuttle that allows him to explore planets and find minerals on them. As he explores the solar system (and our house), he learns more about what makes up the world and the other planets!
Supplies
- Raspberry Pi
- Adafruit PCA9685 PWM Servo Driver
- Various LEDs
- Enough 330ohm resistors
- Wire
- Servo motors
- Soldering Iron
- Wirewrap tool
- Old Laptop
- Old Mobile Phone
- Cardboard
- Craft tools
- Printer
Step 1: Construct the Command Panel
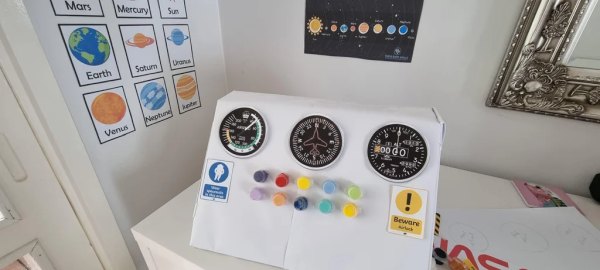
Using Cardboard, fashion a box to serve as the Shuttle's control panel. Get your kids involved and have them decorate to their heart's content — this is their space ship after all!
Step 2: Wire Up Your LEDs and Servo Motors
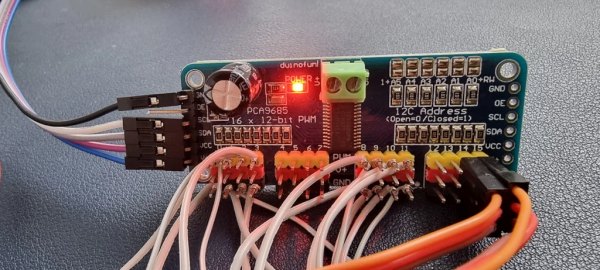
Connect the PCA9685 to your raspberry pi's I2C port.
Connect the Raspberry PI's 5v to the PCAs V+ pin. Note that depending on the LEDs and Servo's you've selected, you may be better off with an external 5v power supply for the PCA9685's V+.
Solder resistors to each LED, then connect them to the output pins to the PWM output pins.
You may choose to solder them, but I chose to wirewrap them, for ease of removal later on.
Connect the servo motors to the appropriate PWM ports — currently channels 14 and 15 (you may need to change ports in the source code otherwise).
Step 3: Install the Electronic Components in the Command Panel
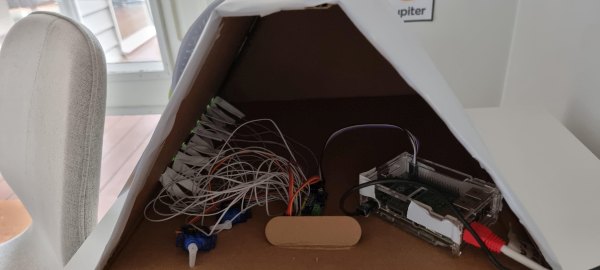
Carefully place the LEDs and Servo motors in the appropriate locations. Place the relevant dials on the servo motors and test them before sealing the box.
Step 4: Install Kids-In-Space Simulator Code
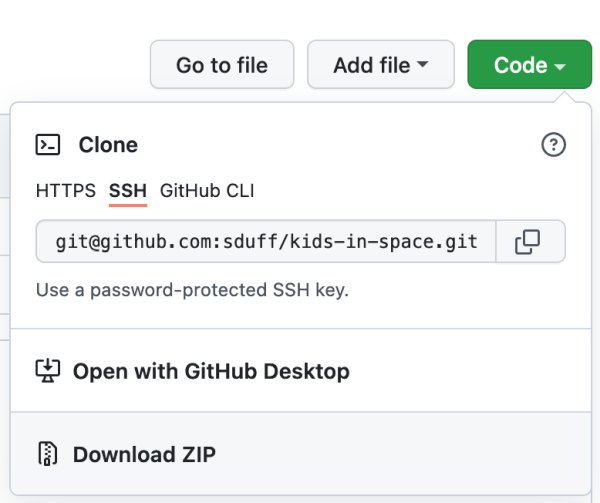
Install the kids-in-space code on your raspberry pi
Use your web browser to go to https://github.com/sduff/kids-in-space and download the ZIP file containing all the code and data you'll need.
Follow the instructions in the repo to install all dependencies. You will need to make sure you have python v3 installed.
Step 5: Run the Simulator
You need to be root to access the GPIO pins on your raspberry pi, so you will need to run the simulator as the root user, or via sudo.
sudo python kids-in-space.py
OR
sudo bash
./kids-in-space.py
This will start the HTTP server running on port 8000. You may need to check firewalls to ensure that this port is accessible remotely — or if you use the raspberry pi web browser, this may not be an issue.
Step 6: Access the Simulator From a Web Browser
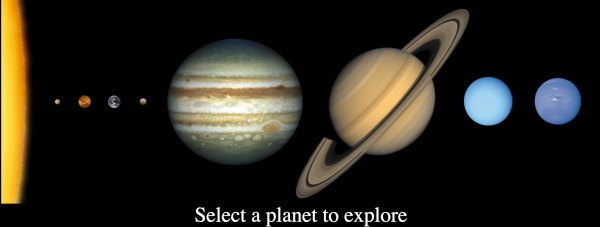
On the laptop, connect to port 8000 of your raspberry pi, and you'll be greeted with the Intro page. Select Cockpit on the laptop, and you'll arrive at the solar system page.
Step 7: Access the Tricoder From Your Mobile Phone
On the mobile phone (tricorder), connect to port 8000 of your raspberry pi, and you'll be greeted with the Intro page. Select tricorder on the phone, and you'll be prompted to allow access to your camera (this is used for scanning QR codes). Accept, and your tricorder will be ready to go.
Step 8: Print QR Codes for Various Elements and Molecules
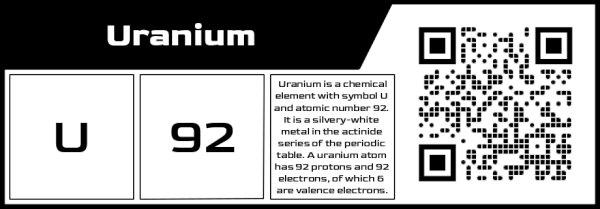
In the GitHub repository, there are a number of QR codes representing various elements and molecules. Print them out and attach them to places associated with that molecule.
For example,
- Helium – on a helium-filled balloon
- H20 – near the Kitchen Sink
- CH4 (Methane) – in your toilet 🙂
The idea is that your child will associate these molecules with their locations, which will likely improve their memory and recall.
Step 9: Buckle In!
It's time for the maiden voyage. Have your child start exploring the galaxy and the elements of each planet. You may need to guide them through the process once or twice, but they'll soon get the hang of it and enjoy the planet-hopping and discovering more chemicals over time.
Step 10: Next Steps
The next step will be to add more functionality to the control panel. I ordered a bunch of buttons for this project, but recent postage problems in Australia mean they haven't arrived in time 🙂 Controlling the ship and scanning planets with physical buttons will much improve the interactivity of the simulator.
Replace all mouse interactivity with a joystick, for real flight control feel.
Voice Recognition — have some back and forth between the captain (my Son!) and his crewmates. Not as difficult to imagine, the API already exists.
More lessons! Not just chemistry, but using Maths to fight off Space Pirates, Spelling and Grammar to buy and sell from friendly aliens, maybe even some basic LOGO for driving a rover around a planet. A lot of opportunities to extend this to other areas.
Teamwork — having more stations to interact with means my child can play spaceship with friends, and work together to solve mishaps when they happen.