
Learn how to install the Snips.ai offline voice assistant, through the SAM CLI tool, for the MATRIX Creator and MATRIX Voice.
THIS GUIDE HAS BEEN DEPRECATED
The Snips Console has been closed and cannot be used anymore. If you're looking for an alternative voice assistant, you can follow our guide here.
Required Hardware
Before getting started, let's review what you'll need.
- Raspberry Pi 3 (Recommended) or Pi 2 Model B (Supported).
- MATRIX Voice or MATRIXCreator – Raspberry Pi does not have a built-in microphone, the MATRIX Voice&MATRIXCreator each have an 8 mic array – Buy MATRIX Voice or Buy MATRIX Creator.
- Micro-USB power adapter for Raspberry Pi.
- Micro SD Card (Minimum 8 GB) – An operating system is required to get started. You can download Raspbian Stretch and use the guides for Mac OS,Linux and Windows in the Raspberry Pi website.
- External Speaker with 3.5 mm audio cable.
- A USB Keyboard & Mouse, and an external HDMI Monitor – we also recommend having a USB keyboard and mouse as well as an HDMI monitor handy. You can also use the Raspberry Pi remotely, see this guide from Google.
- Internet connection (Ethernet or WiFi)
- (Optional) WiFi Wireless Adapter for Pi 2. Note: Pi 3 has built-in WiFi.
Let's Get Started
If you haven't already, be sure to setup your Raspberry Pi with your MATRIX Device.
Once setup, ensure you enable SSH on your Raspberry Pi. This allows the SAM CLI tool to connect to your Pi.
1. Installing the MATRIX Kernel Modules (Raspberry Pi)
Run the following commands in your Raspberry Pi's terminal to add the MATRIX repository & key and update your repository packages.
curl https://apt.matrix.one/doc/apt-key.gpg | sudo apt-key add -echo "deb https://apt.matrix.one/raspbian $(lsb_release -sc) main" | sudo tee /etc/apt/sources.list.d/matrixlabs.listsudo apt-get updatesudo apt-get upgradeReboot your device.
sudo rebootInstall the MATRIX Kernel modules. Aside from a few other changes, this allows the microphones on your MATRIX device to register as an ALSA microphone on your Raspberry Pi.
sudo apt install matrixio-kernel-modulesYou will then need to reboot a second time.
sudo rebootThese next commands will test your microphones by raising your output volume, creating a 5 second long audio recording, and then playing that recording.
Make sure you have a device that can output audio plugged into your Raspberry Pi's HDMI or Audio Jack.
amixer set PCM 100% && arecord recording.wav -f S16_LE -r 16000 -d 5 && aplay recording.wav2. Installing the SAM CLI Tool (Personal Computer)
On your personal computer, you will be using the SAM CLI tool to create, manage and deploy your Snips assistants, to configure your hardware, to view the logs of your assistants on the Raspberry, as well as to run your application locally for quick prototyping.
On your personal computer, you'll need to install Node.js as a prerequisite. Once installed, you can install SAM into your computer with the following command.
macOS / Linux
sudo npm install -g snips-samWindows
Right click your Command Prompt and click “Run As Administrator”, before running the command below.
npm install -g snips-sam3. Installing Snips.ai Through SAM (Personal Computer)
Although the installation will be on your Raspberry Pi, Snips will be installed through the SAM CLI tool from your personal computer. Open your personal computer's terminal and input the following commands.
This command should log all of the Raspberry Pis on your network with their IP address and hostname. If no devices are shown, you can follow this guide as an alternative for obtaining your Pi's IP address.
sam devicesConnect to your Raspberry Pi through one of the following:
- Using your Pi's hostname.
sam connect raspberrypi.local- Or your Pi's IP address.
sam connect 192.168.1.182You'll then be prompted to insert a username and password. The default login is as follows:
- Username: pi
- password: raspberry
After you're connected use the init command, from your personal computer, to install Snips onto your Raspberry Pi.
sam init4. Configuring Snips.ai (Raspberry Pi)
With Snips.ai properly installed, the next step is to edit the snips.toml file for configuring the mics.
On your Raspberry Pi's terminal, run the following:
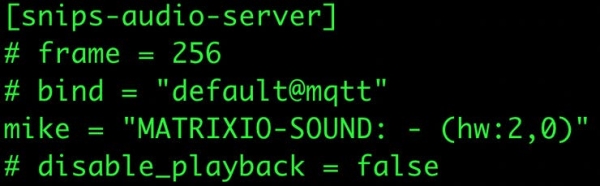
sudo nano /etc/snips.tomlScroll down to where you see [snips-audio-server] and replace
# mike = "Built-in Microphone"
with the following:
mike = "MATRIXIO-SOUND: - (hw:2,0)"
Press ctrl+x, press y, and then press the enter key to save your changes.
5. Testing Snips.ai (Personal Computer)
Through your personal computer's terminal, you can use SAM to test the speaker and microphone of your Raspberry Pi.
- Testing your Raspberry Pi's speakers
sam test speaker- Testing the microphones on your MATRIX device
sam test microphoneIf both commands seem to work, you've properly configured Snips.ai on your Raspberry Pi!
This final command will test if Snips.ai is properly working by installing a demo assistant for the weather.
sam install demoOnce installed, test the assistant by saying
"Hey Snips!"
"What will the weather be like in Madagascar in two days?"
The response from Snips should be:
"You asked for the weather in Madagascar in two days."
6. Next Steps
You can now follow the Snips.ai guide with your now configured Raspberry Pi and MATRIX device.
Follow the guide below to create & deploy your own assistant!
https://docs.snips.ai/articles/console/actions
Troubleshooting: Known Workarounds for Audio Playback Issues
If, after following the above steps, your Snips assistant is freezing when attempting to playback audio as indicated by sam watch, try the following workaround.
In the command line, edit the /etc/asound.conf file
sudo nano /etc/asound.confReplace the entire file with the code below
pcm.!default { type asym capture.pcm "mic" playback.pcm "speaker"}pcm.mic { type softvol slave { pcm "array" } control { name "MicArray Master" card "MATRIXIOSOUND" }}pcm.speaker { type plug slave { pcm "hw:0,0" rate 16000 }}pcm.array { type plug slave { pcm "hw:MATRIXIOSOUND" }}Then enter into the /etc/snips.toml file and scroll down to the section with [snips-audio-server]
sudo nano /etc/snips.tomlCopy-paste the following line at the end of that block
portaudio_playback = "default"Your [snips-audio-server] section should now look like below.