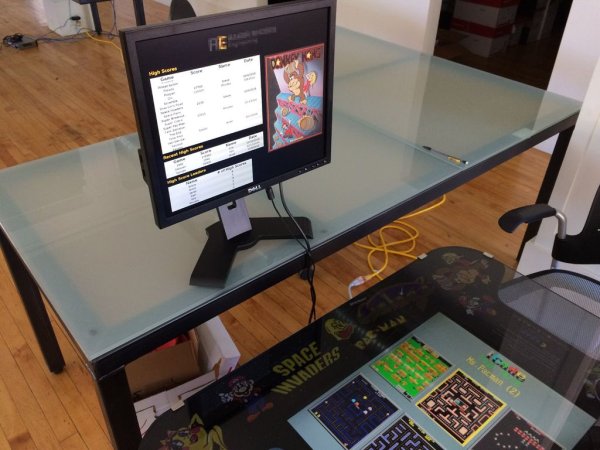
This Instructable will show you how to use a Raspberry Pi board with an existing computer monitor to create an arcade game high score display for your home or office. You and your family or your co-workers can keep an eye on the latest high scores and get into a little trash talkin'. Since the display pulls all of the information it needs from the internet, you can have multiple displays showing the same information or several with the differences you decide.
If you find this Instructable helpful then please vote for this in the Pie Day Contest. Thanks.
This project is a great use of an older 4:3 aspect ratio computer monitor and the low priced Raspberry Pi board, doesn't require any tools, and can create a little competition.
See the video of the display for a demo. Expand the video to full screen and set the quality to the top setting to see a better representation of the display.
FYI – The little blue square in the upper left corner is what is shown in the preview mode of the Presentation when you are viewing the display from the Rise Vision web site.
Step 1: Materials
Materials I used include the following:
- Raspberry Pi
- Raspberry Pi enclosure
- Wireless Adapter
- Keyboard
- HDMI Cable – I used a converter cable to go from HDMI to DVI for the monitor I used. It was about $7 on Amazon.
- USB Power Supply and Micro USB Cable (to power the Raspberry Pi)
- Any monitor – I used an older Dell monitor with a 1600×1200 resolution. You can pick up old monitors off of Craigslist very cheap. Often you can get them for $20 or $30. Once in a while even free.
- 3M Adhesive strips
The software I used for the display is called Rise Vision and is a digital signage company. Their web interface is relatively easy to use and it is free for basic accounts like the one I set up.
Step 2: Set up the Raspberry Pi
Keyboard
I started by connecting a wireless keyboard that has a trackpad built in. It is a Logitech K400 keyboard. For me it worked right out of the box and it only uses one of the USB ports on the Raspberry Pi.
If you are using an older computer monitor that doesn't have an HDMI connection you can use an HDMI to DVI cable. I purchased mine from Amazon and it works great.
Raspberry Pi
I used a new Raspberry Pi B+ board that came with NOOBS memory card with the operating systems that you can pick from when you install the operating system. You have the choice of the following operating systems.
- Raspbian
- Arch
- OpenELEC
- Pidora
- RISC OS
- RaspBMC
- Raspbian – Boot to Scratch
Connect the adapter for the wireless keyboard and wifi adapter.
Install the microSD card with the operating systems.
Connect to a tv or monitor with the appropriate cable.
Connect power to the raspberry PI.
You will get a screen that gives you the option to install one of the different operating systems.
I installed Raspbian operating system as that is what was recommended by Rise Vision – the company whose interface we are using.
Once installed you will get a Software Configuration Tool.
Option 2: In this window you can select to change the user password. I changed mine to “pi” to make it easy.
Option 3: Enable Boot to Desktop/Scratch. I selected the middle option of “Desktop Log In as user “pi” at the graphical desktop.”
Option 4: Internationalisation Options. Select this to select your timezone.
Now you can select “Finish”. You will be given the option to reboot. Select “Yes”.
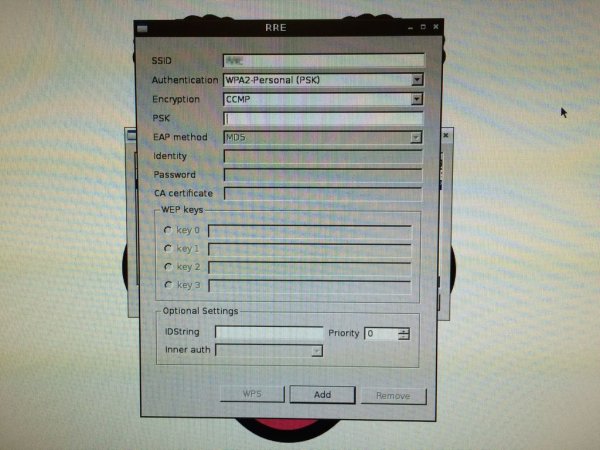
Step 3: Set up WiFi
Open WiFi network app.
Select Scan.
double click on your network.
Enter your network password in the PSK field.
Check your WiFi connection by opening a terminal and enter PING GOOGLE.COM.
If you have any trouble with this step there are plenty of tutorials on how to get a wireless connection set up.
Step 4: Update and Configure the Operating System
Update the OS
Connect to the network using the hardwired connection, open a Terminal window, and enter the following:
sudo apt-get update
Once that is completed, enter this command into the Terminal window:
sudo apt-get upgrade
Now, make sure the whole Linux distribution is up-to-date. This step takes a while to complete. Enter this command into the Terminal window:
sudo apt-get dist-upgrade
Once the distribution upgrade is complete, reboot the Pi.
sudo reboot
Turn off the Screensaver and Power Saver Settings
Open a Terminal window, and enter the following:
sudo nano /etc/kbd/config.
When the file opens, scroll through the file and change the appropriate lines to the following:
BLANK_TIME=0
BLANK_DPMS=off
POWERDOWN_TIME=0
Save and close the file, and restart the Pi.
Type the following in the Terminal Window:
sudo reboot
Step 5: Install VNC
VNC is short for Virtual Network Computing and is a way for the Rise Vision platform to manage your digital display.
Vino is the name of the VNC we are going to install.
Install VNC and configure it to run on Startup
Open a Terminal window and enter the following:
sudo apt-get install vino
Once that is completed, type the following into a Terminal window:
startx
The screen may flash and open a dialog box, but just close it.
Now, configure Vino to allow for remote connections, and set a password to enter when connecting by typing the following into a Terminal window: vino-preferences
Select your preferred options in the Preferences window.
Password was “rise”
Once that is all configured, this next portion you have to follow to the letter. Vino doesn’t autostart with the Pi Operating System, so we need to configure that manually. Type the following into a Terminal window:
sudo leafpad /etc/sudoers.d/vsrv.sh &
Add this text to that file:
#! /bin/bash /usr/lib/vino/vino-server
Save and close that file. Now set it to be executable by entering this into the Terminal window:
sudo chmod +x /etc/sudoers.d/vsrv.sh
Next, add that file to the startup of the Pi by entering this into the Terminal window:
sudo leafpad /etc/xdg/lxsession/LXDE/autostart &
Add this text to the bottom of the autostart file:
@/etc/sudoers.d/vsrv.sh
All of the information in this step was taken from the Rise Vision web site, but has been added here for your convenience. Their web site has a lot of useful information that you can search since a lot of people have been through some of the same issues you might be going through.
Step 6: Install the Rise Vision Player and Registering Your Display
Install Java JRE
To install the Java Runtime Environment (JRE) run the following command:
sudo apt-get install openjdk-7-jre
Install Chromium
sudo apt-get install chromium
install the at package:
sudo apt-get install at
Installing the Rise Vision Player
Download the installation file from here.
http://www.risevision.com/player
Right click on the installation file, go to Properties, go to the Permissions tab, and check the “Make the file executable” checkbox.
Open a Terminal window, and enter the following while you are in the directory you downloaded the file to:
sudo ./rvplayer-installer.sh.
This install step can take a while so be patient.
Enter the super user password to complete the action.
Registering Your Display
Upon startup the Rise Vision Player will ask you to enter either a Display ID or Claim ID to connect your Display to the Platform.
Display ID – From the Rise Vision Platform click on Displays, then Add Display give it a name and click save. Copy the Display ID and enter it in the Rise Vision Player on startup.
Claim ID – From the Rise Vision Platform click on Settings, then find the Claim ID that is unique to your Company. Enter the Claim ID into the Rise Vision player on startup and then name your Display. This will automatically create the Display in the Rise Vision Platform for you. Learn more about setting up and managing Displays here.
For more detail: Raspberry Pi Arcade Game High Score DIsplay for Multiple Locations


