
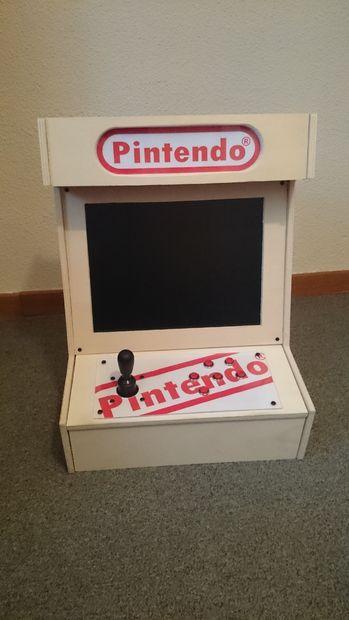
A few months ago, I decided that I wanted an all-in-one arcade machine. I started looking for some info on how to build one, and immediately, the name “Raspberry Pi” came up. This Christmas, I got a couple of them. I started experimenting with a few operating systems, and Retropie became my favorite retro gaming os. The pictures show my finished arcade machine.
Step 1: Choose your raspberry pi
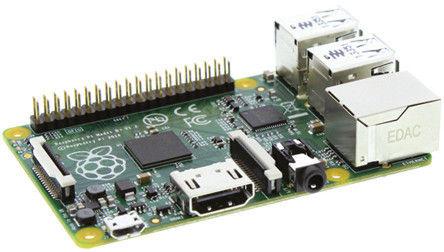
I had 2 raspberry pi b+ on hand, so logically I chose that version of the RPi. For best performance, I recommend using the model b+, and if you're performance hungry, the new raspberry pi 2, which has 1 gigabyte of RAM.
Step 2: Choose your screen
Monitors aren't cheap, so you can't be picky if you to find something cheap. Ideally, it should have an HDMI port, but that brings the price tag up. I went to a thrift shop, and found a Philips 150S 1024×768 monitor for 14.50€, which is around 17 USD. Unfortunately, it had a VGA port. That means you need an HDMI to VGA converter. Not all converters work, and unfortunately, I learnt that the hard way. I finally found one that worked perfectly on Amazon. Here's the link:
http://www.amazon.co.uk/Neewer-Black-Adapter-Conve…
Not all screens are the same, and if it was cheap, it's probably not the best quality screen. If you're having problems with the raspberry pi detecting the right screen height and width, adjust the overscan settings in config.txt. To access the config.txt file, remove your SD or MicroSD card, plug it in your computer, and it's in the root directory (boot). Edit it with a program such as Notepad++.
Step 3: Installing Retropie and drivers
Now you have to install your operating system of choice. I chose Retropie, so that's the one I'm gonna explain. First off, you need to download the Retropie image. Here's a link to the the official download page:
http://blog.petrockblock.com/retropie/retropie-dow…
Once that's done, flash it on to your SD card ( must be at least 4 GB). Now you have to install the Retrogame driver, to enable the use of buttons and joysticks wired to the gpio. Here's a download link with instructions on how to install it:
https://learn.adafruit.com/retro-gaming-with-raspb…
 However, all this can be a hassle. So here's an image of Retropie 2.3 with everything installed, ready to use, compiled by Instructables user rbates4:
https://mega.co.nz/#!BxNFwDZC
Here's the key:
q5NOCk9OO6KQAYeT5e4_JOZCjgEdngkiBsxMAmGF_Fo
All you have to do is flash it.
Step 4: Test it out
Ok, now you've got the basic components. Grab your keyboard and test it out. Make sure Retropie doesn't give errors, adjust the overscan settings, and just make sure everything in general works.
For more detail: Raspberry Pi Arcade