English:
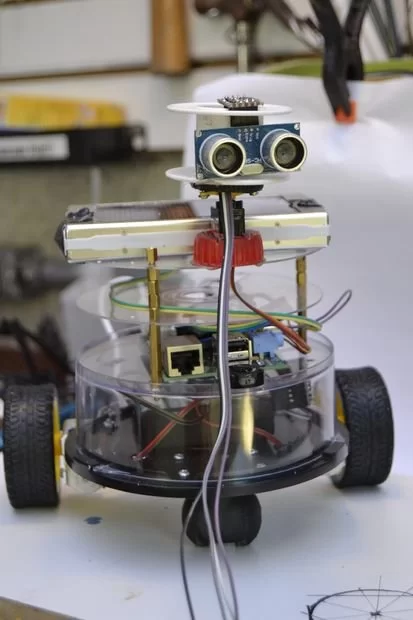
This project is a work that is taking on many weekends. My son, Gabriel, watched the movie “Wall-E” and proposed that we built a similar robot. I see this model in Dx.com and get inspired by it.
We use some scraps we find here at home, especially some old CDs and an empty tube of CDs.
The list of materials is as follows:
HARDWARE
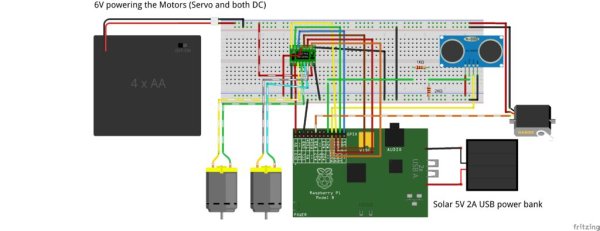
- A Raspberry Pi Model B, with 512Mb
- An SD Card with Occidentalis.
- Two sets of engine and Two Tires (I got the motors and tires from this item
http://www.dx.com/pt/p/four-wheel-drive-smart-robot-car-chassis-for-4wd-yellow-black-2-x-18650-178466)
- A Pololu motor controller TB6612FNG
- A servo motor model HD1800A
- An ultrasonic sensor HC-SR04
- Wires
- Universal PCB
- 1k resistor
- 2k resistor
- A bunch of connectors
- Batteries and suport
- Solar Battery Pack from Dx.com
SOFTWARE
TOOLS
- Soldering iron
- Pliers
- Dremel
- Multimeter
Portuguese:
Esse projeto é um trabalho que está nos tomando muitos finais de semana. Meu filho, Gabriel, assistiu ao filme “Wall-E” e propôs que nós construíssemos um robô parecido. Eu vi este modelo no Dx.com e quis fazer um negócio inspirado nele.
Nós utlizamos algumas sucatas que encontramos aqui em casa, principalmente alguns CDs velhos e um tubo vazio de CDs.
A lista de materiais é a seguinte:
HARDWARE
- Um Raspberry Pi Model B, com 512Mb
- Um SD Card com Occidentalis.
- Dois conjuntos de motor e Dois Pneus (eu peguei os motores e pneus disso aqui:
http://www.dx.com/pt/p/four-wheel-drive-smart-robot-car-chassis-for-4wd-yellow-black-2-x-18650-178466)
- Um controlador de motores Pololu
- Um servo motor modelo HD1800A
- Um sensor ultrassônico HC-SR04
- Um monte de Fios
- Placa universal
- Um resistor de 1k
- Um resistor de 2k
- Conectores diversos
- Pilhas e suporte
- Pack com bateria e carregador solar
SOFTWARE
Adafruit Occidentallis 0.2
FERRAMENTAS
- Ferro de soldar
- Alicates
- Dremel
- Multímetro
Step 1: Mounting the robot plate
English:
The robot base was taken with the tube CD.
I have positioned the two motor holders at an angle of 60 ° to the front wheel. The distance is enough that the wheels are not rubbing with the base. I cut the center pin of the tube using a Dremel and a cutting disc for plastic. At the top of the tube, fixed the battery holder and the pololu motor driver too.
Portuguese:
A base do robô foi feita com o tubo de CD.
Eu posicionei os dois suportes de motor num ângulo de 60º em relação à roda dianteira. A distância é suficiente para que as rodas não fiquem atritando com a base. Cortei o pino central do tubo usando a Dremel e um disco de corte para plástico. Na parte de cima do tubo, fixei o suporte para pilhas e deixei o driver para motores também.
For more detail: Raspberry Pi CD Box Robot