
In the earlier project involving the DS18B20 Digital Sensor, we explored how to connect an Arduino with the DS18B20 sensor and display the temperature on a 16×2 LCD display. In this project, we will focus on the interface between the Raspberry Pi and the DS18B20 Temperature Sensor, as well as the ability to monitor the temperature from a remote location through a web-based temperature monitor.
The project comprises two main parts. The first part involves establishing the connection between the DS18B20 sensor and the Raspberry Pi, and then displaying the temperature readings on the terminal. In the second part, we will access the Raspberry Pi over the internet using Dataplicity, allowing us to view the temperature readings from a remote computer.
Overview
In the previous tutorial, we covered the DS18B20 Temperature Sensor in detail. However, as a quick recap, here are a few important points about the sensor.
The DS18B20 is a digital temperature sensor that communicates via a 1-Wire interface. This makes it particularly suitable for projects involving the Raspberry Pi, as the Pi lacks analog input pins. Therefore, opting for a digital sensor like the DS18B20 is a natural choice for implementation in Raspberry Pi projects.

The DS18B20 Sensor, in its TO-92 package, consists of three pins: GND, DQ (Data), and VDD. Power can be supplied to the sensor through either the VDD pin or the sensor can draw power from the DQ pin in parasite power mode.
For additional details on the DS18B20 Temperature Sensor and instructions on how to interface it with an Arduino, you can refer to the Arduino DS18B20 Interface Tutorial.
Circuit Diagram of Raspberry Pi DS18B20 Interface
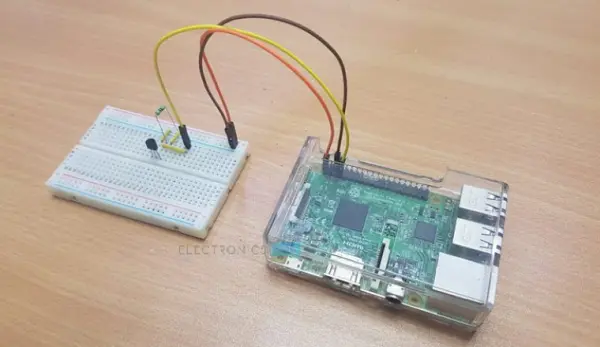
The circuit diagram below depicts the interface between the DS18B20 Temperature Sensor and the Raspberry Pi. The first image illustrates the connections between the Raspberry Pi and the DS18B20 using Fritzing Parts.
[Image: Circuit diagram of DS18B20 Temperature Sensor interfaced with Raspberry Pi using Fritzing Parts.]
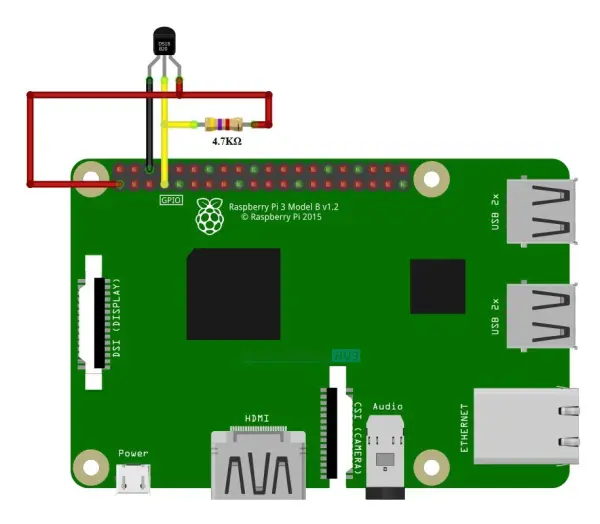
For a more comprehensive understanding of the connections, referring to the following wiring diagram can be quite helpful.

Components Required
To undertake this project, you will need the following components and materials:
– Raspberry Pi 3 Model B
– DS18B20 Digital Temperature Sensor
– 4.7KΩ Resistor (1/4 Watt)
– Breadboard
– Connecting wires
– Micro USB Cable
– Computer with Internet Connectivity
Circuit Design
To begin, make the following connections:
1. Connect the VDD pin of the DS18B20 sensor to the 3.3V pin of the Raspberry Pi.
2. Connect the GND pin of the DS18B20 sensor to the GND pin of the Raspberry Pi. It's worth noting that the DS18B20 sensor can tolerate a +5V supply, but for compatibility with the Raspberry Pi's GPIO voltage level, we use 3.3V.
3. Connect a 4.7KΩ resistor (pull-up resistor) between the DQ pin of the DS18B20 sensor and the 3.3V pin of the Raspberry Pi. This resistor helps in maintaining the voltage level on the DQ pin.
4. Lastly, connect the DQ pin of the DS18B20 sensor to GPIO4 (physical pin 7) of the Raspberry Pi. This connection allows the Raspberry Pi to communicate with the sensor and receive temperature readings.
Raspberry Pi DS18B20 Temperature Sensor Interface
Next, we will explore the process of interfacing the DS18B20 Temperature Sensor with the Raspberry Pi. With this interface, you can develop various applications such as a weather station, remote temperature monitor, temperature data logger, and more.
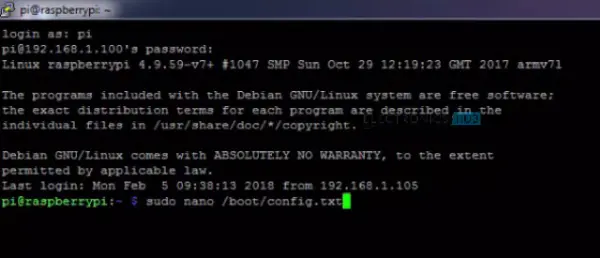
Enable 1-Wire Interface in Raspberry Pi
Make the necessary connections according to the provided circuit diagram and power on the Raspberry Pi. As the DS18B20 sensor communicates exclusively via the 1-Wire interface, we need to enable this feature on the Raspberry Pi. To do so, open the Command Prompt on the Raspberry Pi and access the config.txt file by executing the following command:
Check whether the Sensor is Working
The subsequent steps will help you verify whether your DS18B20 Temperature Sensor is functioning correctly or not. You may choose to skip this step and proceed with writing the Python program for the Raspberry Pi.
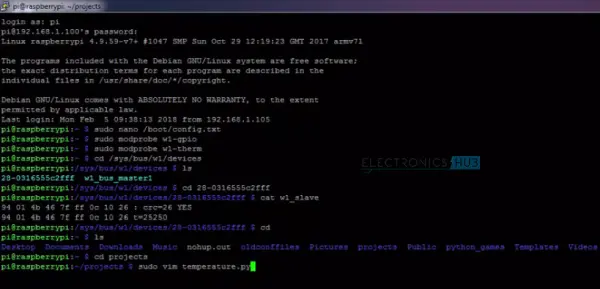
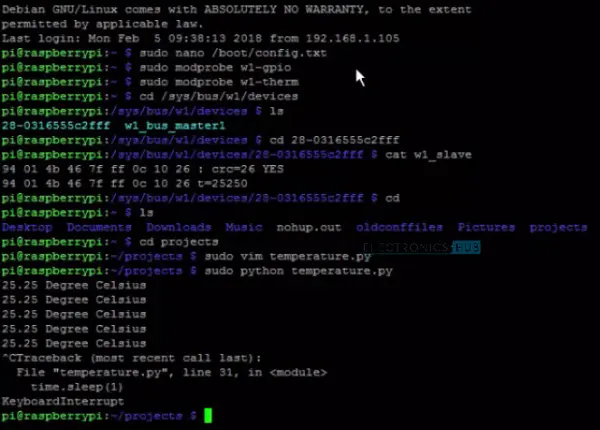
Once your Raspberry Pi has completed the reboot process, log in to your Raspberry Pi and enter the following commands in the command prompt:
Within this directory, you can list the available devices using the “ls” command.
In your case, you will find a directory corresponding to the DS18B20 sensor, such as “28-0316555c2fff”. Use the “cd” command to access this directory.
To view the raw temperature reading from the sensor, use the following command.
If you notice, the value t=25250 at the end of the second line of the result represents the temperature as 25.25 0C.

Python Program for Reading Temperature from DS18B20
I’ve created a folder called ‘projects’ in Raspberry Pi’s Home. Change to this directory and create a new Python file with name ‘temperature.py’ using vim editor.
In this file, type the following code and save the file.
| import os | |
| import glob | |
| import time | |
| os.system(‘modprobe w1-gpio') | |
| os.system(‘modprobe w1-therm') | |
| base_dir = ‘/sys/bus/w1/devices/' | |
| device_folder = glob.glob(base_dir + '28*')[0] | |
| device_file = device_folder + ‘/w1_slave' | |
| def read_temp_raw(): | |
| f = open(device_file, ‘r') | |
| lines = f.readlines() | |
| f.close() | |
| return lines | |
| def read_temp(): | |
| lines = read_temp_raw() | |
| while lines[0].strip()[–3:] != ‘YES': | |
| time.sleep(0.2) | |
| lines = read_temp_raw() | |
| equals_pos = lines[1].find(‘t=') | |
| if equals_pos != –1: | |
| temp_string = lines[1][equals_pos+2:] | |
| temp_c = float(temp_string) / 1000.0 | |
| return temp_c | |
| while True: | |
| i=(read_temp()) | |
| print i, ‘Degree Celsius' | |
| time.sleep(1) |
After writing or copying the code in to editor, save the file and you are ready to run the script. To run the Python Script, simply use the following command.
IoT based Temperature Monitor
Let's take the project further by setting up a web-based temperature monitor. To accomplish this, we will utilize the services of Dataplicity. Follow the link provided to access the Dataplicity homepage.
Enter your email address in Section 1 and click on “Start.” You will be presented with a code in Section 2. Copy this code and paste it into the Command Prompt (Terminal) of the Raspberry Pi to activate the remote shell.
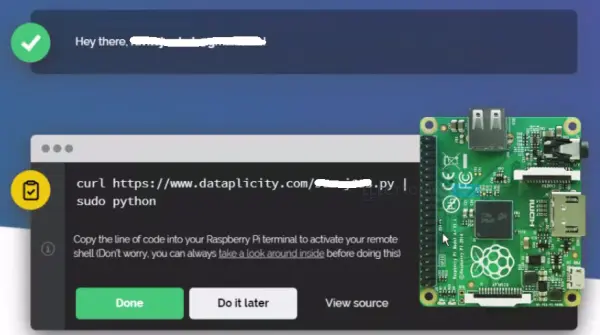
The code will be something like this.
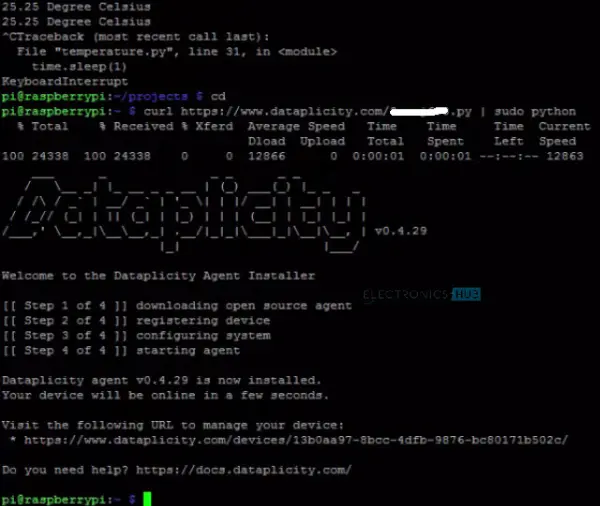
Next, click on “Done” on the Dataplicity website to initiate remote access to your Raspberry Pi. The terminal will become enabled, allowing you to log in using your Raspberry Pi's credentials.
Assuming that your Python script for the DS18B20 sensor is stored in the “projects” folder, navigate to that directory using the following command:
cd projects
Once you are in the correct directory, execute the script using the following command:
sudo python temperature.py
