Introduction
Our objective is to develop an automated translation device using R-Pi due to the increased global travel where individuals often encounter difficulties understanding local languages displayed on signs or spoken in conversation. Existing electronic dictionaries or mobile apps offer translation capabilities, but they usually require manual input of sentences or words, leading to potential errors, particularly when users are unfamiliar with the language's keyboard layout.
![]()
Several companies have advanced AI technology to extract information from images and audio. For instance, Google uses image inputs to derive relevant results, and Siri on iPhones executes user commands based on speech. Thus, our project aims to simplify translation by employing Optical Character Recognition (OCR) to extract text from images captured by a camera and then transmit this text to an interpreter API for translation into the desired language.
Additionally, QR codes have gained popularity as a means to encode information privately. These codes can embed language information, such as sharing Wi-Fi credentials without text input. However, in cases where users forget their smartphones, preventing access to the internet, we propose the direct extraction of text information from QR codes, offering translation options if desired.
Furthermore, our project explores enabling Raspberry Pi to recognize voice inputs and subsequently extract information for translation, surpassing reliance solely on the camera. An embedded system, like the one we aim to develop, possesses specific functionality for real-time computation. This device, based on Raspberry Pi, will execute translation tasks for mobile devices, capable of receiving voice inputs and delivering real-time responses. Thus, eliminating the need to carry a cumbersome computer and relying instead on this portable embedded device.
Design
Our project encompasses three primary functionalities centered on language translation: translation from image to text, translation from voice to text, and QR code translation.

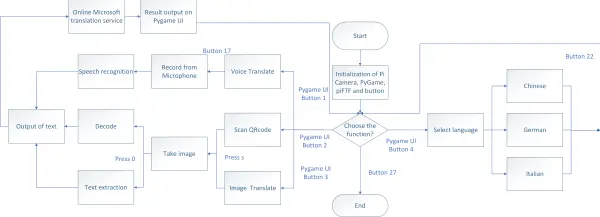
Image to Text translation
The initial feature involves translating images to text, enabling users to capture words or sentences for translation, after which the piTFT displays the translated outcome. To accomplish this, the text within the image must undergo initial extraction. Therefore, integrating an OCR (Optical Character Recognition) library becomes necessary to recognize text information within the image. For this purpose, we've opted for Tesseract, an open-source engine with various language wrappers. Our program utilizes the pytesseract wrapper due to its compatibility with Python, upon installing pytesseract on the Raspberry Pi. Subsequently, our program can call upon it. Figure 3 illustrates the operational process of this function.
The initial phase involves capturing images. To achieve this, we link the PiCamera to the Raspberry Pi and activate the camera when the designated function is invoked. The program then awaits a keyboard input signal to capture an image. Upon pressing the designated key, the image is taken, and pytesseract is employed to extract text from the image using the command “text = pytesseract.image_to_string(image)”. This command retrieves the extracted text, initiating the transition to the third phase. In this phase, the Microsoft text translator API is called upon to translate the text into the specified language.
To successfully utilize the API and dispatch requests, specifying the API key and endpoint becomes imperative. This information allows the program to effectively send the message to the API and receive the corresponding response. We establish the API key and endpoint as environment variables to facilitate this process. Consequently, the program checks the environment variables to ensure the accuracy of the key and endpoint. Additionally, users have the ability to specify the desired translation language, a topic we will elaborate on in the subsequent section. Ultimately, the translated result is showcased on the piTFT screen.
Voice to Text translation
The secondary feature involves converting voice into text. Users can speak words or sentences into a microphone connected to the Raspberry Pi, where the voice is recorded and stored in a designated location. Subsequently, the content of the voice file needs recognition. For voice recognition, we opted for the Google Speech-to-Text API, known for its capability to recognize over 120 languages and process real-time streaming or prerecorded audio. The operational flow of this function is illustrated in Figure KK.
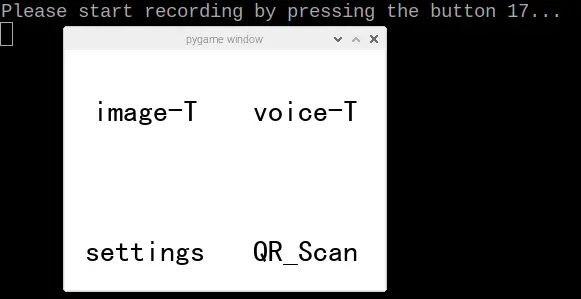
Initially, users input their voice through the connected microphone into the Raspberry Pi. To achieve this, we initialize the pyaudio module. Simultaneously, the sampling rate and channel are configured to 44100 and 1, respectively. The channel's configuration as 1 is necessary because pyaudio supports only single-channel input. To commence recording, we utilize button 17 to control the recording process. When button 17 is pressed, causing GPIO 17 to pull down, the recording initiates and continues until button 17 is released. The recorded voice file is saved, marking the transition to the second stage.
In this subsequent stage, the voice file is transmitted to the Google Speech-to-Text API, which in turn responds with the extracted text content. This text message is then forwarded to the Microsoft Text Translator API, and the resulting translation is displayed on the piTFT screen.
QR code to Text translation
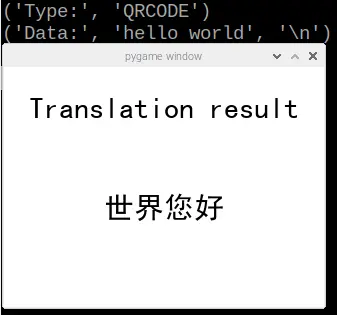
The third feature involves translating QR codes to text, enabling the translator to identify QR codes and provide the textual information contained within them. To achieve QR code recognition, we implemented pyzbar, a Python library specialized in QR code recognition. This function operates similarly to the image translation feature. Initially, the user captures an image of the QR code, following the same process as the image translation function. Subsequently, the image is saved to a designated path. Pyzbar then reads the image from the specified path and decodes it into a text message using the command “pyzbar.decode(image).” This command retrieves the extracted text message, which is then forwarded to the Microsoft Translation API.
Translating Language setting
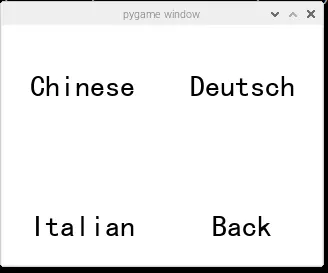
Additionally, our translator provides users with the flexibility to select their desired translation language through the language setting mode. The languages initially integrated into our translator include Chinese, Deutsch, and Italian. While the Microsoft Translation API supports over 50 languages, our future plan involves expanding the language options within our translator to accommodate a broader range of users.
Testing
UI design of the translator
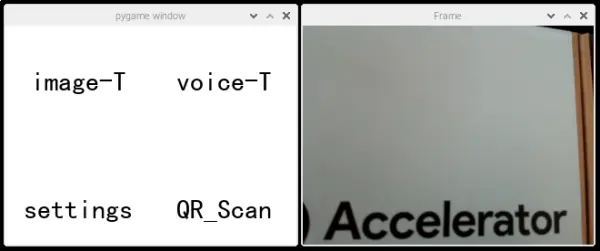
The user interface (UI) design of our translator is depicted in figure 5. It features four primary buttons on the initial screen: “image-T,” “voice-T,” and “QR_Scan,” serving as translation function buttons. Clicking the “settings” button allows users to configure the language settings.
Several issues surfaced during the testing phase. Initially, the mouse's responsiveness was inadequate, causing program sluggishness. Upon investigation, it became evident that the program's execution consumed a significant portion of the CPU resources. This problem arose due to insufficient sleep time allocated before initiating the next iteration within the Pygame UI loop. Consequently, the loop continued iterating incessantly, depriving the mouse operation of necessary resources.
Upon attempting to utilize the piTFT, we encountered complications evidenced by the error information depicted in Figure 6. Our assumption was that the piTFT had malfunctioned and couldn't function as a touchscreen (although the display functions remained normal). The cause of this issue stemmed from leaving the piTFT's external connections exposed, rather than connecting them to the breadboard. As a result, the piTFT's pins short-circuited, damaging the chip responsible for touchscreen control.
For our project's UI design, which incorporated a 3-level menu and employed 4 buttons, an initial issue arose as displayed in Figure 7. However, when we reverted to the original document, no issues were encountered. This discrepancy occurred because when executing the original document, we used “python XXXX.py,” and the pytesseract module was installed in “home/pi/lib.” Conversely, when running the UI version using “sudo python XXXX.py,” the library located in “usr/lib” lacked this module. To resolve this, we copied the tesseract file into the Python 2.7 file within the “usr/lib” directory.


Image Translation test
Initially, we selected the image-T button, setting the default language to Chinese. Executing the program involved utilizing Picamera, which initialized a frame window, as depicted in figure 8. Within the image, the text read “Accelerator,” and subsequently, the outcome was transmitted and showcased on the piTFT, as illustrated in figure 9.

During our testing of the Tesseract program with English, Chinese, and Japanese languages, an “ascii” encoding and decoding error was reported. This issue arose due to certain texts containing special characters and symbols, utilizing the default ascii encoding format in Python. To resolve this, we implemented the UTF-8 encoding format, specifying its usage within the program's header, effectively rectifying this error.
In the translation phase of our program, the text retrieved from the Microsoft Service arrived in JSON format, displaying “\n” in the translation output. This occurrence resulted from the “new line” coding in ascii, commonly employed in Python. To address this, we eliminated the “\n” in the OCR result, substituting it with a blank space. However, when translating multiple paragraphs, the output condensed into a single paragraph. To resolve this issue, we opted to capture images containing one paragraph at a time to ensure accurate translation for each segment.
Voice Translation test
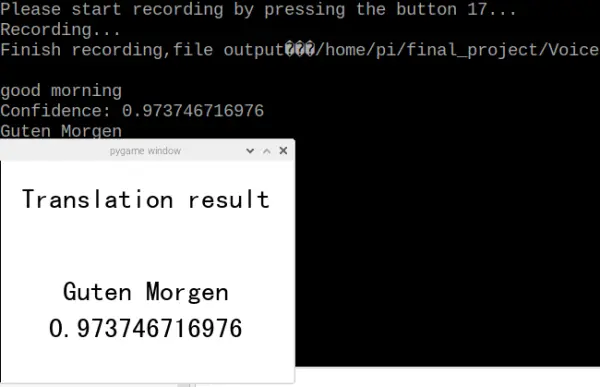
Upon completing the image translation test, pressing button 17 on the piTFT caused the program to return to the initial page. Subsequently, we selected the voice-T button, initiating the Voice translation test. Illustrated in figure 10, upon pressing button 17, the program commenced voice recording and ceased recording upon button 17 release. Utilizing the microphone, we conveyed “Good morning,” and the translated text appeared successfully on the piTFT, as depicted in figure 11 below.

Initially, when selecting a speech recognition API for R-Pi, our intention was to directly utilize an online API. However, most speech recognition platforms only offered SDK APIs, prompting us to abandon our initial approach and opt for an alternative method. Consequently, we settled on Microsoft's Recognize speech service, deeming it a straightforward option. However, we encountered a setback with the Cloud service's SDK, which demanded a 64-bit Operating System, incompatible with the 32-bit Debian Ver.10 Operating System running on R-Pi 3 B+. As a workaround, we proceeded to install the Google Cloud service SDK. Following the setup, we managed to obtain text output from voice inputs. Moreover, we discovered the necessity to upload audio documents in WAV format, featuring a single voice channel, and adhering to a sample rate ranging from 8000 to 48000.
QR Code Translation test
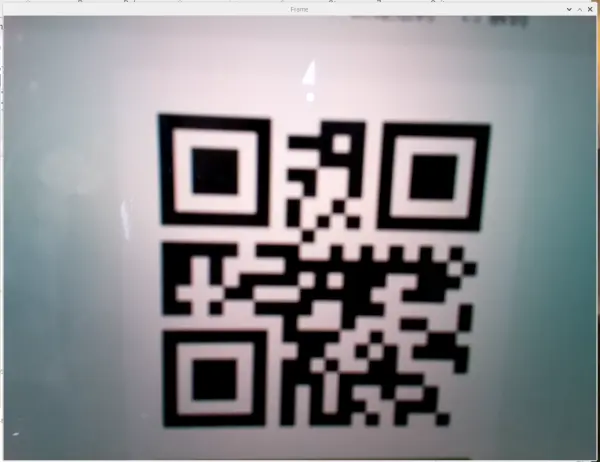
Subsequently, we initiated the QR Code translation test. Initially, we employed an online QR Code generator to create a QR code containing the text “Hello World.” Proceeding further, we selected the third function labeled “QR_Scan” and captured an image of the QR Code, illustrated in figure 12. Following this step, the translated text was effectively exhibited on the piTFT, as depicted in figure 13.
Language Setting test
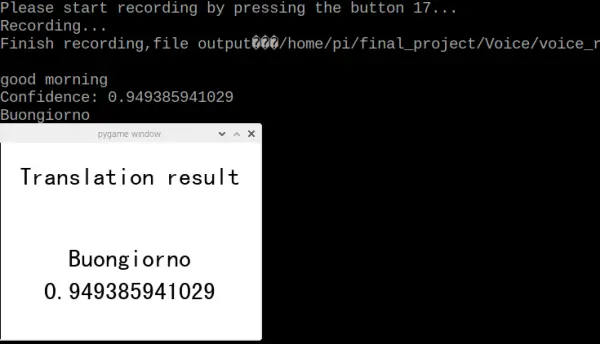
The default language set is Chinese. Users have the option to choose their preferred language by accessing the “settings” button located on the initial page. The layout of the language selection page can be observed in the figure depicted as Figure 14. Furthermore, the test outcomes for both Deutsch and Italian languages are displayed in Figure 15 and Figure 16, respectively. The input phrase used for testing purposes was “Good Morning.”