
Installing the Operating System on an SD Card
To set up an operating system for your Raspberry Pi, you have various options, and one of the popular choices is Raspbian, the official distribution from raspberrypi.org. Raspbian comes in two versions: the full version and the Lite version. The Lite version is a good starting point as it can be easily upgraded with additional software packages as needed. The full version includes more software that you may not necessarily require.
To get started, download the Raspberry Pi Imager from the raspberrypi.org website and install it on your computer. Once installed, open the application and click on “Choose OS” on the first screen. From the list of distributions, select “Raspberry Pi OS Lite (32-bit)” under “Raspberry Pi OS (Other).” Then, insert your SD card into your computer and click on “Choose SD card” to select the inserted SD card. Finally, click on “write” to begin the installation process. The installation of Raspbian Lite typically takes around three minutes, while the full Raspbian version may take approximately ten minutes. Once the process is completed, you will have a bootable disk with Raspbian.
There are two convenient methods to access your Raspberry Pi without a keyboard or monitor: through the serial port console or via WiFi and SSH. To access the Pi through the serial port, you will need a USB-to-serial adapter. This method is generally more reliable as it does not rely on network access, but it does require the adapter. On the other hand, to access the Pi through WiFi and SSH, you need to configure the Pi to connect to the same network as your personal computer.
To enable SSH access using either the serial port or WiFi, there are a few files you need to be aware of: config.txt, ssh, and wpa_supplicant.conf. You can create and edit these files on your boot disk before powering up the Pi. Once you have created the boot disk, remove it from your computer and re-insert it. Open the config.txt file in a text editor to make the necessary configurations.
Enabling Serial Port Access
Starting from the 2017-04-10 release of Raspbian, the Pi's serial terminal is no longer enabled by default. If you want to access the Pi via a serial terminal, you'll need to make a modification to the config.txt file on your boot disk. To do this, follow these steps:
- Insert the boot disk (SD card) into your computer.
- Locate the config.txt file on the boot disk and open it in a text editor.
- Scroll to the end of the file and add the following line:
enable_uart=1
UART stands for Universal Asynchronous Receiver-Transmitter, which is essentially an asynchronous serial port. Enabling the serial port on your Raspberry Pi is as simple as adding the enable_uart=1 line to the config.txt file on the boot disk, as mentioned earlier. Now, let's see how you can connect to the hardware to use the serial port:
- Make sure your Raspberry Pi is powered off.
- Connect a USB-to-serial adapter to your computer.
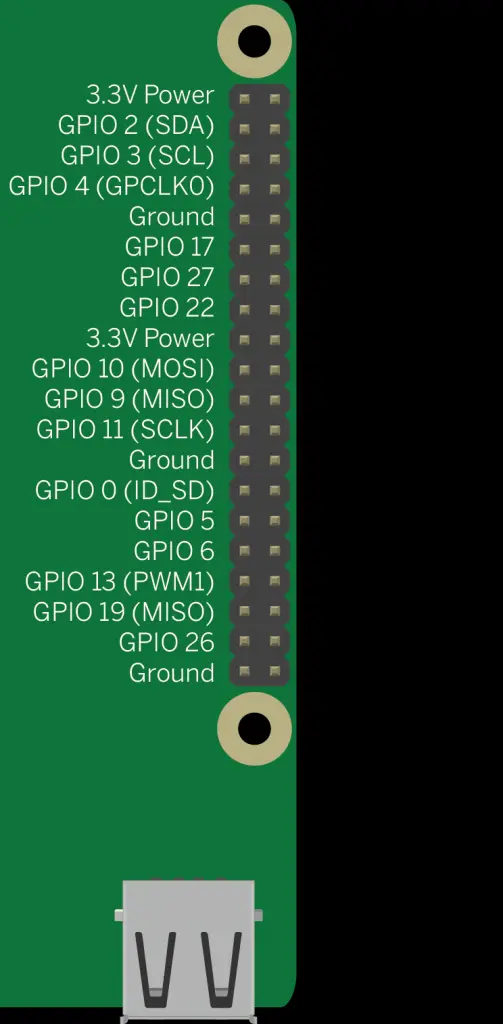
- Use jumper wires to connect the adapter's RXD pin to the Pi's TXD pin and the adapter's TXD pin to the Pi's RXD pin.
- Connect the ground (GND) pin on the adapter to any ground pin (e.g., pin 6) on the Pi.
- Plug in the USB-to-serial adapter to your computer.
With the hardware connected, you can now access the Pi's serial console using a terminal emulator program on your computer. Configure the terminal emulator with the following settings:
- Baud rate: 115200
- Data bits: 8
- Parity: None
- Stop bits: 1
- Flow control: None
Once the terminal emulator is set up, you can power on the Raspberry Pi. You should see the boot messages and the command prompt appearing in the terminal emulator window. You have successfully connected to the Pi's serial port and can interact with it through the serial console.
Making a New User
To create a new user and encrypt the password for the userconf.txt file, follow these steps:
- Open a terminal on your POSIX computer (MacOS, Linux, Unix) or Windows Subsystem for Linux (WSL) on Windows.
- Type the following command to generate the encrypted password:
- You will be prompted to enter the password you want to encrypt. Enter your desired password and press Enter.
- The command will output the encrypted representation of the password.
- Now, create a new file called userconf.txt in the boot partition of the SD card (the part visible when the SD card is mounted on your computer).
- Open the userconf.txt file in a text editor and add a single line of text in the following format:
- Replace “username” with your desired username and “encrypted_password” with the encrypted password obtained from the previous step.
- Save the userconf.txt file.
Make sure to never include an unencrypted password in the userconf.txt file. By following these steps, you have created a new user with an encrypted password for your Raspberry Pi.
echo 'mypassword' | openssl passwd -1 -stdin
To install OpenSSL on Windows Subsystem for Linux (WSL), follow these steps:
- Launch the Windows Subsystem for Linux (WSL) by opening the WSL terminal.
- In the terminal, use the package manager to update the package lists by running the following command:
- Enter your password if prompted.
- Once the package lists are updated, install OpenSSL by running the following command:
- Confirm the installation by typing ‘y' if prompted.
- Wait for the installation to complete. OpenSSL should now be installed on your Windows Subsystem for Linux.
- After installing OpenSSL, you can proceed with the previous instructions to encrypt your password and create the userconf.txt file for your Raspberry Pi.
sudo apt-get install openssl
Powering and Connecting to Your Pi
Insert the microSD card into the Raspberry Pi's microSD card slot. Then, connect your Raspberry Pi to a 5V DC power adapter using the USB micro connection labeled “PWR IN”. It is important to use a power adapter that can provide a minimum of 2A of current to ensure proper operation of the Raspberry Pi.
Connecting Via Serial Port
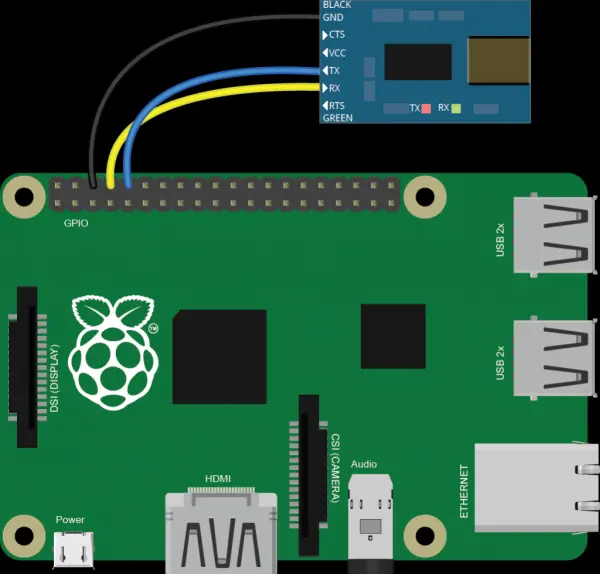
After enabling UART as mentioned earlier, you have configured the Raspberry Pi to provide a command line console through the serial port. To connect the USB-to-serial adapter to the Raspberry Pi's I/O pins, follow the diagram below:
Make sure to connect the RX (Receive) pin of the USB-to-serial adapter to the TX (Transmit) pin of the Raspberry Pi, and vice versa. Also, connect the Ground (GND) of the adapter to the Ground (GND) of the Raspberry Pi. Once the connections are made, connect the USB-to-serial adapter to your computer.
Depending on your USB-to-serial adapter, you may need to install any required drivers or adapters to ensure proper functionality. Once installed, you should see the USB-to-serial adapter appear as a serial port in your preferred serial terminal application. On macOS and Linux, the “screen” program is recommended for this purpose. Alternatively, you can use “CoolTerm,” which is compatible with macOS, Windows, and Linux.
To connect to the serial port using the “screen” program on macOS, you first need to determine the name of your serial port. You can do this by following these steps:
- Plug in the USB-to-serial adapter to your computer.
- Open the Terminal application on your macOS.
- Use the following command to list the ports in the
/devdirectory:
This command will display a list of serial ports available on your system. The serial port name typically starts with /dev/tty. followed by a specific identifier.
Once you have identified the name of your serial port, you can use it to connect to the port using the “screen” program.
$ ls /dev/cu.*
After identifying the name of your serial port, such as /dev/cu.usbserial-14430 or /dev/cu.SLABtoUART, you can use the “screen” program to open a connection to the port at a baud rate of 115200 bits per second. Here's the command to achieve this.
$ screen <portname> 115200
Once you’ve opened a serial connection at 115200 bps, and press the spacebar a few times. You’ll get a login prompt like so:
Raspbian GNU/Linux 8 raspberrypi ttyAMA0
raspberrypi login:
Now you’re ready to log in.
Logging In To The Command Line Interface
The default login for the Raspbian OS is pi, and the default password is raspberry. If you didn’t create a username and password of your own, you can use this. Use these to log into your Pi. When you’re logged in, you’ll get a prompt like this:
The programs included with the Debian GNU/Linux system are free software;
the exact distribution terms for each program are described in the
individual files in /usr/share/doc/*/copyright.

Debian GNU/Linux comes with ABSOLUTELY NO WARRANTY, to the extent
permitted by applicable law.
Last login: Wed May 31 22:24:04 2017


pi@rasbperrypi: ~ $
Configuring Your System
Once you have logged in, there are several configuration tasks you need to perform to set up the operating system for general use. These tasks include changing the default password and administrative user, modifying the default hostname, configuring interfacing options, and expanding the filesystem on the SD card. To begin, enter the following command:
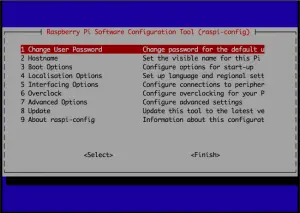
Executing this command will launch the Raspberry Pi software configuration tool. This tool provides a menu-based interface that allows you to navigate through various configuration options. Follow the prompts and select the desired options to make the necessary changes, such as changing the password, modifying the hostname, enabling or disabling interfaces, and expanding the filesystem.
Please note that you will need to enter your password when prompted for authentication to execute commands with superuser privileges using sudo.
$ sudo raspi-config
Note: When working with the Raspberry Pi, most of the commands you'll use will be run with sudo, which stands for “superuser do.” By using sudo, you can execute administrative commands and ensure that you have the necessary privileges. The system will prompt you to enter your password whenever you use sudo.
To navigate through the configuration options, you'll encounter a menu that you can scroll through using the arrow keys. Pressing the Enter key will allow you to select an item from the menu, as illustrated below.
Here are the essential steps you need to take care of:
- Select “System Options” from the menu.
- If you are still using the default pi/raspberry combination, choose “Change Password” to set a new password following the prompts. If you created a new username with the userconf.txt file, you can skip this step.
- Optionally, you can also choose “Change Hostname” to give your system a meaningful name instead of the default raspberrypi.
- If you want to connect to a wireless network, you can set the SSID and password in this menu. If you are using an enterprise network, follow the steps below.
- Select “Interfacing Options.”
- If you didn't create an ssh file on your SD card before booting, enable SSH to allow remote login via SSH.
- If you plan to use a camera or communicate with external hardware using the I2C or SPI buses, enable the corresponding options.
- Select “Advanced Options” and choose “Expand Filesystem” to make more space available on your SD card for the system. The process will prompt you to reboot your Pi. Select “Yes” to reboot.
From now on, if you are using the Ethernet-over-USB option or logging into your Pi over a network via SSH (which we'll cover shortly), you will need to log in using [email protected] (replace your-pi-name with the name you chose during the hostname configuration).
Changing Defaults To Increase Security
If you didn't create a custom user using the userconfig.txt file mentioned earlier, it is recommended to add a new user to enhance the security of your Pi. Replace “username” below with the desired name for your new user:
$ sudo adduser username
Follow the prompts to set a password and provide any additional information for the new user. Make sure to choose a strong password that is not easily guessable.
Once the user is created, you can grant administrative privileges to the new user by adding them to the sudo group:
$ sudo adduser username sudo
Replace “username” with the actual name of your new user.
By creating a new user and assigning administrative privileges, you will reduce the risk associated with using the default username and password.
pi       User-specific group. A group is automatically created for
         each new user; you can ignore this.
adm      Allows access to log files in /var/log and using xconsole
dialout  Allows access to serial ports/modem reconfiguration, etc.
cdrom    Enables access to optical drives.
sudo     Enables sudo access for the user.
audio    Allows access to audio devices like microphones and soundcards
video    Allows access to a video devices, e.g. framebuffer, videocard, webcam
plugdev  Enables access to external storage devices
games    Many games are SETGID to games so they can write their high score files.
users    A Pi-specific group enabling access to
         /opt/vc/src/hello_pi/ directory and contained files.
input    Appears to give access to the /dev/input/mice folder and nothing else.
netdev   Enables access to network interfaces
gpio     Pi-specific group for GPIO pin access.
i2c      Pi-specific group for I2C access.
         Generated after installing i2c-tools.
spi      Pi-specific group for the SPI bus.
You can do this group by group with:
$ sudo adduser username groupname
or you can add many at a time like so:
sudo usermod -a -G adm,dialout,cdrom,sudo,audio,video,plugdev,games,users,input,netdev,gpio,i2c,spi username
For security purposes, it is recommended to assign only the necessary groups to your user. If your project requires access to specific groups like GPIO and SPI, add those groups and avoid adding unnecessary ones.
After adding the new user and granting the appropriate permissions, you can log out of the current session by typing either logout or exit. Then, log back in to the Pi using the newly created user:
$ssh [email protected]
Replace “username” with the name of the user you created, and “your-pi-name” with the custom name you assigned to your Pi during the configuration process.
This will establish a new SSH session with the Pi using your newly created user credentials, enhancing the security of your system.
Now make sure the root account is disabled by locking it like so:
$ sudo passwd -l root
If you need to unlock it later you can do so by typing:
$ sudo passwd -u root
Next delete the default pi user like so:
$ sudo deluser --remove-home pi
After deleting the default “pi” user, you may receive a message stating: “Warning: group ‘pi' has no more members.” This is nothing to worry about. The system will automatically remove the corresponding “pi” group when you delete the “pi” account. By removing the default “pi” user, you reduce the risk of someone guessing the username and gaining unauthorized access to your Pi. This adds an extra layer of security to your system.
Configuring After Changing Users
It's important to note that many software packages are installed per user, rather than system-wide. Therefore, it's advisable to ensure that you have the desired user configuration in place before installing firewalls, development software, or any other tools you intend to use. This precaution prevents the unpleasant surprise of installing software under one user and later discovering it's not accessible when you switch to another user. By setting up your user configuration beforehand, you can ensure a consistent and reliable experience across different user accounts on your system.
Connecting To the Network via WiFi
To verify if the built-in WiFi on your Pi Zero W or Pi 3, Pi 4, or later models is functioning properly, you can execute the following command:
$ iwconfig wlan0
If you get a response that begins like this:
wlan0 IEEE 802.11bgn Nickname:
If the WiFi on your Pi is not working or appears to be blocked, you can try the following steps to unblock it:
- Open a terminal window on your Pi.
- Enter the following command to open the configuration file:
bash
sudo nano /etc/modprobe.d/raspi-blacklist.conf
- Look for any lines that contain “blacklist brcmfmac” or “blacklist brcmutil” and add a
#at the beginning of those lines to comment them out. It should look like this:arduino
- Press Ctrl+X to exit the nano editor, then press Y and Enter to save the changes.
- Reboot your Pi by entering the following command:
sudo reboot
After the reboot, check the WiFi again by running the command:
iwlist wlan0 scan | grep ESSID
If you can see a list of available WiFi networks, it means your WiFi should be unblocked and working.
Now try this command to see nearby WiFi hotspots:
$ iwlist wlan0 scan | less
You will get a list of WiFi hotspots nearby and their credentials. It’s piped through the less utility to paginate it. You should see a list of all nearby WiFi access points, with their details. You can see the listings page by page using the spacebar, and close the list by typing q.
Getting the MAC address of the Pi’s WiFi Radio
To retrieve the MAC address of your Pi's WiFi, follow these steps:
- Open a terminal window on your Pi.
- Enter the following command:
ip link show wlan0 | awk '/ether/ {print $2}'
- The output will display the MAC address of your Pi's WiFi interface.
Make note of the MAC address shown on the screen. You can then use this MAC address for registration or any other required networking configurations.
$ ifconfig wlan0 | grep ether
You’ll get a response like this:
ether b8:27:eb:aa:bb:cc txqueuelen 1000 (Ethernet)
After registering the MAC address of your Pi with your institution, you can proceed to modify the wpa_supplicant.conf file to connect to the institution's network. Here's how you can do it:
- Open the
wpa_supplicant.conffile using a text editor. You can use thenanotext editor by running the following command in the terminal: - In the file, locate the existing network configuration or add a new one for your institution's network. It should look similar to the following:
- Replace
YOUR_NETWORK_SSIDwith the name (SSID) of your institution's network. ReplaceYOUR_NETWORK_PASSWORDwith the corresponding password. - Optionally, if your institution uses WPA2 Enterprise security with EAP authentication, you'll need to provide additional configuration settings. Here's an example of an entry for WPA2 Enterprise:
- Replace
YOUR_USERNAMEandYOUR_PASSWORDwith your login credentials for the institution's network. - Save the changes and exit the text editor (in nano, press
Ctrl + X, then confirm withYand pressEnter).
- Replace
- Once you've modified the
wpa_supplicant.conffile, your Pi should be able to connect to your institution's network using the provided configuration. Restart your Pi or restart the networking service for the changes to take effect.Note: Make sure to handle sensitive information (such as passwords) securely and avoid storing them in plain text files.
Network Configuration by Editing wpa_supplicant.conf
To create or edit the wpa_supplicant.conf file for storing your WiFi configuration, follow these steps:
- Open the terminal on your Raspberry Pi.
- Run the following command to open the
wpa_supplicant.conffile using a text editor (such as nano): - In the text editor, add the following lines to the file:
-
- Replace
YOUR_COUNTRY_CODEwith the appropriate code for your country (e.g., US for the United States, GB for the United Kingdom, etc.).Replace
YOUR_NETWORK_SSIDwith the name (SSID) of your WiFi network.Replace
YOUR_NETWORK_PASSWORDwith the corresponding password for your WiFi network. - Save the changes and exit the text editor (in nano, press
Ctrl + X, then confirm withYand pressEnter). - Restart the networking service on your Raspberry Pi to apply the changes by running the following command:
sudo systemctl restart networking.service
Once you've completed these steps, your Raspberry Pi should connect to the specified WiFi network using the provided configuration.
$ sudo nano /etc/wpa_supplicant/wpa_supplicant.conf
You should see something like this:
ctrl_interface=DIR=/var/run/wpa_supplicant GROUP=netdev
update_config=1
country=GB

network={
        ssid="your_network_name"
        psk="your_password"
}
To generate an encrypted version (hash) of your password, you can use the
opensslcommand-line tool. Follow these steps:- Open the terminal on your Raspberry Pi.
- Run the following command, replacing
YOUR_PASSWORDwith your actual password:This command will generate an encrypted hash of your password.- The output of the command will be a string of characters, which is the encrypted version of your password.
- Make sure to keep this encrypted password secure and do not store the actual plaintext password. You can use this encrypted password in configuration files that require password authentication.
Note that the method of generating encrypted password hashes may vary depending on the specific Linux distribution or version you are using. The above command using
opensslshould work for most Raspbian distributions.
$ wpa_passphrase your_network_name your_password
This will generate a response like this:
network={
 ssid="your_network_name"
 #psk="your_password"
 psk=6a24edfec4d204601b6e1f409630702...
}
Delete the line with your password in plaintext, then use this in place of the network={…} block in the wpa_supplicant.conf file and you should be good to go. The wpa_supplicant.conf file can contain network blocks for multiple networks, so if you want to add your home network as well, you can. On startup, the Pi will go through the list and try to connect to each one in turn, stopping when it succeeds. So if you have two networks available in one location, then make sure to put the default one first.
CONFIGURING FOR AN ENTERPRISE NETWORK
For connecting to an enterprise network using PEAP with MSCHAPv2 authentication, you can configure the
wpa_supplicant.conffile as follows:- Open the
wpa_supplicant.conffile for editing:bashsudo nano /etc/wpa_supplicant/wpa_supplicant.conf
- Delete any existing network blocks if present.
- Add the following configuration for the PEAP network:
makefile
network={

ssid="YOUR_NETWORK_SSID"

key_mgmt=WPA-EAP

eap=PEAP

identity="YOUR_USERNAME"

password="YOUR_PASSWORD"

phase1="peaplabel=0"

phase2="auth=MSCHAPV2"

}
Replace
YOUR_NETWORK_SSIDwith the SSID (name) of the enterprise network,YOUR_USERNAMEwith your network username, andYOUR_PASSWORDwith your network password. - Save the changes and exit the text editor.
- Restart the networking service to apply the changes:
sudo systemctl restart networking.service
Alternatively, you can reboot the Raspberry Pi.
With this configuration, the Raspberry Pi will attempt to connect to the enterprise network using PEAP with MSCHAPv2 authentication. Make sure to replace the placeholder values (
YOUR_NETWORK_SSID,YOUR_USERNAME, andYOUR_PASSWORD) with your actual network credentials.ctrl_interface=DIR=/var/run/wpa_supplicant GROUP=netdev update_config=1 country=US network={ ssid="network_name" key_mgmt=WPA-EAP eap=PEAP proto=WPA2 phase2="auth=MSCHAPV2" anonymous_identity="your_username" identity="your_username" password=your_password }To generate an encrypted hash for the password in the
wpa_supplicant.conffile, follow these steps:- Open a terminal on your Raspberry Pi.
- Run the following command to generate the password hash:
- Replace
YOUR_NETWORK_SSIDwith the SSID (name) of your network, andYOUR_PASSWORDwith your network password. The command will output a block of text that includes the encrypted password hash. - Copy the generated encrypted password hash.
- Open the
wpa_supplicant.conffile for editing: - Locate the
networkblock for your network, and replace thepasswordline with the encrypted password hash you copied earlier. It should look like this:- Replace
YOUR_ENCRYPTED_PASSWORD_HASHwith the encrypted password hash generated in step 2. - Save the changes and exit the text editor.
- Replace
- By replacing the password line with the encrypted password hash, you ensure that your password is not stored in plaintext in the
wpa_supplicant.conffile.Remember to replace
YOUR_NETWORK_SSIDandYOUR_PASSWORDwith your actual network credentials when running the commands.
Once you have set up the network configuration in the
wpa_supplicant.conffile and saved it, your Raspberry Pi should start scanning for networks and attempt to connect. You can check if you are connected by following these steps:- Open a terminal on your Raspberry Pi.
- Run the following command to check the network interface configuration:
ifconfig wlan0
This command will display the network interface details, including the IP address assigned to your Pi's wireless interface (
wlan0). - Additionally, you can run the following command to check the wireless configuration:
iwconfig wlan0
This command will provide information about your wireless interface, including the SSID (network name), signal strength, and other wireless parameters.
By running these commands, you can verify that your Raspberry Pi is connected to the network using the configured WiFi settings.
Please note that the specific network interface name (
wlan0) may vary depending on your system configuration.Connecting Via WiFi and ssh
To connect to your Raspberry Pi via WiFi and SSH, make sure you have already created the
sshfile and thewpa_supplicant.conffile as mentioned earlier. Once your Pi has booted up and connected to the configured network, follow these steps to establish an SSH connection from your personal computer:- Ensure that your personal computer is connected to the same WiFi network as your Raspberry Pi.
- Open the command line interface or terminal on your personal computer.
- Type the following command to establish an SSH connection to your Raspberry Pi:
lua
ssh pi@your-pi-ip-address
Replace
your-pi-ip-addresswith the IP address assigned to your Raspberry Pi on the WiFi network. If you don't know the IP address, you can find it by running theifconfigcommand on your Pi or checking your router's DHCP lease table. - Press Enter and enter the password for the user
pi(or the custom user you have created) when prompted. Note that while typing the password, no characters will be displayed on the screen for security reasons. Press Enter again to confirm.
If the IP address and credentials are correct, you should establish an SSH connection to your Raspberry Pi. From there, you can remotely manage and configure your Pi using command-line tools and utilities.
Note: If you have modified the default SSH port (22) on your Raspberry Pi, you need to specify the port number in the SSH command using the
-poption, like this:ssh -p your-ssh-port pi@your-pi-ip-address. Replaceyour-ssh-portwith the actual SSH port number you have configured.Please ensure that you have properly set up the SSH and WiFi configurations on your Raspberry Pi before attempting to connect.
ssh [email protected]
Alternately, you can use the IP address of your Pi if you know it, instead of raspberrypi.local. You should get a response like this:
[email protected]'s password:
Enter your password and you’ll be logged in.
Testing Your Network Connection with curl
You can test your network connection by making a web request. The command line program curl is a good way to do this. Type:
$ curl http://www.example.com
You should get a response that includes a lot of HTML,
ending with the following:<body> <div> <h1>Example Domain</h1> nts. You may use this domain in examples without prior coordination or asking for permission.</p> <p><a href="http://www.iana.org/domains/example">More information...</a></p> </div> </body> </html>
If you got this result, your Raspberry Pi is now connected to the internet.
Deleting Your History File
At this point you have entered some sensitive information on the command line (like your passwords) and it gets saved in a file called
.bash_history.To see this file, type:$ sudo less ~/.bash_history
You can view and edit the command history file in order to remove any sensitive information. Follow these steps to open the file using the nano text editor and delete specific lines:
- In the command line interface, type the following command to open the command history file:
bash
nano ~/.bash_history
- The nano text editor will open, displaying the contents of the command history file. Scroll through the file using the arrow keys until you locate the line(s) you want to delete.
- Move the cursor to the beginning of the line you want to delete and press
Ctrl-Kto cut the line. - Repeat the previous step for any other lines you want to remove.
- Once you have deleted the desired lines, press
Ctrl-Xto exit nano. - Nano will prompt you to save the changes. Press
Yto confirm the change and save the modified file.
By following these steps, you can remove any sensitive command lines from the command history file to mitigate the risk of exposing sensitive information.
Note: It's important to be cautious when deleting lines from the command history file, as it permanently removes them from the record. Make sure you only delete the lines that contain sensitive information and not any necessary or useful commands.
Updating the Operating System
To ensure that your operating system is up to date and includes the latest patches, you can perform a system upgrade using the APT package manager. Follow these steps:
- Open the command line interface on your Raspberry Pi.
- Update the list of available software packages by running the following command:
sql
sudo apt-get update
This command retrieves the latest package information from the Raspbian package repository.
- Once the package list is updated, you can proceed with upgrading the installed packages by running the following command:
arduino
sudo apt-get upgrade
This command upgrades all installed packages to their latest versions.
- The upgrade process may take some time, depending on the number of packages and the internet speed. Follow the on-screen prompts, if any, to confirm the upgrade and allow the installation to proceed.
- Once the upgrade is complete, you can also perform a distribution upgrade to update to the latest version of the operating system by running the following command:
arduino
sudo apt-get dist-upgrade
This command performs a more comprehensive upgrade that takes care of package dependencies and handles major updates.
By following these steps, you can ensure that your operating system is upgraded to the latest version and has all the necessary patches and updates installed.
$ sudo apt update
You should get this message at the end:
Reading package lists... Done
If you get an error, check your network connection. The most likely error is that it didn’t get all the updates because it didn’t have a network connection. If it says you don’t have enough disk space, make sure you expanded the filesystem using raspi-config earlier. When you’ve updated the package lists, Type:
$ sudo apt upgrade
This will upgrade any installed software packages. This will take even longer than the update, and will ask you to confirm that you want to upgrade all the software. Type y to do so. Once this is complete, you’ll have the latest versions of all the tools in your Raspbian distribution.
Configuring a Firewall
When it comes to securing your Raspberry Pi's network connections, setting up a firewall is a recommended practice. Firewalls help control incoming and outgoing network traffic by specifying rules for allowing or blocking connections on specific ports. Follow the steps below to set up a basic firewall configuration:
- Open the command line interface on your Raspberry Pi.
- Install the
ufw(Uncomplicated Firewall) package by running the following command:arduinosudo apt-get install ufw
- Once
ufwis installed, you can start configuring the firewall rules. By default,ufwdenies all incoming connections and allows all outgoing connections. - To allow incoming SSH connections on port 22, run the following command:
sudo ufw allow 22
- To allow incoming HTTP connections on ports 80 and 443, run the following command:
sudo ufw allow 80

sudo ufw allow 443
- If you need to allow incoming connections on port 8080 (common for node.js servers), run the following command:
yaml
sudo ufw allow 8080
- Once you have added the necessary rules, enable the firewall by running:
bash
sudo ufw enable
This command will activate the firewall and start enforcing the configured rules.
- To verify the status of the firewall and check the rules, you can use the command:
lua
sudo ufw status
This will display the current firewall status and list the allowed ports.
By following these steps, you can set up a basic firewall configuration that allows specific incoming connections on selected ports while blocking all other incoming traffic. Remember to adjust the firewall rules according to your specific requirements, adding or removing ports as needed.
First you need to install ufw. Assuming you’ve updated your package manager, start by installing ufw:
$ sudo apt install ufw
Once it’s installed, you can set defaults to allow outgoing traffic and deny incoming:
$ sudo ufw default allow outgoing
$ sudo ufw default deny incoming
This would disconnect your ssh connection if you enabled it now, so you might want to enable ssh connections before you enable the firewall. The following line will enable TCP connections on port 22, the default ssh port:
$ sudo ufw allow ssh
If you’re planning to run an HTTP server, or an HTTPS server, you’ll need to enable them as well. You can specify not only the application (http, https), but also the transport protocol, like so:
$ sudo ufw allow http/tcp
$ sudo ufw allow https/tcp
More specific rules ensure that someone won’t try a sneaky attack like flooding UDP packets through your open HTTP ports. If you’re planning to do custom server development, you might want to enable the ports you’ll use for that as well. These settings are typical for node.js development.
$ sudo ufw allow 8080/tcp
$ sudo ufw allow 8081/tcp
Port 8081 is used by the p5.serialserver, which is common at ITP.
If you plan to use VNC to connect to the Pi desktop remotely, you’ll need to enable port 5900 as well.
Once you’ve configured your firewall, you enable it like so:
$ sudo ufw enable
You should reboot once you do this, to check that everything is in order. Once enabled, you can get a status report from ufw like so:
$ sudo ufw status
You should get a reply like this:
Status: active

To                         Action      From
--                         ------      ----
22/tcp                     ALLOW       Anywhere
80/tcp                     ALLOW       Anywhere
443/tcp                    ALLOW       Anywhere
8080/tcp                   ALLOW       Anywhere
8081/tcp                   ALLOW       Anywhere
22/tcp (v6)                ALLOW       Anywhere (v6)
80/tcp (v6)                ALLOW       Anywhere (v6)
443/tcp (v6)               ALLOW       Anywhere (v6)
8080/tcp (v6)              ALLOW       Anywhere (v6)
8081/tcp (v6)              ALLOW       Anywhere (v6)
Now you’ve got a reasonably secure setup for a networked device.
Updating your Programming Environment
To ensure you have the necessary programming tools installed on your Raspberry Pi, follow the steps below:
- Open the command line interface on your Raspberry Pi.
- Install Node.js by running the following command:
arduino
sudo apt-get install nodejs
This command will install Node.js, a popular development environment for networked applications.
- Install npm (Node Package Manager), which is bundled with Node.js, by running the following command:
arduino
sudo apt-get install npm
npm allows you to easily manage and install additional Node.js packages and libraries.
- Install Git, a version control system, by running the following command:
arduino
sudo apt-get install git
Git is widely used for software version management and collaboration.
- Once the installations are complete, you can verify that Node.js and Git were installed successfully by checking their versions. Run the following commands:
css
node -v

git --version
These commands will display the installed versions of Node.js and Git, respectively.
By following these steps, you will have installed Node.js, npm, and Git on your Raspberry Pi, providing you with the necessary programming tools for developing networked applications. Remember to perform these installations using the appropriate user account you have created to ensure proper configuration and access rights.
To check if any software tool is already installed, you can use the which command like so:
$ which git
You’ll get a reply like so:
/usr/bin/git
If you get no reply, then the software is not installed. You can check if the software is listed in the package repository like so:
$ sudo apt-cache show packageName
Replace packageName with the name of the package you’re looking for. If it’s there, you’ll get all the details on it, and you can install it using apt-get, like you’ll do for git next. Install git like so:
$ sudo apt install git
This will automatically install the version of git that’s listed in the Raspbian package list.
Upgrading node.js
In this section, you’ll remove the installed version of node.js from the Rasbpian distribution and upgrade to a more modern version. First, remove all node and npm files already on your Pi. These instructions come from this gitHub repo. Note that node.js stopped support for the processor on the Pi Zero as of version 12.0.0, so you’ll use an older version:
$ wget -O - https://raw.githubusercontent.com/sdesalas/node-pi-zero/master/install-node-v16.3.0.sh | bashCheck the version of node.js that you installed like so:
$ node --version
You should get this reply:
v16.3.0
Now you’ve got a working, reasonably secure Pi, and a programming environment with which to program it. Congratulations! Finally, reboot or shutdown:
$ sudo reboot
or
$ sudo poweroff
Back Up Your Custom Installation
At this point you may want to make a copy of the SD card using Etcher as you did at the beginning. Then you’ll have a customized image on which you can build other things. Since you’ll likely customize your system further for each application, it’s helpful to have a base installation from which to start. The ApplePiBaker app makes it easy for MacOS users to do backups simply.
Remote File Access
Remote file editing can be a pain on a Pi. If you’re using Visual Studio Code, here’s a set of instructions for the remote VSCode plugin that works well on the Pi. They have to be on the same network, but it can make editing much easier. Here’s the summary version:
- Install Visual Studio Code on your personal computer and run it
- Click the Extensions icon in the right side toolbar and search for Remote VSCode. Install it and relaunch VS Code.
- On your Pi, install rmate like so:
$ sudo wget -O /usr/local/bin/rmate https://raw.github.com/aurora/rmate/master/rmate

$ sudo chmod a+x /usr/local/bin/rmate
- In VS Code, Open the command palette (CTRL+P for Windows, CMD+P for MacOS) and type
>Remote: Start Server
- This will start the VSCode live share server.
- Get your Pi’s IP address.
- Now open the terminal pane in VS code (CTRL+` for MacOS and Windows) and type (replace PI_IP_ADDR with the Pi’s IP address):
$ ssh -R 52698:localhost:52698 PI_IP_ADDR
- This will log your computer into your Pi. You can then use rmate to open and edit files. For example, if there’s a file called myFile.txt, you can edit it by typing
$ rmate myFile.txt
- The file will open in VSCode, and you can edit and save, and it’ll automatically get saved on the Pi. Simple!
- Replace