
Album art from your currently playing track on a small, tiny and beautiful high resolution colour display powered by a Raspberry Pi.
This project is an evolution from a previous one which displayed your currently playing track on an e-ink display.
In this latest project I've combined that concept with an absolutely beautiful mini display from Pimoroni: the HyperPixel 4.0 Square. This thing is 4 inches square, just a couple of millimetres thick and can be powered from a £25 Raspberry Pi, but make no mistake, it's an absolute belter of a display: 720 pixels square with a pixel density equal to a modern smartphone, 262, 144 colours and a 60 fps refresh rate. It's stunning.
This project will put this lovely little display to work to display the album art from whatever is currently playing on your Sonos system. You can build the whole thing for £75 and I will talk you through every single step in the tutorial below: literally no prior experience required.
(Note: I am using the non touch version of the HyperPixel 4.0, which is cheaper and does everything we need. Also note that this tutorial only works with the HyperPixel 4.0 Square, not the rectangular one)
Step 1: Set up your Raspberry Pi
If you have a setup and running Raspberry Pi then skip to Step 2.
If you don't, then go through my super-simple, no-prior-knowledge-assumed, every-single-step-explained tutorial on how to set one up here. It takes max one hour and assumes zero prior knowledge (promise). See you back here when you're done.
Ok, on to Step 2.
Step 2: Connect the hardware
I recommend using a Pi 3 or Pi 4 for this project. The ideal one in my view is the Pi 3A+ as it's the thinnest.
The HyperPixel sits right on top of the Pi. No soldering or messing around is required. Pimoroni know how to make cool kit.
What is required is that you unplug it from the power first to protect yourself and the hardware.
You can also use the included spacers if you are using a B+ model or want more space.
Step 3: Raspberry Pi housekeeping
Run these commands at the command line to ensure everything is up to date on your Raspberry Pi:
sudo apt updatesudo apt upgradeStep 4: Install the Sonos API
The http-sonos-http-api is the bit of software that actually interfaces with our Sonos system.
Open up a Raspberry Pi command line and type the following to install the pre-requisites.
sudo apt install nodejs npm gitNow let's install the actual Sonos API code:
git clone https://github.com/jishi/node-sonos-http-api.gitcd node-sonos-http-apinpm install --productionnpm -- startThis should install and start the Sonos API server. Let's check if it's working.
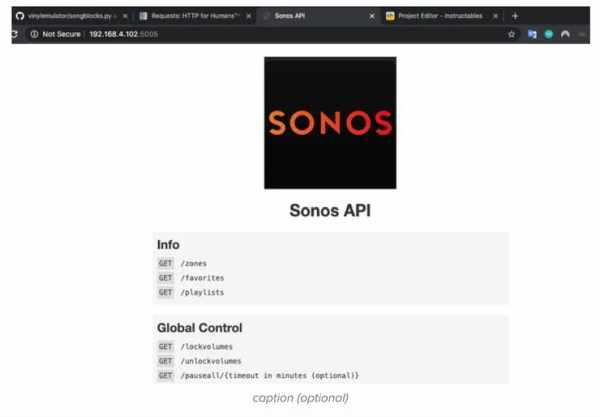
Open a web browser on your Raspberry Pi desktop and navigate to http://localhost:5005/
(Note this will only work on the Pi itself. If you want to connect from your PC/Mac/iPhone then replace localhost with the IP address of your Pi.)
You should see a nice Sonos interface in your web browser, which shows that the API is working:
Step 5: Automate it at startup
Go back to the terminal and kill the server with <CTRL> C.
Now we will install something called PM2 which will start the server every time we boot our system.
sudo npm install -g pm2 cd node-sonos-http-apipm2 start npm -- startThis should start the server again, but this time in the background. Check it's working by going to http://localhost:5005/ in your web browser again.
Assuming it's all good let's get it to run on start:
pm2 startup systemdThis last command generate something which looks a bit like:
sudo env PATH=$PATH:/usr/bin /usr/local/lib/node_modules/pm2/bin/pm2 startup systemd -u pi --hp /home/piCopy what your Pi generates (not the exact text above – yours may be different) and enter it into the command line. This instructs the system to run PM2 on boot every time, which we can then use to start the programs we want to run all the time.
Now save everything down and reboot:
pm2 savesudo rebootOnce it reboots try visiting http://localhost:5005/ again to see that it's started automatically.
Step 6: Set up the HyperPixel display
I've laid out the key steps below on how to set up the HyperPixel display. If any of this doesn't make sense then there is a full tutorial here from Pimoroni (makers of the HyperPixel).
Open a terminal window, and then type the following and press enter:
curl https://get.pimoroni.com/hyperpixel4 | bashThe installer may prompt you to type y or n and press enter at various points and, if it asks you whether you'd like to reboot once it's finished, then type y to reboot.
Once rebooted, your HyperPixel display should be displaying the Raspbian desktop.
Step 7: Install the music-screen-api software
Open a terminal window (you can continue to use SSH or VNC to connect here, rather than trying to read the tiny screen.
Let's do some housekeeping first:
sudo apt updatesudo apt install python3-tksudo apt install python3-pil sudo apt install python3-pil.imagetksudo pip3 install requestssudo pip3 install aiohttp RPi.GPIOClone the music-screen-api library from github:
git clone https://github.com/hankhank10/music-screen-api.gitFire up a terminal window in VNC (not SSH – you need to be in the GUI) and type:
python3 music-screen-api/go_sonos_highres.pyIt will prompt you for a room name – enter the Sonos room name you want to display, ensure some music is playing and you should see the album art, which indicates everything is working.
Now killing this screen is not entirely straightforward. It's full screen as you can see, and VNC doesn't accept key presses to terminate it. As such, to get back to our desktop we need to either:
- <ALT><TAB> within VNC to get back to the terminal screen on our desktop and press <CTRL><C> – this is recommended way; or
- fire up a SSH window to the Pi and type pkill python
That should deliver you back to the Pi desktop.
Step 8: Set your room details
When we were testing the code we entered our room name manually, but we don't want to do that each time.
First of all, let's create a copy of the sonos_settings.py file which we can actually edit using:
cp music-screen-api/sonos_settings.py.example music-screen-api/sonos_settings.pyLet's set the room name. At a command line:
nano music-screen-api/sonos_settings.pyAbout half way down you will see a setting currently called:
room_name_for_highres = ""Change this to your room name, for instance:
room_name_for_highres = "Living Room"Save the file (<CTRL><S>) and exit (<CTRL><X>).
Step 9: Make it run on startup
We want the program to run on startup and without us doing anything. We will do this by adding a file to the “autostart” folder.
Open a command prompt:
sudo nano /etc/xdg/lxsession/LXDE-pi/autostartThen insert the following lines at the end of the file that has opened
@xset s noblank@xset s off@xset -dpms@sudo /usr/bin/python3 /home/pi/music-screen-api/go_sonos_highres.pyThis tells our screen not to turn off (because we don't want it to power save just because we're not moving the curstor and typing) and to boot our script at startup.
Save the file (<CTRL><S>) and exit (<CTRL><X>).
Let's see if it works:
sudo rebootThe Pi will reboot. When it starts up you should see the Raspbian desktop for a moment before it loads up a black screen. This will stay like this for up to 30 seconds while things get running, and then you should see the album art (assuming you have music playing in the room you chose).
Step 10: Get rid of the cursor
Looks cool, right?
But one thing is annoying? The cursor right in the middle of the screen. Let's get rid of it.
Open up a command prompt on the Pi (either via SSH or by quitting the desktop app using one of the techniques above). We will install a script called unclutter and tell it to run on startup:
sudo apt updatesudo apt install uncluttersudo nano /etc/xdg/lxsession/LXDE-pi/autostartThis will take you back to the file we saw before. This time add:
@unclutter -idle 0Save the file (<CTRL><S>) and exit (<CTRL><X>).Then reboot:
sudo rebootThe cursor should now have disappeared.
One thing to note about removing the cursor is that while it looks nice for displaying our album art, it's a pita if you actually want to do anything (like change settings or actually use the user interface). Remember where this file is so you can delete the line via SSH if you want to use it in the future.
Step 11: Advanced settings (feel free to ignore – I've chosen the best ones for you already)
If you're so minded then you can edit the go_sonos_highres.py file to change a few things about how the screen operates. Everything you'll want to mess with is in the set user variables section at the top.
show_details is set to False by default. If you change this to True then it will shrink the album art a bit and show some details about the music at the bottom. I personally don't like this feature, but it's your Raspberry Pi so do what you want.
show_artist_and_album is set to True by default. If you have show_details set to False then this won't do anything, but if you do want to show text then this will allow you to choose what you want to see. If it's True then you'll see track name, artist name and album. If you set it to False then you just see track name.
THANK YOU!
Thank you so much for the incredible response to this and my other projects! I'm so excited that so many of you are building these cool little toys.
I've had a lot of questions about whether I will be building and selling these. The answer is definitely not: this is a hobby for me and part of the fun is the elbow grease that goes in. I think I've made the instructions possible for everyone, and I'm always here to help (reddit: u/vinylemulator) if you get stuck.
I don't accept donations but if you are inspired by my projects and want to recognise the work then you can buy me a coffee here.
Step 12: Enjoy!
I'd love to see what you make with this! Please feel free to amend, edit and mess with my code to improve it.
If you get stuck and need help please raise an issue on Github and I'll help you out!