
Ditch subscription fees! Secure your data & access your home network remotely with your own Raspberry Pi Zero & OpenVPN. Easy step-by-step guide of setting up your own OpenVPN server on Raspberry Pi for beginners.

While one-click VPN services offer convenient out-of-the-box solutions, they come at a price, and entrusting valuable data to these servers may pose security risks. Thus, opting for a more affordable and secure alternative, I prefer utilizing the popular Raspberry Pi Zero with PiVPN to establish my VPN server. In this guide, I'll illustrate how you can easily set up your OpenVPN server on a Raspberry Pi.
What is a VPN?

A VPN, short for Virtual Private Network, ensures online privacy by creating a secure connection. Initially employed by large organizations and governments for heightened security, VPNs have become ubiquitous as they guarantee privacy and safeguard data for everyone.
With a VPN:
- Your locations remain confidential
- Your data undergoes encryption
- Web browsing can be done anonymously
I've chosen to establish a VPN server on my home network using a Raspberry Pi. This allows me to securely access my local network even when I'm away. Moreover, I'm cautious about leaving an open SSH port vulnerable to potential hacking attempts.
When data is transmitted online via a VPN, it establishes a protected tunnel between your device and the designated server. This involves the use of an intermediary server. Without the VPN, your online requests go directly to the desired server. However, with the VPN activated, your requests are encrypted and routed first to your VPN provider's server before reaching the intended destination.
Why use a VPN?
Understanding what occurs when you enter a domain name and press “Enter,” consider that the domain name serves as an alias for the website's IP address. An IP address, akin to a home address, comprises numerical values instead of street names. This substitution of names for numbers makes it far more convenient to remember. This translation is performed by a server commonly known as the Name Server.
Each device connected to our network, including our computer, possesses its unique IP address. When we input a chosen domain name and hit “Enter,” the request is directed to a name server. The server translates the data and returns the requested website. However, the issue arises when sending data to the server—not only the requested information but also location details and various other information are included.
This is where a VPN plays a crucial role. By activating a VPN, an additional layer of security is integrated into your network. It's not to say that breaking into a VPN network is impossible, but it certainly presents a more challenging barrier.
Websites you visit often gather information for demographic purposes. However, there are situations where safeguarding your privacy becomes imperative. In such cases, VPNs become vital protectors of your data.
Several VPN services operate with a ‘no logs' policy, implying they don't retain records of the sites you visit. Hence, if government authorities request your logs from the VPN provider, you can be assured there won't be any records to provide.
In essence, VPNs play a pivotal role in preserving your privacy and ensuring the security of your data.
Types of VPN
While discussing VPN protocols that ensure secure connections, let's delve into three of the most popular ones, although I won't cover all available protocols.
1. Point-to-Point Tunneling Protocol (PPTP): Introduced in the mid-'90s by Microsoft, PPTP, or Point-to-Point Tunneling Protocol, was among the earliest VPN protocols. Initially integrated with Windows 95 and commonly used in dial-up connections, PPTP's basic encryption was later compromised, raising significant security concerns. Despite its speed due to basic encryption techniques, it's considered less secure compared to modern-day VPN protocols.
2. L2TP/IPSec: L2TP (Layer 2 Tunneling Protocol) resulted from a collaboration between Microsoft and Cisco, aiming to address security flaws found in PPTP. L2TP, without inherent encryption, required integration with a security protocol. Consequently, it became highly secure and free from vulnerabilities by using IPSec for end-to-end encryption during communication.
3. OpenVPN: Introduced in 2001, OpenVPN is an open-source VPN protocol renowned for its use of AES-256 bit key encryption, 2048-bit RSA authentication, and a 160-bit SHA1 hash algorithm—considered theoretically unbreakable. Widely adopted due to its robust security features, OpenVPN supports major operating systems and is even embedded in routers and various network devices.
4. SSTP: Secure Socket Tunneling Protocol (SSTP) gained popularity for its integration with Windows Vista SP1. Using 2048-bit SSL/TLS certificates for authentication and 256-bit SSL keys for encryption, SSTP offers strong security. However, being a Microsoft proprietary protocol, its source code remains inaccessible to individual developers.
5. IKEv2: Internet Key Exchange version 2, or IKEv2, is a widely used VPN tunneling protocol that combines secure key exchange protocols similar to L2TP (IKEv1) with IPsec for encryption and authentication. Its notable advantage lies in its ability to quickly re-establish a connection after temporary disruptions, making it an ideal choice for mobile and cellular internet connections.
What You'll Need for Raspberry Pi OpenVPN Server

To prepare for this setup, you'll require the following essentials:
– A Raspberry Pi (I'm utilizing a Raspberry Pi Zero).
– Either a Wi-Fi adapter or a USB to Ethernet Adapter (I'll opt for the Wi-Fi adapter).
– A USB OTG cable.
– A Power Brick capable of delivering sufficient current.
– A micro SD card.
– A USB cable for powering the device.
Please note, I'll be utilizing the headless setup method for configuring the Raspberry Pi. If you prefer an alternative method, you can connect a monitor and a keyboard, but this requires a separate USB hub and can be a bit messy.
Setting up the Raspberry pi for VPN Server
Configuring your Raspberry Pi is a straightforward process that involves only a few steps. To begin, you'll need to acquire the Raspberry Pi OS from the official Raspberry Pi website, prepare the SD card, and proceed with the installation of the Raspberry Pi OS onto the card. For further guidance on initiating your journey with the Raspberry Pi, explore additional information for OpenVPN server Raspberry is available here.
Build Your Secure VPN Server with Raspberry Pi & OpenVPN
Download the Raspberry PI OS:
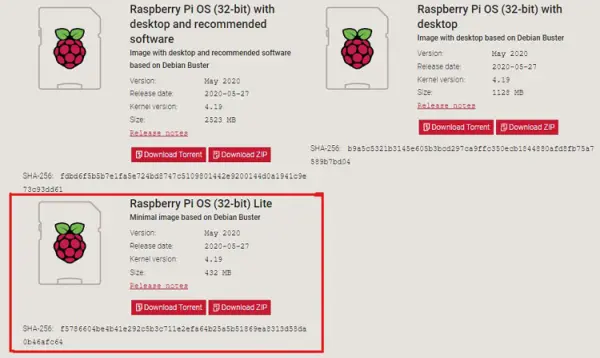
I am using a Raspberry pi zero, so I am going to download the Raspberry Pi OS (32-bit) Lite image.
Flash the SD Card:
To flash that, we need a tool called balenaEtcher or you can use your favourite flashing tool.

I suggest opting for the portable version as it doesn't require installation. Simply open Etcher, select your file, choose your target, and proceed to flash it. Once completed, you'll find a small 250MB partition named “boot.”
Setup Headless SSH:
To activate Headless SSH configuration, you'll create a blank file titled ‘ssh.' This uncomplicated action effectively enables SSH for the Raspberry Pi.

Setup Headless Wi-Fi:

For establishing Headless Wi-Fi, create a file called ‘wpa_supplicant.conf' and save it in the boot partition, as I mentioned earlier.
The file should contain the following content:
ctrl_interface=DIR=/var/run/wpa_supplicant GROUP=netdev
update_config=1
country=<Insert 2 letter ISO 3166-1 country code here>
network={
 ssid="Test_Raspberry-PI"
 psk="12345678"
}
Enter your router's SSID and password in the designated SSID and PSK sections.
With the SD card set up, proceed by inserting it into your Raspberry Pi and powering it up.
Assign a Static IP:

Assigning a static IP address to the Raspberry Pi is crucial to prevent dynamic changes that might lead to issues.
Within my router settings, I access the operations tab and can reserve the IP address specifically for the Raspberry Pi by clicking on the green sign. If you're performing this task, you'll need to locate the corresponding process specific to your router.
SSH to the Raspberry Pi:
Now, let's initiate an SSH connection to the Raspberry Pi in order to update and upgrade the operating system. For this task, I'll be utilizing Git Bash on my Windows PC. If you prefer, you can use PuTTY or your preferred SSH application for this process.
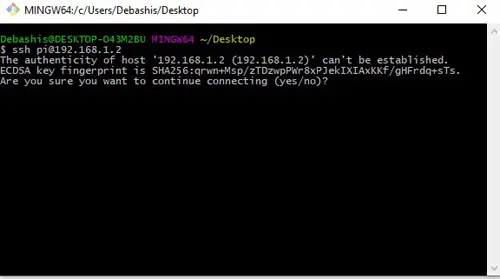
Access your Raspberry Pi via SSH by entering “pi@yourIPAddress” into the command line. In my instance, it was “[email protected]”. If everything functions correctly, you'll receive a prompt to input your password.
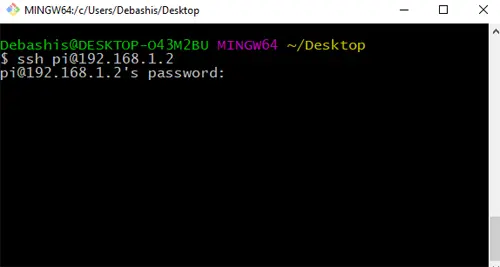
Enter the default password for the Raspberry Pi which is raspberry.
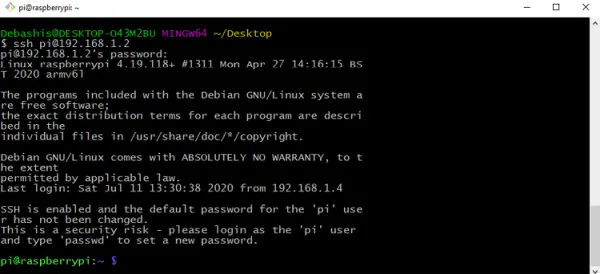
If all is functioning correctly, you'll be greeted with the prompt “pi@raspberry bash.” Congratulations on successfully establishing an SSH connection to your Raspberry Pi.
Next, proceed to update and upgrade your Raspberry Pi OS by entering the following command and pressing enter.
sudo apt-get update && sudo apt-get upgrade
Modifying the Default SSH Password:
Once you've completed the update and upgrade process, it becomes crucial to alter the default SSH password for the Raspberry Pi. Otherwise, hackers might exploit this vulnerability to gain unauthorized access to your network.
To accomplish this, enter sudo raspi-config, which will lead you to the following screen.
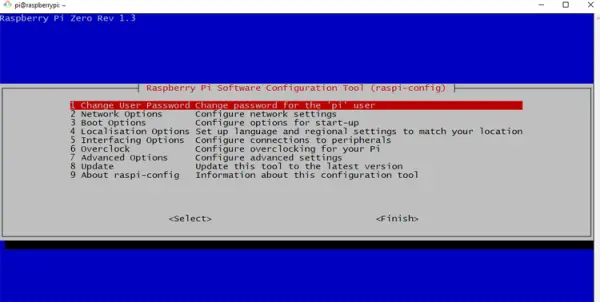
Press the enter key as it's the primary option listed, create your new password, and you're ready to proceed.
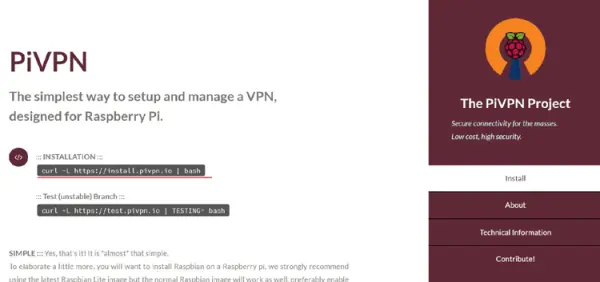
Next, we'll configure OpenVPN by leveraging the PIVPN project available on the PIVPN website.
Installing OpenVPN with PiVPN in Raspberry Pi Zero
Thanks to PIVPN, installing a VPN on Raspberry Pi becomes remarkably simple. By following the steps outlined below, you'll have a VPN server set up in no time.
Begin by visiting the PIVPN website and copying the provided curl command.
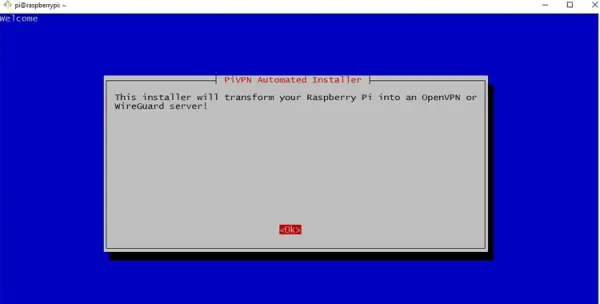
Following that, access your Raspberry Pi via SSH, paste your code, and press enter. This action will initiate the download and setup of all essential components required to run OpenVPN.
Subsequently, you'll encounter a screen indicating the transformation of your Raspberry Pi into an OpenVPN system.
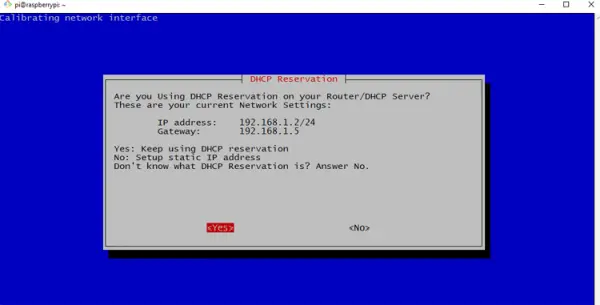
On the following screen, you'll encounter a prompt to configure a static IP address for your Raspberry Pi. Since we've already completed this setup earlier, there's no need to reconfigure it. Simply select “Yes” and proceed forward.
Next, we need to specify a Local User for the server.
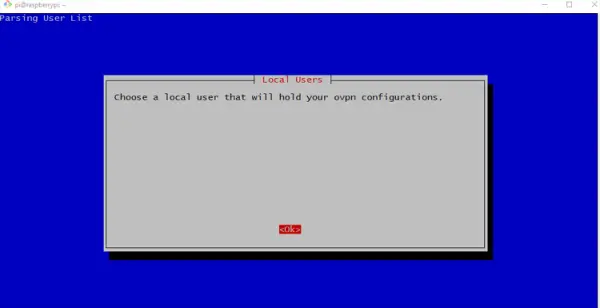
Press enter to access the user selection page, where you'll need to choose ‘pi' (the default user), then press enter again.

Next, you need to choose what type of VPN you like to use. It's the open VPN:
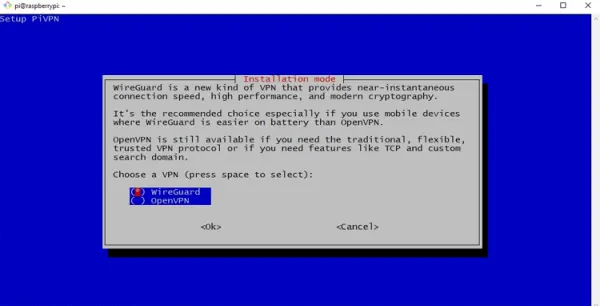
Select OpenVPN by pressing Enter.
Subsequently, you'll be prompted to select a protocol: TCP or UDP.
I opt for UDP due to its faster performance compared to TCP.
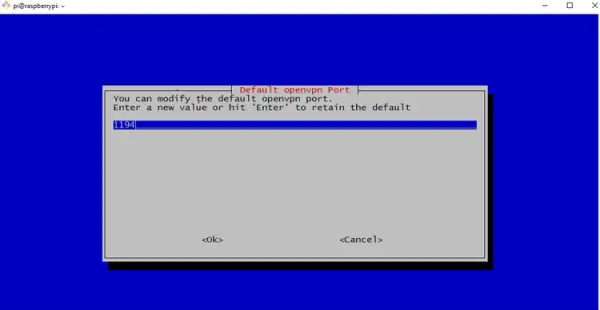
Validate the settings by choosing ‘yes' and pressing enter.
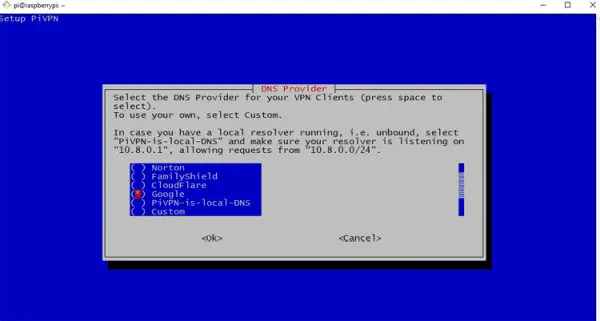
Following that, you'll be asked to choose a DNS provider. I'm opting for Google as my DNS provider.
Next, you will be prompted to select your search domain.

Choose ‘yes' and press enter.
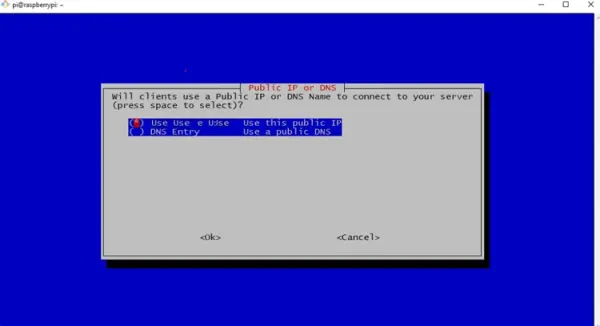
Upon selecting ‘yes,' the next step involves setting up a dynamic DNS server, enabling access to our VPN network from outside our home network.
To accomplish this, utilize a free dynamic DNS name server. I prefer using dynu as it's free and straightforward to configure. Simply create a free account to proceed.
Continuing further…
Enter your dynamic DNS server name and press enter. If everything is correctly configured, you'll receive your public IP address in the Raspberry Pi console.
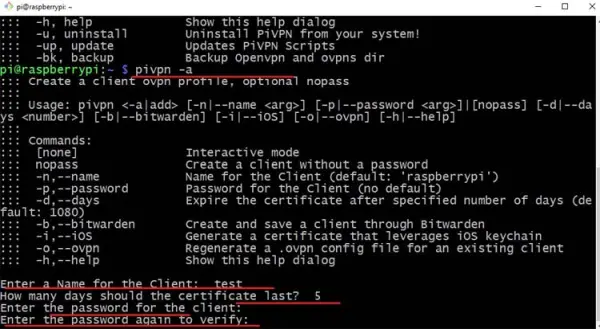
Following the reboot of the Raspberry Pi, log back in via SSH and execute the command ‘pivpn add'.
This command facilitates the creation of a new VPN profile. It's essential to generate a unique VPN profile for each device we intend to connect.
Upon entering ‘pivpn add' into your terminal and pressing enter, you'll encounter a set of options as illustrated below.
The file is now generated, and to transfer it to our desktop, I'll use the secure copy method. Execute the following command to proceed.
scp [email protected]:/home/pi/ovpns/test.ovpn /c/Users/your directory/Desktop

Once completed, we require a VPN client for the PC. I'll opt for the OpenVPN Client software available on the OpenVPN community-download page.
After completing the download and installation process, launch the software. If an error message appears, don't be concerned; it simply indicates that the software didn't detect any profiles. Click ‘OK,' and subsequently, a new icon will appear in the system tray of your PC.
![]()
Similar to the image above, right-click and select ‘import.' Proceed to provide the .ovpn file and click ‘OK.' You'll receive a message confirming the successful import.
Patience is key at this point; allow the GUI a moment to process. After a brief wait, you'll notice a green icon indicating a successful VPN connection for OpenVPN server Raspberry.
![]()