
THIS BOOK UNVEILS THE POTENTIAL FOR YOU, as a creator, to automate your home or business,
enhancing the quality of life while also incidentally achieving certain efficiencies. The latter could manifest as real energy savings or simply streamlining the rhythm of day-to-day personal activities. I've also incorporated the Raspberry Pi as a core controller in a majority of the projects explored within this book due to its affordability and impressive functionalities, especially in implementing home automation (HA) solutions.
I've previously covered HA projects in several of my earlier maker-oriented publications, which also highlighted the Raspberry Pi as the central controller. However, in this volume, I've delved into extensive discussions about personal voice assistants and their integral role in HA projects. These devices, typified by the Amazon Echo and Google Home devices, are relatively novel in the market. Their inclusion in this book is rooted in the realization that they are swiftly gaining popularity as the preferred means of interaction with HA systems. The traditional act of adjusting a thermostat or flicking a light switch is rapidly diminishing in the face of these innovative voice-activated devices.
The initial chapters of this book focus on exploring the functionality of various voice-activated devices and their interaction with the Raspberry Pi. It's crucial to acknowledge that Amazon Echo devices exhibit distinct dynamics in their interaction with the Raspberry Pi compared to other options, and these nuances are thoroughly dissected.
Moreover, the first few chapters are dedicated to unraveling the mechanics of various voice-activated devices and their interactions with the Raspberry Pi. It's important to recognize that Amazon Echo devices exhibit distinct dynamics when coupled with the Raspberry Pi compared to other alternatives, and these nuances are extensively explored. I strive to elucidate how you can effectively interface with both types of devices, all the while highlighting the advantages and disadvantages of each approach. I am confident that by successfully following my numerous demonstrations, you will become adept at interfacing with either class of device.
Chapter 5: Subsequent to the comprehensive discussion on voice-activation devices, delves into HA operating systems, which significantly enhance the implementation of a functional HA system. A comprehensive survey of currently available HA operating systems (OSs) is provided. However, given the dynamic nature of this field, these surveys are subject to change, and substantial revisions are likely by the time this book is published. Nonetheless, the foundational principles of a robust HA OS remain constant, and I aspire that my discussion in this area guides you in selecting an appropriate OS that aligns with your needs. Chapter 5 also presents a practical demonstration of one of the most popular HA OSs, aiming to provide an in-depth understanding of its functioning and aiding in your decision-making process regarding its suitability as an HA solution.
Chapter 6 delves into a Z-Wave-enabled HA system. Z-Wave has gained substantial traction as a method for establishing communication links among distinct or distributed HA components. Several manufacturers offer a diverse range of Z-Wave-compliant devices, each with their unique characteristics and applications.
Regarding Z-Wave-enabled components, it's my belief that familiarizing yourself with this particular communication protocol is crucial due to its remarkable popularity and the abundance of accessible devices and components. I also take the initiative to present a chapter demonstration wherein I directly interface a Raspberry Pi with a Z-Wave system, granting you the capability to tailor your own control scripts for various Z-Wave devices.
Chapter 7 delves into an open-source alternative to Amazon Echo and Google Home devices. I introduce Picroft, an open-source device hosted on a Raspberry Pi, which is a variant of its parent device, Mycroft. Essentially, Mycroft and Picroft are interchangeable terms. Mycroft is a tangible open-source device available for purchase, while Picroft refers to the software image installed on a Raspberry Pi. In essence, the Mycroft device comprises a Raspberry Pi running the same software featured in the Picroft image. I seamlessly alternate between the terms Mycroft and Picroft throughout the chapter, maintaining clarity and context. My intention in discussing Mycroft is to present a cost-efficient option compared to Amazon and Google devices. However, when you factor in the necessity of an external USB microphone and speaker/amplifier to create a functional Picroft system, the cost disparity is minimal. If you calculate these additional expenses alongside the Raspberry Pi's cost, the total expense is likely comparable to purchasing an Amazon Echo Dot or Google Home Mini. Nevertheless, for those inclined to embark on a creative endeavor, constructing a personalized open-source voice assistant can be an enjoyable endeavor.
Chapter 8 delves into the realm of artificial intelligence (AI), exploring how AI fuzzy logic (FL) can be effectively applied to a home heating, ventilation, and air-conditioning (HVAC) system. Detailed discussions center around designing a functional FL system using a multi-step procedure. The benefit is that a Raspberry Pi-powered HVAC FL controller doesn't necessitate additional expensive components. Merely creating and loading the FL code onto the Raspberry Pi suffices. An actual FL demonstration simulates the functioning of a real HVAC system, utilizing light-emitting diodes (LEDs) to indicate appropriate heating and/or cooling commands.
Chapter 9 serves as a comprehensive resource, covering the utilization of a range of sensors commonly found in various HA systems, including HVAC and security setups. This chapter provides valuable insights into sensor selection considerations and the design of suitable interfaces between sensors and controllers – in this case, a Raspberry Pi.
Chapter 10 delves into an HA security system employing a remotely placed sensor in conjunction with the Raspberry Pi main controller. I incorporate the use of XBee, a robust wireless data link system that not only transmits binary on/off signals but also actual sensor data values, if necessary. The XBee subsystem is governed by an Arduino Uno microcontroller, introducing the concept of coprocessing into the HA system design discussion. At times, a Raspberry Pi's capabilities might fall short, necessitating additional support. Communication timing plays a pivotal role, yet the asynchronous nature of the Linux OS running on a Raspberry Pi means there's no assurance that the computer will be available to process incoming communication data. In contrast, the Uno offers immediate and continuous attention required for the communication link.
Chapter 11, I provide a concise exploration of crucial concepts regarding the integration of distinct HA systems. This integration aims to offer users a cohesive perspective of the entire HA setup, alongside guidance on establishing centralized control. Additionally, I delve into the effectiveness of employing scripts or macros executed on an HA controller to markedly enhance the overall user experience within the HA environment.
Designing and Building
I CONSIDER THIS CHAPTER as a foundation, equipping you with the essential knowledge necessary to embark on the creation of home automation (HA) projects. This knowledge complements the detailed insights provided in this book and other resources. Often, comprehending the overarching context proves valuable prior to delving into specific intricacies and finer details. Subsequently, the following section outlines a generalized approach to conceptualizing and executing an HA solution.
To facilitate your journey, each chapter will commence with a Parts List, allowing readers to identify the components required for replicating the projects and demonstrations featured within that particular chapter. These lists also suggest sources, which are current as of the time of this writing. It's important to note that the actual parts necessary may vary based on what each individual reader already possesses in their parts collection. The initial list also encompasses items and components that are common to other Parts Lists, such as power supplies and HDMI cables. Subsequent Parts Lists will omit these standard items as they are self-explanatory.
Parts List
| Item | Model | Quantity | Source |
| Raspberry Pi 3 | Model B | 1 | mcmelectronics.com adafruit.com digikey.com mouser.com farnell.com |
| T-Cobbler | 40-pin P/N 2029 | 1 | adafruit.com |
| Solderless breadboard with 830 tie points | Commodity | 1 | mcmelectronics.com adafruit.com digikey.com mouser.com farnell.com |
| 5-volt (V), 2.5-ampere (A) power supply with micro USB connector | Commodity | 1 | mcmelectronics.com adafruit.com digikey.com mouser.com farnell.com |
| HDMI-to-HDMI cable, 1 meter (m) | Commodity | 1 | amazon.com |
| Item | Model | Quantity | Source |
| LEDs, various colors | Commodity | Varies | mcmelectronics.com adafruit.com digikey.com mouser.com farnell.com |
| 330-ohm (Ω), ¼-watt (W) resistor | Commodity | Varies | mcmelectronics.com adafruit.com digikey.com mouser.com farnell.com |
| 2N3904 NPN transistor | Commodity | Varies | mcmelectronics.com adafruit.com digikey.com mouser.com farnell.com |
| Jumper wire package | Commodity | 1 | adafruit.com |
| USB keyboard | Amazon Basic | 1 | amazon.com |
| USB mouse | Amazon Basic | 1 | amazon.com |
| HDMI monitor | Commodity | 1 | amazon.com |
| Google AIY Voice Kit for Raspberry Pi | 3602 | 1 | adafruit.com |
Generalized HA Design Approach
Defining requirements marks the inaugural phase of any HA project, barring the simplest ones. This involves articulating project necessities in a clear and unequivocal manner. For instance, the statement “to turn on the lights” lacks specificity, omitting crucial details like which lights, activation mode, or duration. A more precise requirement could read as “to activate the front porch lights via voice for one minute.” In this revised version, the requirement specifies the light, activation duration, and method. Each component of the requirement serves as a roadmap for tailored HA implementations, aiding in the creation of accurate and fitting solutions to meet personalized needs within an HA system.
The architecture of an HA solution pivots greatly on the types of devices to be controlled and their placements within the home. For instance, managing a thermostat vastly differs from activating a light. Distinct control technologies come into play, each necessitating specific interfaces with their respective technologies. While a Raspberry Pi serves as the standard microcontroller for all HA projects within this book, diverse control technologies will be employed. This accommodates the range of device placements, with wireless control technology applied to devices separated over distance and direct-wired approaches suited for devices proximal to the controller. A few scenarios will even employ two-wire control data signals for distributed devices.
Safety stands as a pivotal design aspect when devising an HA system. Devices connected to the mains supply must invariably be controlled using certified, country-appropriate equipment. In the United States, this entails devices with Underwriters Laboratories (UL) approval. Comparable rating organizations exist in other countries where HA projects are implemented. While certified control devices might escalate project costs, there's no compromise when it comes to ensuring the safety of you and your family. Notably, this book's projects involving mains-connected devices adhere exclusively to UL-approved products.
Another essential HA design consideration involves user interaction with the system. In the earlier example, voice activation was mentioned as it's currently a popular approach. A few years ago, HA systems relied on keypads and relatively basic liquid-crystal display (LCD)/light-emitting diode (LED) electronics for user interaction. Traditional home-brew HA systems used workstations coupled with monitors, keyboards, and mice. In this book, both workstation and voice-recognition approaches are utilized. Workstations offer distinct advantages for designing and developing tailored HA solutions. The integration of voice-recognition assistants into the system comes after the initial design is validated. The functioning of the Google Voice Assistant will be explained later in this chapter. However, prior to that, I'll elucidate the process of configuring a Raspberry Pi to serve as an HA system controller.
Raspberry Pi Setup
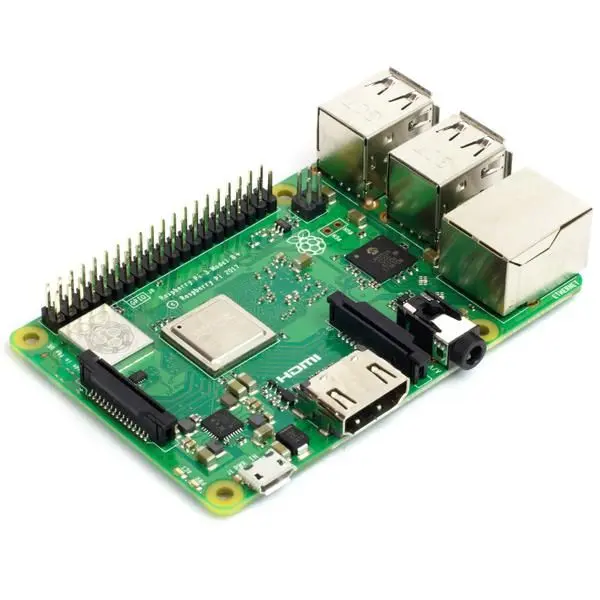
To replicate the projects within this book, you'll need to establish a setup using a Raspberry Pi (RasPi). I'll guide you through configuring a RasPi 3 Model B to function as a workstation, housing the necessary applications to implement various HA solutions. The RasPi 3 Model B, as depicted in Figure 1-1, is utilized throughout this book.
It's worth noting that the Raspberry Foundation introduced the Raspberry Pi 3 Model B+ around the time of writing. This variant offers minor speed enhancements and wireless function improvements, which, however, have no impact on the projects outlined in this book. Both the B and B+ models can be employed interchangeably without necessitating any software or hardware adjustments.
Detailed elaboration on the components comprising a RasPi single-board computer isn't covered here, as it has been extensively addressed in numerous available resources. I refer you to two of my previous books, namely “Raspberry Pi Projects for the Evil Genius” and “Raspberry Pi Electronics Projects for the Evil Genius,” where I delve into the architecture and constitution of the RasPi single-board computer series. For this book, a RasPi 3 Model B is used in a workstation configuration—simply connected to a USB keyboard, USB mouse, and HDMI monitor. Powering the RasPi is a 2.5-A, 5-V supply with a micro USB connector, as detailed in the Parts List. Now, let's proceed to explore the setup of secondary storage for the RasPi, which is pivotal for its functionality.
Unlike conventional disk drives, a RasPi doesn't require one for software applications, utilities, and the operating system (OS). Recent designs, from the past few years, rely on a plug-in micro SD card for this secondary storage function. While it's possible to connect a traditional disk drive to a RasPi, it serves only as auxiliary storage, not the primary and persistent storage for the OS and boot partition. The ensuing sections will guide you through the process of downloading and installing an OS onto a micro SD card, enabling your RasPi to boot as a functional HA microcontroller.
Obtaining a pre-programmed micro SD card is easiest through one of the RasPi suppliers listed in the Parts List. These cards are ready for use, requiring configuration to align with your specific workstation setup, including your private WiFi network. We'll delve into the configuration process later, but let's first explore how to create your own micro SD card if purchasing a pre-programmed one isn't an option.
The software to be loaded is known as an “image” and is freely available from multiple online sources, with the recommended source being the Raspberry Pi Foundation site at raspberrypi.org. The latest image can be downloaded from the Downloads section of the website. There are two image versions available: NOOBS and Raspbian. NOOBS, short for “New Out Of the Box Software,” is a collection of files and subdirectories. The BitTorrent or Zip downloads are around 1.2 gigabytes (GB), with the extracted image at 1.36 GB, expanding to over 4 GB once installed. Thus, an 8-GB micro SD card is advisable, preferably Class 10 for optimal data throughput with the operating RasPi.
The second image version, Raspbian, is a Debian Linux distribution tailored for the RasPi. The current image is named Stretch. This version sees frequent updates, and I'll guide you on how to ensure you have the most current version in the configuration section. Raspbian can be downloaded through BitTorrent or as a Zip file, with final image sizes similar to the NOOBS image.
Following the download of the desired image, a micro SD card must be loaded with it. The process depends on the downloaded version, which I will elaborate on in the subsequent sections.
Writing the NOOBS Image to a Micro SD Card
Creating a bootable micro SD card becomes straightforward by utilizing the downloaded and extracted NOOBS image. To begin, you'll have to format the micro SD card using a suitable application compatible with your host computer. For Windows and Mac systems, access the formatter program via the following link: www.sdcard.org/downloads/formatter_4/.
I personally employed the Mac version without encountering any issues. Nevertheless, it's crucial to ensure the proper formatting of your micro SD card, as an incorrectly formatted card will impede the NOOBS installation process.
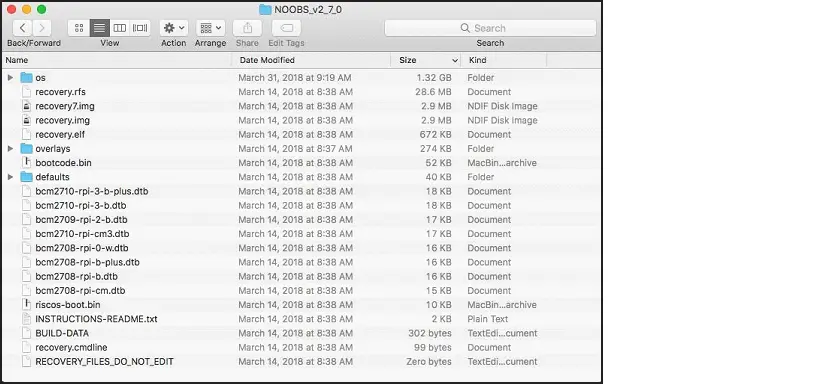
Once the NOOBS file has been downloaded, it will be labeled as NOOBS_v2_7_0.zip. Upon complete extraction, it forms a directory named NOOBS_v2_7_0. It's crucial to navigate into this folder and then proceed to copy all the files and subdirectories contained within it, as visually depicted in Figure 1-2. Afterward, these folder contents should be pasted directly onto the formatted micro SD card. VITAL: It's important to note that merely copying the NOOBS_v2_7_0 folder itself is not sufficient. The contents of the folder must be copied onto the SD card for it to be bootable by the RasPi.
Writing the Raspbian Image to a Micro SD Card
The process of creating a Raspbian image varies slightly from the NOOBS method. In this scenario, you are not required to format the micro SD card before writing the image. This aspect of the procedure is automatically handled by the application responsible for writing the image onto the card. The setup involves using a suitable application based on your host computer. For Windows users, I highly recommend the utilization of Win32DiskImager, accessible at https://sourceforge.net/projects/win32diskimager/files/latest/download.
Upon download, you'll receive a Zip file that needs to be extracted prior to use. The procedure is as simple as running the application and specifying the location of the disk image, along with designating the correct logical file letter for the micro SD card. Figure 1-3 visually represents the configuration screen I used when writing the Raspbian Stretch version onto a micro SD card on a Windows machine.

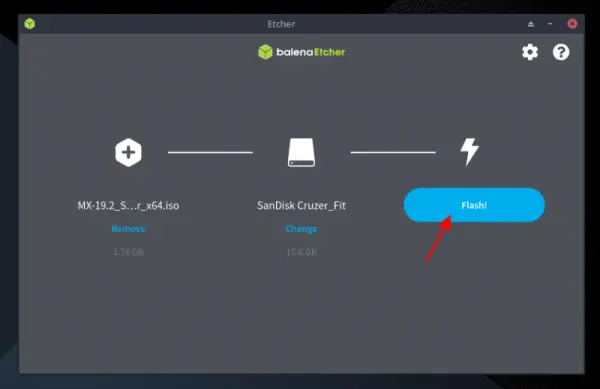
For Mac users, I suggest utilizing the Etcher program for loading the disk image. You can obtain it from https://etcher.io/. This application operates in a manner similar to the Win32DiskImager program. A visual representation of the program in action on my MacBook Pro can be seen in Figure 1-4.
Once you have successfully loaded the image onto your micro SD card, the subsequent step in the setup process involves configuring the image. The subsequent two sections provide comprehensive guidance on configuring the NOOBS image initially, followed by the Raspbian image.
Configuring the NOOBS Image
To begin configuring the NOOBS image, the initial step involves setting up a RasPi as a workstation. Before connecting the micro USB power supply to the RasPi, insert the micro SD card containing the NOOBS file into the card holder on the RasPi. It's important to insert the card upside-down, with the printed side facing downward. Incorrect insertion is unlikely unless unreasonable force is applied, which could potentially damage the card holder mechanism.
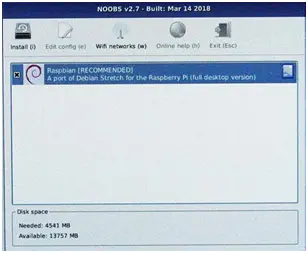
Once the micro SD card is in place, connect the USB power cable. This action will prompt the appearance of the initial screen, as demonstrated in Figure 1-5. Notably, in this specific downloaded image, only one OS selection is displayed. In earlier NOOBS versions, multiple OS selections were visible.
Read more: Raspberry pi home assistant using google , amazon alexa complete project