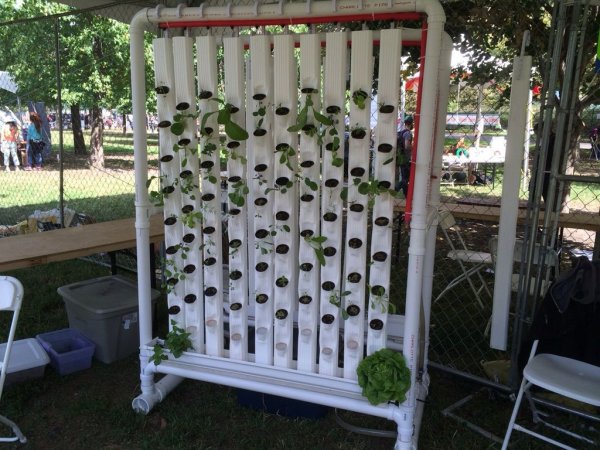
We call our project RUFS, for Robotic Urban Farm System
- A vertical hydroponic garden
- Allowing for high density yields and shorter growth cycles
- Reducing resource consumption – water, fertilizer and space
- Labor saving – no weeds or soil to till
- Higher consistency of crops with great tasting results
- Maintained by micro-controllers (Raspberry Pi & Arduino)
- Watering cycles – monitor and auto refill levels
- Plant nutrients and pH – monitor and correct
- Temperature monitoring
- Air Circulation & Lighting controls (for indoor operation)
- Smart and Connected
- Farm Controller App for smartphone, tablet and pc
- Get notified when the system needs a refill
- Alerts when something isn't running as expected
- Year round growing – fresh produce every month of the year
- Perfect for Urban setting with limited space
- Reduced operational time and maintenance with automation
- Eliminate the guesswork of nutrients and watering cycles
Hydroponics is a subset of hydroculture and is a method of growing plants using mineral nutrient solutions, in water, without soil.
The word hydroponics technically means working water, stemming from the Latin words “hydro” meaning water, and “ponos” meaning labor. Many different civilizations from the beginning of time have relied on hydroponics for growing plants, such as the early Mexican and Egyptian civilizations. However, recently growing hydroponically has grown in popularity and use across many different markets.
(from Wikipedia http://en.wikipedia.org/wiki/Hydroponics)
Green and Efficient
Water is recirculated which allows for great efficiency, often more than 90% efficiently on water consumption.
Our vertical design allows for a higher density of plants in a much smaller footprint. With a space less than 5′ x 5′ we are growing 160 plants.
Automation
The system is maintained with a series of Arduino controllers. Watering cycles, pH levels, nutrient levels, lighting cycles and ventilation fans are all maintained via the Arduino's.
The Arduino's can be networked to a Raspberry Pi using I2C to allow all system parameters to be monitored and updated in real time. The Raspberry Pi is further used to maintain a historical log of all the systems running data and make it available via a set if web services.
A companion smartphone/tablet app interfaces with the Raspberry Pi allowing for configuring and monitoring your entire system from anywhere in the world. The Raspberry Pi communicates with app via a JSON web service.
The steps are outlined here, additional project information including plant suggestions and updates are available on our website at http://www.bltrobotics.com/
What are we growing?
Vertical hydroponics lends itself very well to leafy green vegetables.I am currently growing successfully lettuces (romaine, boston bib, spring mix) , cabbages (red and green), herbs (basil, cilantro, mint, dill, chives), spinach, kale (dwarf curly variety), broccoli and petunias.
Step 1: What To Buy
For construction of model pictured above, 2 banks of 10 towers
Parts and Pieces (What to buy)
Support Frame
(5) 10′ – 2″ PVC pipe
(1) 10′ – 3″ PVC pipe
(4) 2″ PVC 90° elbow
(8) 2″ PVC tee
(4) 3″ to 2″ PVC tee
(4) 3″ PVC endcaps
Note: All PVC pipe and fittings are Schedule 40 – cellular PVC
Towers/Return
(10) 10′ – 2″ x 3″ PVC downspouts
(1) 10′ PVC extruded gutter 4″
(4) PVC gutter end caps (make sure to get 2 left and 2 right)
(2) 1″ threaded to 3/4″ barbed adapter
(2) 3/4″ PVC female threaded connectors
(20) 2″ PVC Pipe Hangers (“J” hooks)
(20) #6 Stainless 1 1/2 ” machine screws and nuts
Water Supply/Return
(1) 10′ – 1″ID potable water tubing
(3) 1″ threaded to 3/4″ barbed adapter
(1) 1″ barbed tee
(5) 3/4″ PEX 90° elbow – barbed
(1) 3/4″ PEX tee – barbed
(1) 1″ to 3/4″ PEX reducer – barbed
(2) 10 pack PEX crimp rings
(1) 10 pack 1 1/2″ hose clamps
(1) 25′ – 3/4″ PEX
(20) adjustable 0-10GPH drip emitters
(1) 14 gallon soft plastic bucket
Step 2: Building Support Frame
Support Frame
The support frame is constructed from standard Schedule 40 PVC in 2″ and 3″ OD(outer diameter). The frame was constructed from this material for is modular properties (easy to fit together) and the ease of use for sizing (easy to cut straight with basic tools). This does not preclude the use of other structural material such as wood, plastic and metal as the frame is structural and does not carry water.
Tool note:
PVC pipe for this project is best cut using a mitre saw. These are readily available as an inexpensive hand tool or an electric/power tool. A mitre saw provides good 90° cuts that help add to the stability of the frame.
PVC is glue using a two part glue system.
An Oscillating Multifunction Power Tool was used to cut pockets in vertical towers.
An Electric Heat Gun was used to shape the pockets in the vertical towers.
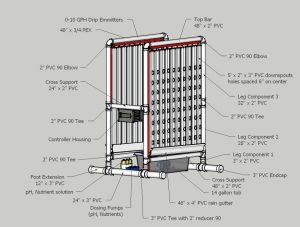
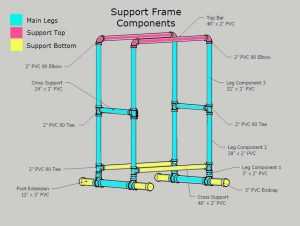
The support frame is (2) main leg components joined by the (2) “top bar” components and (2) “cross supports”.
The length of the “top bar” and “cross supports” dictate the capacity of the towers your system will support.
There are two additional leg extensions made from the 3″ PVC that can provide addition support against the elements when used outside. These can be omitted for indoor use.
At 4′ we are supporting (10) grow towers spaced at 4.5″ on center apart.
Step 3: Main Legs
The core to the frame structure are (2) identically constructed leg units.
We glued our individual leg components together for stability but did not glue them to the cross pieces for ease of disassembly when the unit is moved indoors.
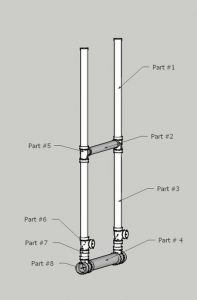
The majority of the legs are 2″ PVC with the exception of pieces #4 and #8 which are 3″.
Main Leg Cut List
- From a 10′ section of 2″ PVC
- Cut (2) sections at 32″ – (these are Part #1 – first set)
- Cut (2) sections at 28″ – (these are Part #3 – first set)
- From a 10′ section of 2″ PVC
- Cut (2) sections at 32″ – (these are Part #1 – second set)
- Cut (2) sections at 28″ – (these are Part #3 – second set)
- From a 10′ section of 2″ PVC
- Cut (2) sections at 24″ – (these are Part #2 – first & second set)
- Cut (4) sections at 3″ – (these are Part #7 – first & second set)
- Reserve remaining 60″ for cross pieces
- From the 10′ section of 3″ PVC
- Cut (2) sections at 24″ – (these are Part #4 – first & second set)
Main Leg Assembly Instructions
Part #5 and Part #6 are 2″ 90° PVC tee's. You will need (8) in all to complete both legs. Part #8 is a 3″ to 2″ 90° PVC tee. You will need (4) in all to complete both legs.
Dry fit the following:
- Fit 3″ pipe Part #4 into (2) Part #8 90° tee with 2″ opening on the top
- Fit small 2″ pipe Part #7 into top of Part #8 90° tee
- Fit 2″ 90° tee Part #6 into Part #7 with the opening of the tee at 90°
- Fit 2″ pipe Part #3 into Part #6 90° tee
- Fit 2″ 90° tee Part #5 into Part #3 with the opening of the tee at 90° facing towards other side of leg
- Fit 2″ pipe Part #1 into Part #5 90° tee
- Fit 2″ pipe Part #2 into the (2) Part #5 90° tee adding support to the leg
Step 4: Support Top
The top support dictates the size of the grow system and the number of towers the system can support.
Our current plan includes a 4′ length of 2″ PVC with towers spaced at 4.5″ on center. The spacing can be modified to support larger growing areas by increasing spacing between the centers of the towers.
Additional you can decrease the length of pipe to support a smaller number of grow towers.
The support top structure are (2) identically constructed units.
Support Top Cut List
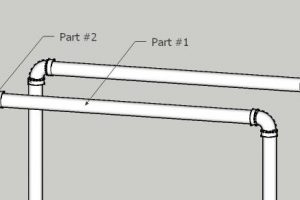
- From a 10′ section of 2″ PVC
- Cut (2) sections at 48″ – (these are Part #1 – first & second set)
Support Top Assembly Instructions
Dry fit the following:
- Fit 2″ pipe Part #1 into (2) Part #2 90° elbow
Step 5: Support Bottom
Like the top support, the bottom cross dictates system size, the piece must be the same width as the support frame top.
Our current plan includes a 4′ length.
The support bottom piece are (2) identically 4′ sections.
Also included in the bottom of the frame are (2) optional extension legs that are good when the unit is set up outside to provide additional support against wind.
Support Bottom Cut List
- From a 10′ section of 2″ PVC
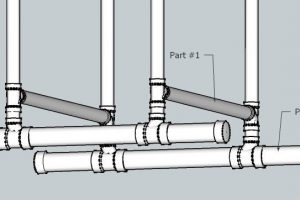
- Cut (2) sections at 48″ – (these are Part #1 – first & second set)
- From the remaining section of 3″ PVC
- Cut (4) sections at 12″ – (these are Part #2)
Support Top Bottom Instructions
Dry fit the following:
- Fit 2″ pipe Part #1 into the Part #6 90° tee of the main leg component
- Note:You man need an additional person to help hold up the legs when installing bottom cross pieces
- Optional: Fit 3″ pipe Part #2 into the Part #9 90° tee of the main leg component
- Optional: Install cap Part #3 into the 3″ pipe Part #2
Step 6: Grow Towers/Water Return
The towers provide the grow area for the plants in this system.
Or current design supports a very high density of plants by spacing the 3″ vertical grow towers 4.5″ apart on center (distance from center of tower to neighboring tower), providing approximately 1.5″ between towers.
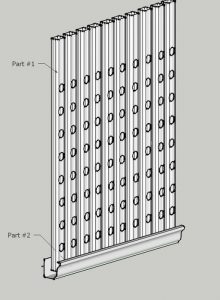
The current 4′ length supports (10) towers with (8) slots per tower. With two sides we get (160) plants for our entire system.
There are some limitations to this high density and vertical grow systems to the types of plant you can grow. We are continuing to test the limits of what we can grow and will share our successes and failures in our What to Grow sections of our wiki and user forum.
Towers/Return Overview
The towers are 2″ x 3″ PVC modified downspouts. The downspouts are generally available in 10′ sections.
The availability of 10′ sections dictated the 5′ height of our design.
The water returns are 4″ PVC rain gutters. Also available in 10′ sections. They are cut and capped on the ends with gutter caps. Make sure you pick up both left and right versions of the end caps as they are different.
Towers/Return Construction Steps
Part 1: Towers
Towers Cut List
- From a 10′ sections of 2″ x 3″ PVC downspouts
- Cut (10) sections in half at 60″
Tower Shaping Instructions
We constructed a wood template tool to help form the plant pockets
- Divide the (20) towers in to (2) sets of (10).
- To improve grow space we offset/stagger the plant slots in the grow towers.
- Mark a horizontal line across the front of the first set of (10) towers every 6″ starting 6″ from the bottom for (8) lines.
- A speed square is helpful and getting a straight line across the down spout material.
- Mark a horizontal line across the front of the first set of (10) towers every 6″ starting 9″ from the bottom for (8) lines.
- Using a Oscillating Multifunction Power Tool with the straight cut bit, cut a 2″ slice on the drawn lines.
- Using the Electric Heat Gun soften the plastic for a few seconds (approx. 15-30 seconds depending on wattage of your heat gun) 3″ above and 3″ below the cut. The PVC will start to pucker or sink and takes on the appearance of wet saggy paper.
- Use your wood template to slide into the softened PVC at the cut. Hold in place for approximately 30 seconds.
- Repeat for remaining slots in the tower.
- Drill a 3/16″ hole on the top, back side of the tower to put the screw for the tower hanger.
Part 2: Water Return
Water Return Cut List
- From a 10′ sections of 4″ PVC gutters
- Cut (4) sections at 46″
Water Return Assembly Instructions
- Identify the right and left gutter end caps.
- Test fit end caps on the sections of gutter.
- We roughed up the gutter plastic with some 150 grit sandpaper where the caps overlap the gutter (about 5/8″) for a better adhesion.
- Spread a liberal bead of silicone PVC adhesive on the inside overlapping edge of the end caps.
- Carefully fit the end cap on the gutter making sure glue contacts all around the gutter material.
- We used our finger to push excess adhesive around the edge of the gutter and cap to ensure good contact.
- Place a piece of masking tape or other easily removable tape on the cap till the recommended dry time.
- Repeat for other 3 sides and set aside till dry.
- Drill a 1″ hole on the back wall of the 4″ gutter to insert 1″ to 3/4″ barbed adapter. This will serve as the connector for the water return to the 14 gallon bucket.
- Thread the 1″ threaded side of the adapter and thread into the female 1″ connector on the inside of the gutter.
- Cut a (2) – 12″ section of soft 1″ vinyl hose for each side of the water return.
- Join at the center with the 1″ barbed tee.
- Cut a section of vinyl tube to length to where you position your 14 gallon water tank.
Step 7: Water Supply
We choose 3/4″ PEX for the main water supply lines for it's potable water safety properties and the ease of installation because we had a PEX crimp installation tool. CPVC would also be an excellent choice if the crimp tool was not available, CPVC is also certified for potable water but requires glue and joint connectors for assembly.
Water Supply/Return Overview
The water supply is laid out so there is a single rise that forks at the center cross piece of the main leg. This design was implemented to reduce the overall height load on the water pump. Instead of (2) 6′ rises reducing overall water flow, the rise is slightly more efficient to the pump.
Water Supply/Return Construction Steps
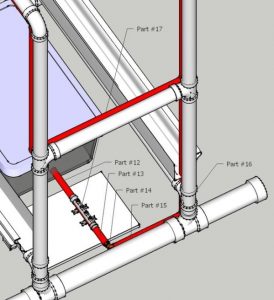
- Parts #1 – #6 are 3/4″ PEX cut to mirror the main leg dimensions.
- These are best sized by taking the measurements of the legs.
- Crimp Part #1, Part #2 and Part #3 together with Part #7 – 3/4″ barbed PEX tee.
- Crimp Part #3 and Part #4 together with Part #8 – 3/4″ PEX 90° elbow.
- Crimp Part #4 and Part #5 together with Part #9 – 3/4″ PEX 90° elbow.
- Crimp Part #2 and Part #6 together with Part #10 – 3/4″ PEX 90° elbow.
- Drill holes in Part #5 and Part #6 for Part #11 – drip emitters.
- Starting at elbow end of Part #5/Part #6 – measure from end 4″ and mark first hole at the bottom of the PEX pipe.
- It is helpful to draw a line along the bottom of the PEX pipe marking the bottom for the remaining marks.
- Measure 4.5″ from first mark and make a second mark.
- Repeat every 4.5″, the last mark should be 4″ from the opposing leg from the elbow.
- Using 3/16 drill bit drill on the mark.
- Starting at elbow end of Part #5/Part #6 – measure from end 4″ and mark first hole at the bottom of the PEX pipe.
- Fit in the the drip emitters – Part #11
- The hole is slightly snug for the drip emitters to prevent unwanted dripping, soften the PEX briefly (30 sec.) with the heat gun, this will allow for easier insertion of the drip emitters into the PEX.
- Cut a 1″ hole in the 14 gallon water bucket.
- Thread the 1″ to 3/4″ barbed adapter through the wall of the water container.
- Attach the soft vinyl hose from the return gutters tee to the water bucket.
Step 8: Automation: Using Intel Edison & Intel IoT Cloud
The goal is to add automation using the Intel Edison, automation would include;
- water cycles
- by timers
- light
- by timers
- by measurement of natural light and augmenting to maximize throughput
- by fetching current observed weather from weatherunderground.com and augmenting
- temperature
- by measurement and corrective action via a fan and louver
- nutrition
- by measurement and corrective action via nutrient dosing pump
- water quality (pH)
- by measurement and corrective action via nutrient dosing pump
- IoT Integration
- data collection
- all measurements and actions recorded to the cloud for analytics
- alerting
- all measurement data is available to create alerting rules from the cloud
- corrective actions
- all measurement data is available to create rules from device specific corrective actions the cloud
- data collection
We used the Grove Starter Kit Plus – Intel® IoT Edition to provide many of our sensors.
What's Inside the Grove Starter Kit Plus – Intel® IoT Edition:
- Base Shield v2
- Grove – Buzzer (more info)
- Grove – Button (more info)
- Grove – LED (more info)
- Grove – Rotary Angle (more info)
- Grove – Sound Sensor (more info)
- Grove – Smart Relay (more info)
- Grove – Temperature (more info)
- Grove – Touch Sensor (more info)
- Grove – Light Sensor (more info)
- Grove – Mini Servo (more info)
- Grove – LCD RGB Backlight (more info)
- 8GB Micro SD Card with an SD Card Adapter
- 9V to Barrel Jack Adapter
- 26mm 26AWG Grove Cable
- Micro USB Cable
- Serial Cable
- Ethernet Cable
Enviornmental kit – provided by Intel Roadshow
- Grove 1/4″ Water Flow Sensor (more info)
- Grove Dust Sensor (more info)
- Grove Dry Reed Relay (more info)
- Grove Water Sensor (more info)
- Grove LED Bar (more info)
- Grove Moisture Sensor (more info)
- Grove Gas Sensor (more info)
- 6V Mini Water Pump (more info)
- Grove Digital Light Sensor (more info)
- Grove UV Sensor (more info)
Additional Sensors/Parts
- RoboMesh analog pH sensor
- Conductivity Sensor (EC)
- 12V DC Peristaltic Dosing Pump
Step 9: Automation Continued: Intel XDK IoT Edition
We utilized Intel's XDK IoT Edition. It allows you to write your code in JavaScript using Node.js libraries.
The software can be found at Intel XDK IoT Edition, there are many documents regarding how to get started with the IDE.
Code:
/*jslint node:true, vars:true, bitwise:true, unparam:true */
/*jshint unused:true */
/*global *
*
A simple node.js application intended to blink the onboard LED on the Intel based development boards such as the Intel(R) Galileo and Edison with Arduino breakout board.
MRAA – Low Level Skeleton Library for Communication on GNU/Linux platforms
Library in C/C++ to interface with Galileo & other Intel platforms, in a structured and sane API with port nanmes/numbering that match boards & with bindings to javascript & python.
Steps for installing MRAA & UPM Library on Intel IoT Platform with IoTDevKit Linux* image
Using a ssh client:
1. echo “src maa-upm http://iotdk.intel.com/repos/1.1/intelgalactic” > /etc/opkg/intel-iotdk.conf
2. opkg update
3. opkg upgrade
Article: https://software.intel.com/en-us/html5/articles/intel-xdk-iot-edition-nodejs-templates
*/
var mraa = require(‘mraa'); //require mraa
// UDP Options
var options = {
host : ‘127.0.0.1',
port : 41234
};
console.log(‘MRAA Version: ‘ + mraa.getVersion()); //write the mraa version to the Intel XDK console
var dgram = require(‘dgram');
var client = dgram.createSocket(‘udp4');
var request = require(‘request');
var lcdDisplayTimer = 0;
var lights = new mraa.Gpio(3); //LED hooked up to digital pin 13 (or built in pin on Galileo Gen2)
lights.dir(mraa.DIR_OUT); //set the gpio direction to output
var ledState = true; //Boolean to hold the state of Led
var groveSensor = require(‘jsupm_grove');
var LCD = require(‘jsupm_i2clcd');
var myLcd = new LCD.Jhd1313m1 (0, 0x3E, 0x62);
var rotarySensor = new mraa.Aio(1);
var myButton = new mraa.Gpio(6);
var servoModule = require(“jsupm_servo”);
//var digitalLightSensor = require(“jsupm_tsl2561”);
//var lightSensor = new digitalLightSensor.TSL2561();
var lightSensor = require(‘jsupm_grove');
var light = new groveSensor.GroveLight(0);
var lightLevel = 0;
var lightLowCnt = 0;
var lightTimeRemaining = 960; // minutes in 16 hours
var lightDay = 1440; // minutes in 24 hour day
var lightsState = 0;
var waterSensor = require(‘jsupm_grovewater');
var waterLevel = new waterSensor.GroveWater(2);
var waterLeverTimer = 0;
var waterLevelValue = 0;
var tempSensor = new groveSensor.GroveTemp(3);
var tempBase = 23; // goal temperature
var tempTheshold = 25; // try to cool down
var tempAlarm = 27; // too hot sound alarm
var louverOpened = 160;
var louverClosed = 0;
var tempValue = 0;
var circulationPump = new mraa.Gpio(4);
circulationPump.dir(mraa.DIR_OUT); //set the gpio direction to output
var circulationPumpState = 0;
var circulationPumpTimer = 0;
var CIRCULATION_PUMP_TIME_ON = 1; // pump time on
var CIRCULATION_PUMP_TIME_OFF = 1; // pump time off
//Instantiate Servo module on digital port 5
var servo = new servoModule.Servo(5);
servo.setMinPulseWidth(600);
servo.setMaxPulseWidth(2200)
var ecSensor = new mraa.Aio(1);
var EC_reading = 0;
var ecDoser = new mraa.Gpio(6);
ecDoser.dir(mraa.DIR_OUT); //set the gpio direction to output
var ecDoserState = 0;
var ecDoserTimer = 0;
var ecDoserActivate = false;
var ecSampleTimer = 0;
var EC_DOSER_INTERVAL = 2; // seconds to run doser
var EC_SAMPLE_INTERVAL = 1; // minutes to wait before using EC reading to determine to dose
var EC_LIMIT = 1500; // dose when below this value minus EC_Band until it reaches this level
var EC_BAND = 200;
var EC_MS = 0; // EC micro/S
var fanCooling = new mraa.Gpio(7);
fanCooling.dir(mraa.DIR_OUT); //set the gpio direction to output
var fanCoolingState = 0;
var alarm = new mraa.Gpio(8);
alarm.dir(mraa.DIR_OUT); //set the gpio direction to output
var alarmState = 0;
var logTimer = 1;
var localWeather = ‘Cloudy';
var url = ‘http://api.wunderground.com/api/df5bd75178df2c09/conditions/q/RI/Providence.json';
var weatherTimer = 1; // wait 1 minute before first call
var data = [{
sensorName : “light”,
sensorType: “light.v1.0”
},{
sensorName : “temperature”, // air temp
sensorType: “temperature.v1.0″
}];
/*
data.forEach(function(item) {
registerNewSensor(item.sensorName, item.sensorType, function () {
});
});
*/
periodicActivity(); //call the periodicActivity function
function periodicActivity()
{
if (checkTimer(weatherTimer)) {getWeather(); weatherTimer = setMinutesTimer(240);} // every 4 hours
growLights();
tempControl();
checkECDoser();
waterEC();
if (checkTimer(waterLeverTimer)) {waterCirculation(); waterLeverTimer = setSecondsTimer(1);}
if (checkTimer(lcdDisplayTimer)) {lcdDisplay(); lcdDisplayTimer = setSecondsTimer(1);}
if (checkTimer(logTimer)) {sendToCloud(); logTimer = setMinutesTimer(1);}
setTimeout(periodicActivity,500); //call the indicated function after 1 second (1000 milliseconds)
}
function lcdDisplay()
{
var lums = 0;
myLcd.clear();
myLcd.setCursor(0,0);
myLcd.write(‘Cond: ‘ + localWeather);
myLcd.setCursor(1,0);
myLcd.write(‘EC:' + EC_MS);
myLcd.setCursor(1,8);
if (lightLevel < 100) {lums = ‘L';} else if (lightLevel < 130) {lums = ‘M';} else {lums = ‘H';}
myLcd.write(‘L:' + lums);
myLcd.setCursor(1,12);
myLcd.write(‘T:' + tempSensor.value());
} // lcdDisplay
function getWeather()
{
request({
url: url,
json: false
}, function (error, response, body) {
if (!error && response.statusCode === 200) {
// console.log(response.body);
var foo = response.body;
// console.log(foo.substr(foo.indexOf(‘”weather”:”‘) + 11,10));
localWeather = foo.substr(foo.indexOf(‘”weather”:”‘) + 11,10);
}
});
} // getWeather
function waterEC()
{
EC_reading = ecSensor.read(); // read the analog input voltage
// 0 to 1024 = 0 to 5v
// 204 micro/S per volt
EC_MS = (EC_reading * 4.88).toFixed(); // 5000 micro/S / 1024 = 4.88
if (EC_MS < (EC_LIMIT – EC_BAND)) { // outside of acceptible range
if (checkTimer(ecSampleTimer)) { // time to re-dose
ecSampleTimer = 0;
// console.log(‘–ecDoserState ‘ + ecDoserState);
if (ecDoserState != 1) { // if doser not ON then turn it ON
ecDoserActivate = true;
ecSampleTimer = setMinutesTimer(EC_SAMPLE_INTERVAL); // reset time until next sample – dose
console.log(‘dose for EC');
}
}
// console.log(‘lower than ‘ + (EC_LIMIT – EC_BAND));
}
// console.log(‘ecSampleTimer ‘ + ecSampleTimer);
// console.log(‘EC = ‘ + EC_MS);
} // waterEC()
function waterCirculation()
{
waterLevelValue = waterLevel.isWet();
if (waterLevelValue == true)
{
if (checkTimer(circulationPumpTimer)) {
if (circulationPumpState == 1) {
circulationPumpState = 0;
circulationPumpTimer = setMinutesTimer(CIRCULATION_PUMP_TIME_OFF);
} else {
circulationPumpState = 1;
circulationPumpTimer = setMinutesTimer(CIRCULATION_PUMP_TIME_ON);
}
circulationPump.write(circulationPumpState);
}
} else {
console.log(‘low water');
circulationPumpTimer = 0;
circulationPumpState = 0;
circulationPump.write(circulationPumpState);
}
// console.log(‘pump = ‘ + circulationPumpState);
} // waterCirculation
function checkECDoser()
{
if (ecDoserState == 0 && ecDoserActivate == true) // if not already on and needs to be on
{
ecDoserTimer = setSecondsTimer(EC_DOSER_INTERVAL);
ecDoserState = 1;
ecDoser.write(ecDoserState);
console.log(‘EC Doser is ‘ + ecDoserState + ‘ for ‘ + EC_DOSER_INTERVAL + ‘ seconds');
}
if (checkTimer(ecDoserTimer)) { // timer went off
ecDoserActivate = false;
ecDoserState = 0; // turn doser off
ecDoser.write(ecDoserState);
// console.log(‘EC Doser Timer Fired');
}
// console.log(‘ecDoserTimer ‘ + ecDoserTimer);
} // checkECDoser
function tempControl()
{
// when temp to high; turn on fans, open louvers
// if temp above theshold, stay on until lowered to base temp
// turn on buzzer at alarm temp
tempValue = tempSensor.value();
// console.log(‘temp is=' + tempValue);
if (tempValue > tempTheshold) {
fanCoolingState = 1;
servo.setAngle(louverOpened);
// console.log(‘temp hot');
} else if (tempValue <= tempBase) {
fanCoolingState = 0;
servo.setAngle(louverClosed);
// console.log(‘temp normal');
}
fanCooling.write(fanCoolingState);
if (tempValue >= tempAlarm) {
alarmState = alarmState ? 0:1;
alarm.write(alarmState);
} else {
alarm.write(0);
alarmState = 0;
}
// console.log(‘alarm is=' + alarmState);
} // tempControl()
function growLights() // called every minute
{
//lightLevel = lightSensor.getLux();
lightLevel = light.value();
if (lightLevel < 100 && lightTimeRemaining > 0) {
if (lightLowCnt < 2) {lightLowCnt++;} else {lightsState = 1; lightLowCnt = 0;}
} else {
lightsState = 0;
lightLowCnt = 0;
}
lights.write(lightsState);
lightTimeRemaining–;
lightDay–;
if (lightDay < 1) {lightDay = 1440; lightRemaining = 640;} // new day 24 hr day with 16 hours of light
if (lightLowCnt > 0) console.log(‘lightLow: ‘ + lightLowCnt);
console.log(‘LightLevel: ‘ + lightLevel);
} // end growLights
function setSecondsTimer(waitTime)
{
var endTime;
var d = new Date();
endTime = d.getTime() + (waitTime * 1000); // convert back to milliseconds from seconds
return endTime;
} // setSecondsTimer
function setMinutesTimer(waitTime)
{
var endTime = 0;
var d = new Date();
endTime = d.getTime() + (waitTime * 60000); // convert back to milliseconds from minutes
return endTime;
} // setMinutesTimer
function checkTimer(timer) {
var d = new Date();
// console.log(‘current time ‘ + d.getTime() + ‘ timer =' + timer);
if (d.getTime() > timer) {return true;}
else {return false;}
} // checkTimer
function registerNewSensor(name, type, callback){
var msg = JSON.stringify({
n: name,
t: type
});
var sentMsg = new Buffer(msg);
console.log(“Registering sensor: ” + sentMsg);
client.send(sentMsg, 0, sentMsg.length, options.port, options.host, callback);
};
function sendObservation(name, value, on){
var msg = JSON.stringify({
n: name,
v: value,
on: on
});
var sentMsg = new Buffer(msg);
console.log(“Sending observation: ” + sentMsg);
client.send(sentMsg, 0, sentMsg.length, options.port, options.host);
};
function sendToCloud(){
//sendObservation(“light”, lightLevel, new Date().getTime());
//sendObservation(“temperature”, tempValue, new Date().getTime());
//sendObservation(“waterPump”, circulationPumpState, new Date().getTime());
//sendObservation(“ecSensor”, EC_MS, new Date().getTime());
// sendObservation(“ecDoser”, ecDoserState, new Date().getTime());
//sendObservation(“coolingFan”, fanCoolingState, new Date().getTime());
//sendObservation(“waterLevel”, waterLevelValue, new Date().getTime());
//sendObservation(“growLights”, lightsState, new Date().getTime());
//sendObservation(“louvers”, fanCoolingState, new Date().getTime());
} //sendToCloud
Step 10: Automation Continued: Intel IoT Analytics Dashboard
Using Intel's IoT Analytics Dashboard
There are some great tutorials on getting set up on the dashboard here on instructables. I found Intel-IoT-Analytics-Dashboard by 10DotMatrix very helpful. Follow the steps outined there to get your account set up.
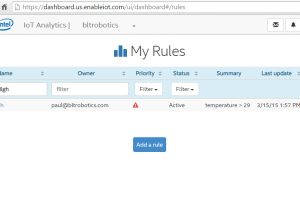
Once you get your account set up as described in the instructable by 10DotMatrix you can define the rules for notification and controls.
Building Rules in Intel's IoT Analytics Dashboard
- Go to the “Rules” menu item in the left hand nav
- My Rules Page
- Click the “Add a Rule” button
- My Rules – Detail Page
- Give your rule a name, select a priority and pick the type of action to take:
- Email – sends an email
- HTTP Endpoint – Call a webservice of your choice
- Actuation – This will integrate with your Edison to trigger an action you can code to
- Give your rule a name, select a priority and pick the type of action to take:
- My Rules – Devices Page
- Pick the device/devices you want to monitor
- My Rules – Conditions Page
- Monitor Measured – Select the control from the list of registered controls that you want to construct your rule against.
- Trigger When – Pick your trigger type
- Pick your operation type: equal to, greater than, etc…
- Enter your test value
Step 11: Automation Option #2: With Arduino & Raspberry Pi Edition
Alternatively you can implement automation using Arduinos and a Raspberry Pi
We broke the functionality of the controllers up into separate components.
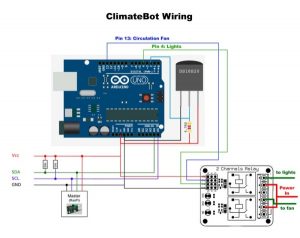
ClimateBot
Role: Environmental controls for indoor operation.
Used to maintain light cycles based on schedule of on/off intervals and a thermostatically and/or schedule based control of a circulation fan.
Hardware Components
(1) Arduino
(1) 2 Channel Relay Module Board and Shield For Arduino (source: eBay)
(1) Circulation Fan sized to your space
(1) 15 Meter – LED based – 12v Flexible 5050 5:1 Red/Blue (source: eBay)
(1) Waterproof DS18B20 Digital Temperature Sensor Probe for Arduino (source: eBay)
pHarmBot
Role: Water quality control
Used to maintain pH level maintenance and nutrient level maintenance.
Hardware Components
(1) Arduino
(1) 2 Channel Relay Module Board and Shield For Arduino
(1) Analog pH Meter Kit (source: RobotMesh.com)
(1) Arduino Conductivity Sensor (source: eBay)
(1) Waterproof DS18B20 Digital Temperature Sensor Probe for Arduino (source: eBay)
(2) 12V DC Peristaltic Dosing Pump (source: Amazon)
hydroBot
Role: Watering cycles based on schedule of on/off intervals and water reservoir level maintenance
(1) Arduino
(1) 2 Channel Relay Module Board and Shield For Arduino
(2) Side Mounted Water Level Control Float Switch Normal Closed (source: eBay)
(1) 1″ Water Flow Meter Counter 1-60L/min (source: Amazon)
(1) 1/2″ DC 12V Electric Solenoid Valve Water Inlet Flow Switch Normally Closed (source: eBay)
(1) 620 GPH Submersible Pump (source: Harbor Freight)
Arduino Resources (Sketches and Links):
DS18B20 Digital Temperature Sensor Probe – See attached document (OneWire.txt)
http://playground.arduino.cc/Learning/OneWire
Arduino Conductivity Sensor – See attached document (EC_Sensor.txt)
Analog pH Meter – See attached document (ph_Meter.txt)
Step 12: Webserver/Database and Smartphone App
Management Interface
The management interface is an optional component that allows you to update the schedule and levels of the controller components. It additionally records the sensor data and corrective actions, both for immediate electronic notification and historical data analysis.
Note: These tasks can also be accomplished by direct communication with the Arduino with the Arduino SDK.
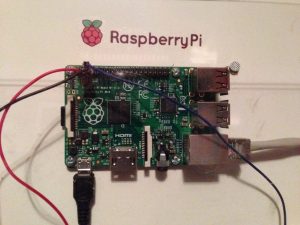
The Raspberry Pi communicates with the Arduino controllers via I2C on a simple communications bus.
Hardware Components
(1) Raspberry Pi
Software Setup
Raspberry Pi
Apache2 Web server
MySQL Database serve
PHP5
Python
The Raspberry Pi is coded to support a series of web services that are interfaced with the smartphone/web app using a JSON encoded string that contains the sensor ID and current reported value.
Current Air Temperature example:
{ “id”: 1, “name”: “Air Temperature”, “currentValue”: 78.2 }
Step 13: Winter/Inside Operation
The system easily convert from outside seasonal growing to indoor or winter growing.
The grow towers mounted on the “J” hooks are removed from the top 2″ PVC pipe.
Turn the towers 180 degrees so the plant put face in facing towards the center so that it would be facing the other side of the frame.
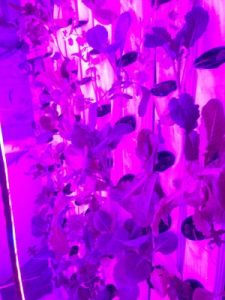
I use 5050 Red/Blue LEDs in a 5/1 configuration (5 red/1 blue). Because green plants reflect green light and absorb red/blue light, by providing just that spectrum, no light wavelength is wasted, further increasing the efficiency.
The LED strips are hung in the center of the grow frame much like a shower curtain dangling between the 2 sides of the growing plants. The LEDs hang approximately 12″ away from the plants as the frame is constructed about 2 feet apart.
The lights are 12 volts and use approximately 0.6 amp per meter.
I use (8) – 5 foot sections, spaced 6″ apart, alternating orientation so one strip faces one side, the alternate, the other.
Thanks for looking at my project and feel free to add your comments, questions and suggestions.
Source: Vertical Hydroponic Farm


