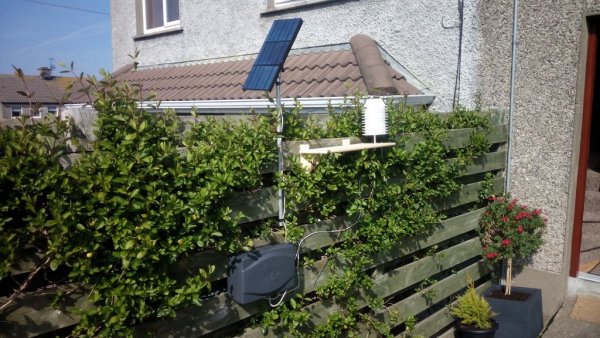
This is a simple project for a weather station.
Initially it reads temperature, pressure and humidity. Next step is to measure wind direction and after that wind speed.
The base of the project is a Raspberry PI A+ which was chosen by its small consumption, since the idea was that the weather station being powered by solar power.
The OS is raspbian distro, with some off the shelve python libraries.
Main program was written in Python.
Weather station uploads all data to www.wunderground.com every 2 minutes.
Step 1: Hardware description
For the completion of the project we will need the following :
Raspberry Pi A+ (It is possible to use any model)
Temp/Pressure sensor Bosch BMP180
Temp/Humidity sensor HTU21D
Wireless adapter
SD card
10W Solar panel
7.2 Ah 12V battery
Generic 12V solar controler/charger
5V regulator 7805
Bits and bogs needed
Step 2: Setting up the basics
I will not waste time explaining how to install raspbian on a Rpi. I assume that whoever wants to build this project is profficient enough in these matters.
Anyways the link for the distributions is http://www.raspberrypi.org/downloads/
Since i own a few Rpi's , i already have na SD image ready to roll with wireless conectivity, so it was just a question of rewriting it to a new card.
If you do not have such a “backup” it is probably better for you to use a B+ or other model with ethernet, and setup everything using one of many tutorials available.
A good tutorial for setting up Rpi is http://www.raspberrypi.org/help/quick-start-guide/
A good one for wireless is http://www.raspberrypi.org/documentation/configuration/wireless/
If everything went alright you should have now a Rpi with wireless internet access.
You still need to have your Rpi ready to use I2C protocol.
A good one is https://learn.adafruit.com/adafruits-raspberry-pi-lesson-4-gpio-setup/configuring-i2c
Step 3: Setting up other software
After you set up your Rpi, there are a few pieces of software needed for us to be able to read the used sensors.
I did all using Rpi “Headless” and using command line
I used Adafruit library for the BMP180, just follow the link to install it
We also need Pigpio library for Reading the humidity sensor. You can download from
http://abyz.co.uk/rpi/pigpio/download.html and follow installation instructions
After that you have to make sure that whenever you reboot the Rpi, Pigpio is also loaded. I did this by adding the following line to /etc/rc.local
sudo pigpiod
In my case this is enough but this depends on where you have installed pigpio. If you run into problems, just put the whole path for the file and you should be ok.
The presented tutorials are pretty straightforward but if you need any help i'm here 😀
Step 4: Setting up the sensors
I got both sensors from Ebay, since it's easier (and cheaper) to get ready made small boards with the sensors already soldered that to do them by yourself. If you search Ebay for BMP180 and HTU21D you will find them for sure.
These are I2C sensors which are very easy to communicate with. The I2C protocol allows you to connect several sensors in paralell and communicate with each of them because each has a unique address.
I got both soldered together with some skill , matching all signals as seen on the pictures.
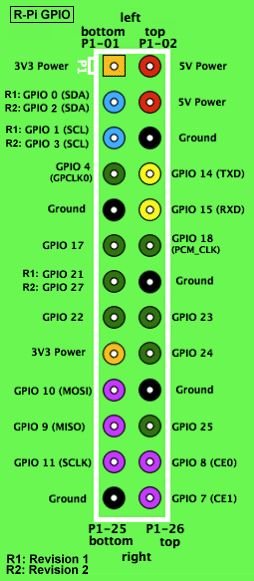
The sensors will need +3.3V, GND, SDA and SCL signals from the Rpi.
You can use any wiring you like, but a 4 wire cable (telephony) is probably a nice idea.
Step 5: Main program
Main program is temp-monitor.py
You should have python installed , if not, just follow http://raspberry.io/wiki/how-to-get-python-on-your-raspberrypi/
The first part of the program shows the libraries needed.
import Adafruit_BMP.BMP085 as BMP085
import smbus
import os
import sys
import getopt
import sqlite3
import math
import pigpio
import time
Following the program we have 2 functions that will read humidity. Read_temperature is a function that will read the temperature of the HUT21D for compensation when calculating the relative humidity. It is necessary for the following function read_humidity.
There is a few calculations inside these functions, but this is all according to the sensors datasheet. Not importante stuff, but you cam always check them if you like
BMP180 http://www.vssec.vic.edu.au/media/41229/BMP180-datasheet.pdf
HTU21D http://www.meas-spec.com/downloads/HTU21D.pdf
The cmd variable is responsible for sending the data to www.wundergroud.com using curl. This website provides some really nice stats and graphs. You need to register (it's free) an account to upload the data.
After that you will have an ID and a password which you sould change in the cmd variable as shown
cmd = “curl “+”‘http://weatherstation.wunderground.com/weatherstation/updateweatherstation.php?ID=&PASSWORD=&dateutc=now&tempf=”+str((temp*1.8)+32)+”&humidity=”+str(round(humidity,2))+”&baromin=”+str((pressure/100)*0.0295299)+”&action=updateraw”+”‘”
You then have to change again /etc/rc.local and insert a line for the program to start when the Rpi is rebooted :
sudo python /usr/lib/cgi-bin/temp-monitor.py &
The & symbol is important because it will put your program into memory and releasing the command line to be used.
UPDATE
For the curious minds, temp-monitor-online.py is the current program i'm using, with readings for temperature, pressure, humidity, dew point, wind speed and direction and uv and insolation.
Step 6: Building up the solar panel
So if you have all sorted out and working well it's time to put your weather station outside.
I chose to feed my Rpi using a solar powered system, using 3 3,5W modules bought on Ebay.
The modules output 6V, so 3 modules in series will give us 18V, which is the standard for a 12V solar system.
You can arrange them as i did and you will end up with a pretty nice small panel capable of running the system.
Probably you are thinking that 10W and a 7,2Ah battery is a bit much for the Rpi, but since i am in Ireland, i am expecting to run a few days without sun, so…
For more detail: Weather station based on Raspberry Pi


