
| Hardware components: | ||||||
 |
|
× | 2 | |||
 |
|
× | 2 | |||
 |
|
× | 1 | |||
 |
|
× | 1 | |||
 |
|
× | 1 | |||
 |
|
× | 3 | |||
|
× | 4 | ||||
|
× | 4 | ||||
 |
|
× | 4 | |||
 |
|
× | 4 | |||
| Software apps and online services: | ||||||
|
||||||
|
||||||
 |
|
|||||
|
||||||
STORY
Finding a free parking lot in a congested city like Dhaka is very hard. Here, if anyone wants to go outside from home with personal car first thing comes in his mind is about parking, where he will park his car. Most of the cases, people go to a parking station and find that all parking slot are full and then he have to search for another parking lot. So, it is a big hassle and many people keep in fear about parking of his car when he gets out with his car.
I realized that, to enjoy a better transport a better parking system is necessary especially in a congested city like Dhaka.
So, I was thinking, how the problem can be solved and finally I succeeded to make a cloud based smart parking system and I hope implementing the system can remove the parking problem of my city. ARTIK Cloud is really a nice and appropriate platform for such job.
Using this system a user will be will able to find an available parking lot easily using mobile or web app from anywhere. I also used Intel Edison with a display which may be placed several important locations of the city or road from where it will be possible to find free parking lot. The system updates parking data every 30 seconds.
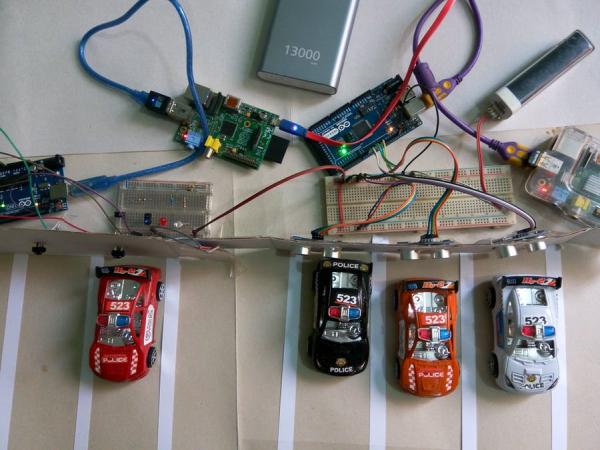
In this project I will show you how you can easily build such smart system. Definitely, I will use ARTIK Cloud platform, the coolest IoT cloud platform. Before going to the details, enjoy the demo video of my demo project.
For this demo system you have to create three new devices in Samsung Artik Cloud platform. I will show it for one device. The steps are same for all devices. I named three devices as rainbow-parking, indigo-parking & edison respectively. Rainbow-parking & indigo-parking receive and store parking data such as free slots in a parking lot. Edison sends parking information according to the preset rules.
Steps involved in this project:
1. Making three devices in Artik Cloud Platform
2. Making one application in Artik Cloud
3. Making one rule in Artik Cloud
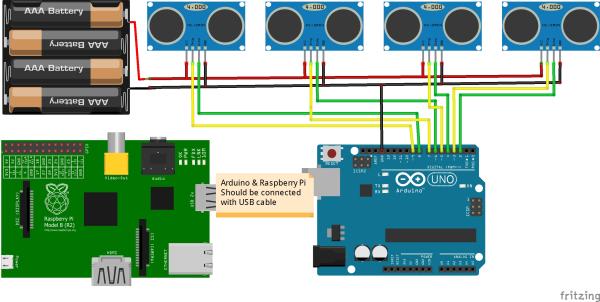
4. Preparing Arduino
5. Connecting the Sensors
6. Preparing Raspberry Pi
7. Preparing Intel Edison
8. Developing Web Application
9. Developing Android Application
10. Completing the Project.
So, Let's start one by one. First thing first. Let's start with making a new device in Artik cloud platform.
Step 1: Making a new device in Artik Cloud Platform
A) Log in to your Samsung account and Click on DEVELOPERS option from top right corner.
B) From the DASHBOARD select DEVICE TYPES.
C) Click on + NEW DEVICE TYPE
D) On the DEVICE DISPLAY NAME type a name for the device and give a UNIQUE NAME, then click to CREATE DEVICE TYPE.
E) Click on + NEW MANIFEST
F) Type a FIELD NAME for your sensor data you will upload and store here and mention the DATA TYPE as integer. Then click to SAVE.
G) Then click NEXT: DEVICE ACTIONS
H) Make an action or select from the STANDARD ACTIONS. Click to SAVE. For our project actions will not be required. Then click to NEXT:ACTIVE MANIFEST.
I) Take a look to Device Fields and again click to NEXT:ACTIVE MANIFEST.
J) Congratulation! you successfully created your first device. Now you have to connect the device to Artik cloud. So, let's do it.
K) Go to ARTIK CLOUD from right top corner.
L) Click on MY ARTIK CLOUD and select DEVICES
M) Click to +Connect another device.
N) Type the name of the device you just created and click on it.
O) Click on CONNECT DEVICE… button.
P) Your device is connected to the CLOUD.
Q) Click on settings icon.
R) Click on GENERATE DEVICE TOKEN…
S) Note down your DEVICE ID and DEVICE TOKEN. These will be required latter every time you want to connect to your device from physical devices, web apps or android apps.
Click on SAVE CHANGES.
Follow the same procedures to make an connect other two devices. I connected three devices named as rainbow-parking, indigo-parking and edison. Rainbow-parking and indigo-parking represent two parking stations and edison represents message board. I connected rainbow-parking to one raspberry pi and indigo-parking from another pi and placed in two different parking lot. Again, raspberry pis are connected with the sensors placed in parking lots to identify free and engaged parking slot through Arduino board.
I will jump to 3rd step now, I will explain second step later.
Read More: ARTIK Cloud based Smart Parking System