
In this instructable I am going to talk through a project I have created – a tiny audio effects rig and recording platform!
As with most hobbyists Coronavirus brought to a halt a lot of things, with lockdowns, and has changed the landscape of how we do things moving forward. My hobby is that of a musician, and lockdown resulted in many a canceled gig and a long period of inactivity for my band until we were able to tackle socially distant album recording sessions in pairs (not much use for a 9 piece!). It also curtailed and recording work I had in the pipeline for other musical projects, and that sucked.
During this period I dreamt of a way to be able to record at home, with a tiny rig that wouldn't take up much more space than the mic stand needs. It needed to be easy to assemble, and, most importantly, it needed to be good enough to present the output to sound engineers to use in real music projects.
After a long period of trying various setups and various software combinations, I finally settled on a setup that I was really happy with. The objectives of the project grew far beyond a little recording box due to uncovering lots of weird and wonderful things while researching this.
This project is completely repeatable with off-the-shelf parts, and while some of this instructable may be specific to my setup I will provide as much information as I can for alternatives.
Supplies
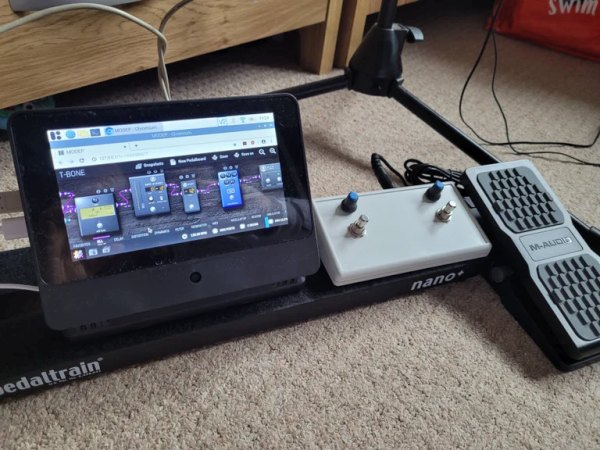
Recording and Effects Unit
- Raspberry Pi 4
- Raspberry Pi Official Touchscreen
- SmartiPi Pro Case
- Raspberry Pi USB C Power Supply
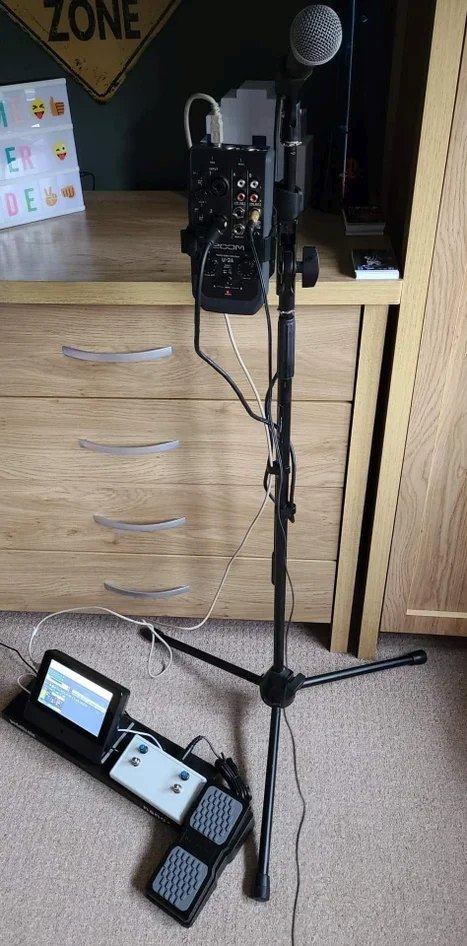
- Zoom US-24 Audio Interface (Or other interfaces)
- USB Cable to power Interface
- Rode NT1-a Condenser Microphone (or instrument input)
- SD Card
- Instrument/Mic Cable
Foot controller
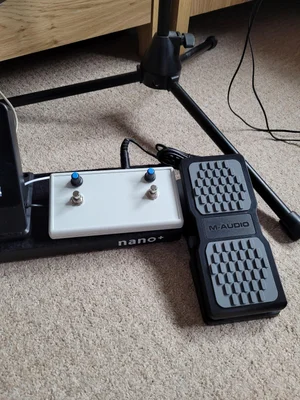
- Arduino Due (Or ATMega32u4 Arduino, such as Leonardo, Pro Micro, etc)
- USB Cable
- Enclosure
- Footswitches
- TRS sockets
- Encoders
- Wire
- Solder
- Soldering Iron
- Optional Expression Pedal
Step 1: Hardware
The hardware required for this project will be familiar to anyone who has recorded at home; you need a computer to run some recording software on, and an audio interface to get sound from your instrument or mic into it.
Computer
While any PC will run some recording software be it on Windows, Mac, or Linux, the requirement for me necessitated something a lot smaller, and so I have chosen the Raspberry Pi 4. I have long been a fan of the Raspberry Pi boards, and have used them for many projects, from the website hosting up to headless controllers running Python software. Traditionally they have been cheap, low-powered gateways into coding and Linux for beginners, but with the arrival of the Raspberry Pi 4, it has really become a viable option for more than just blinking some LEDs connected to the GPIO. The Pi 4 is capable of running a 64 bit OS, and also comes with options to have 2GB, 4GB, or 8GB RAM. I have all three versions to try, and so far the 4GB has been perfect for what is needed.
If you are just interested in running this as an effects unit you could get away with the 2GB model, but if you are planning on running the recording software on it I would look to invest in 4GB or 8GB.
While you could use your Raspberry Pi completely headless and use another device to remote into it, I opted to use the official Raspberry Pi 7″ touchscreen. Having that touch option there really helps with basic onscreen control like triggering recording and suchlike, but it's not ideal when playing a two-handed instrument such as the trombone. This is why I'm using a foot controller to control the software – more on that later!
Audio Interface
The audio interface is an important part of this project, but it is also the most interchangeable part of the setup too. I opted for my Zoom U-24 audio interface because it's small, powered by USB (The Pi4's USB3 port can power it comfortably), has jack and XLR inputs for mics or instruments, has Phantom power for using condenser mics like my Rode NT1-a, has plenty of outputs on it to route the sound to headphones, RCA outputs and main jack outputs (great for live performance, for example), and mainly because I already owned it. I did also try this on an Alesis Core1 interface early in the project, but couldn't get it to work, but I think that was more down to my inabilities with the software at the time 🙂
Whichever interface you settle on it's worth googling its settings/manual, just for configuring it with the Linux OS later in the project.
A worthy shout-out here is the Pisound, an audio interface by Blokas. It is built specifically for the Raspberry Pi and used the GPIO pins rather than USB, and creates a really tidy and small package. It gives great quality and really low latency. My only issue is it didn't have XLR or phantom Power, meaning I'd be stuck using a dynamic mic with a weird unbalanced Jack/XLR cable which I didn't like the idea of. It's certainly an option though!
Foot Controller
The foot controller portion is the only DIY segment of my rig, but is certainly replaceable with off the shelf devices
All software used in this project can have its functions controlled by MIDI, so it seems a perfect solution to allowing me to control aspects of the project on foot.
While there are several MIDI controllers available (the Behringer FCB1010 is an absolute beast), a lot of them are really expensive for what they do. So, being a cheapskate I chose to start experimenting with building my own!
The heart of the footswitch is an Arduino Due. it is a microcontroller with a secondary USB port that appears to computers as a native HID device that can be used for MIDI over USB. Perfect!
I will attach the sketch here that I have used, but it's a really simple sketch. It reads the inputs (two momentary switches, two encoders, and two encoder buttons, plus the analog input from the expression pedal) and sends MIDI CC commands to the software. This is excellent for either controlling the record button on the Recording software or triggering effects in the effect software I am using.
This is what makes this project brilliant, as it is taking the computer and allowing it to be controlled like a guitarist would his signal chain – by dancing on it!
Expression Pedal
The expression pedal was a cheap purchase to add an expression input. It plugs into my Arduino controller and its values are read and sent in the MIDI command data.
This is completely optional but really handy for controlling effects such as volume pedals, expression pedals, and my favorite – the Whammy pedal.
Once you have settled on the hardware, it's time for the main part of the project – the software…
Step 2: Software

The software is the main part of this project, and what makes it such a formidable tool to have for performing.
The main function of this was to be able to record audio and record it reliably. In order to do so a lot of time was spent looking for the right software to handle the recording and the best flavor of Linux on which to run it to get the best performance.
The DAW (Digital Audio Workstation) software to use for recording was a straightforward choice; Reaper. Reaper is cross-platform, pretty light on resources when running and recently people have had a good solid performance from it on the Pi.
The OS choice was a more difficult affair, and there weren't many options at all until I stumbled upon Blokas' Patchbox OS. Absolute game changer!
PatchboxOS + MODEP
PatchboxOS is an operating system built specifically for the purpose of using the Pi as a music device. It was first built to run MODEP, a guitar effects emulator with a web-based front end, but then grew to a platform to run many music-based modules such as PureData.
Configuring Patchbox was easy; on the first run, you are greeted with a wizard to help you configure what you want to use, add WiFi settings, and all the normally tedious and tricky stuff, for you.
I chose to add MODEP at this stage for experimentation, and it was a great decision. it runs on startup, and you can access it via any web browser to drag and drop any effect pedals from the hundreds on-off together. Absolutely great fun, if nothing else, but the more I've used it the more It has become useful; from adding in a tuner to keep an eye on pitching, to adding a chain of octaves and harmonizing effects to turn the sound of a single trombone into a full section.
The web GUI is amazing for building the pedalboards you want to use, but it is cumbersome to use on the small screen to activate the effects. This is what lead me to build the MIDI controller. Every effect is controllable by MIDI, as is cycling through your banks of saved boards. The foot controller really turns this into a joy to use!
Reaper
Reaper is a brilliant DAW and records brilliantly on the Raspberry Pi. It may struggle to multitrack and Orchestra, but for recording individual trombone lines over the top of a client's provided audio track it is perfectly capable.
In the early phases of testing, Reaper was running on a second Pi, but too much latency was the result of having two interfaces chained into each other. Getting Patchbox on a Pi 4 and putting everything on one box certainly made this whole project simpler to work with and control – I can now use the same foot controller I build for the effects to also send a MIDI command to arm and fire recording without needing to go to the Pi screen.
JACK
Reaper and MODEP were both the winner when it came to doing their respective jobs, but a big problem existed; Reaper and MODEP were both using the interface's raw inputs, and the effects were not making their way into the Recording software to be recorded.
JACK (Jack Audio Connection Kit) is an audio server that saved the day here. With help from the Blokas forums, I was able to use JACK to feed the outputs of MODEP into two phantom inputs in Reaper. This allows me to not only record the effects audio on inputs 3 and 4, but also still record the clean audio from inputs 1 and 2.
In order to automate the process of connecting the outputs of MODEP to the inputs of Reaper via JACK I based on this script:
https://github.com/MacFizz/JMConnector
The script is brilliant; it cycles through the available outputs from MODEP and attaches them to the Reaper inputs in the script. When setting up your interface in Reaper, just add an extra two inputs to however many yours has and you can then target them without interfering with physical inputs.
Reaper and MODEP are both required to be open in order for the script to work as expected. MODEP runs as a module on startup but Reaper does not, so I added a line in the above script to start reaper, pause, then try and connect them. It seems to work quite well, but I would like to do some more testing on the time period it needs to minimize the time it takes to be up and running.
When it comes to options this setup is so versatile and allows me to use the device as a recording unit, an effects unit, or both together.
Step 3: Current Feature List
I will itemize the specs and the features of this current setup here:
- 24 bit, 96kHz recording
- 2 x Jack/XLR inputs
- 4 x Jack/RCA outputs
- 1 x Stereo Headphone output
- 2 x footswitches
- 2 x rotary encoder (rotary and switch inputs)
- 2 x Expression pedal inputs (only one in use currently)
- Fully routable audio effects chain to the main output
- Full recording capabilities of clean audio and effect audio
Step 4: Tiny Sample From the Tiny Rig
I just thought I'd upload a little clip from my testing of the rig, for posterity.
Please ignore the terribly loose playing – I'm new to live looping, haha.
All sound is produced on MODEP, feeding the live signal into a Whammy Effect, Sub Octave Effect, and harmonizer then into a loop pedal (all in the software), and the whole session was then recorded in Reaper.
Step 5: Future Plans
Improvements I am currently looking to make
Bigger Controller
I'd like to add some more buttons to the controller to allow for larger pedalboards to be controlled and more recording functions to be controlled without cycling through buttons or using holds or double taps
All-in-one Design
I'd love to take the controller, the Pi, and the Audio interface and combine them into one unit. It makes it extremely portable and more robust.
USB Booting
To improve booting times and increase reliability I'd like to boot the Pi from a high-speed USB drive rather than the MicroSD card
WiFi OSC Controller
Open Source Control is another protocol that can be used alongside MIDI for controlling the software. I'd like to build a handheld controller that can mount onto my trombone to allow for some controls on the instrument
Source: Tiny Audio Effects Rig!