Software Topology and Theory of Operation
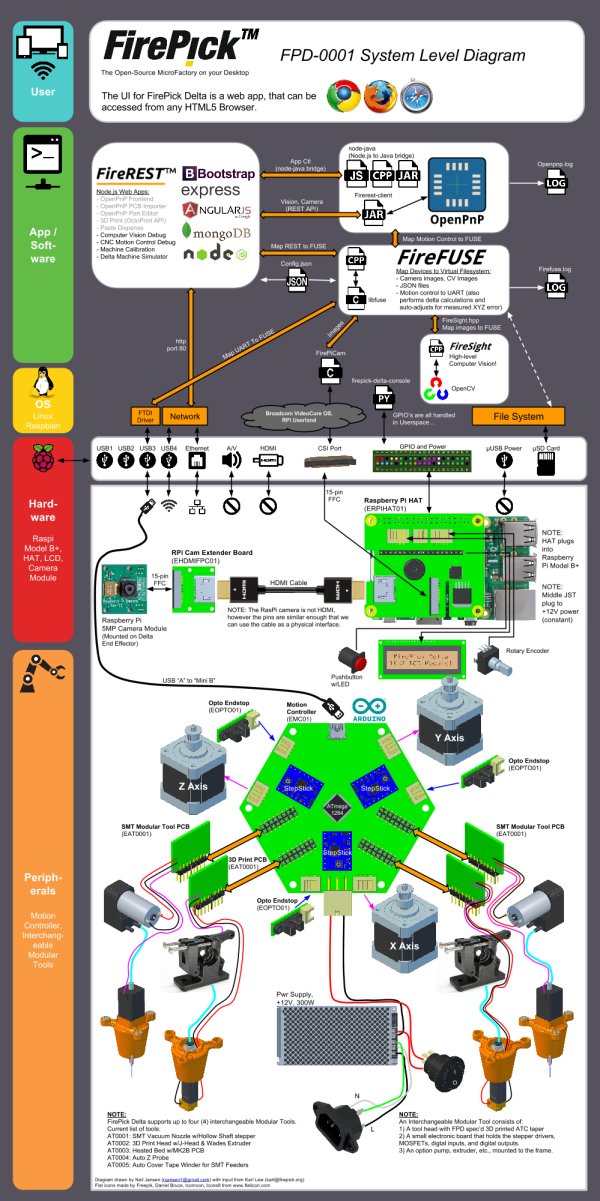
OpenPnP is the high-level brains of the machine, that does the seemingly-simple stuff like “pick up that part” and “put it over there”. Lots of libraries and sub-systems feed information to it, and it passes information to the various motors and actuators via other libraries and software modules. It was created by Jason von Nieda, long before FirePick Delta was started. It's technically still in alpha-state, but the underlying software is solid and has been used on several production machines. Although it was well-written and extremely modular and extensible, the documentation wasn't great… Until now. In the spirit of open-source and full-disclosure, we've decided to document OpenPnP ourselves. Hopefully we'll get all of this pushed upstream back the official project.
The Java files shown above (‘JAR' icons) can be replaced or used as a base class for coming up with your own machine configuration. Each of the Java files above (with the exception of the configuration model(s)) can be specified in the ‘machine.xml' file. If you're not familiar with Java, this might seem strange, but it's really neat. It means you can specify the path to a bunch of .java files, and that will determine which classes get instantiated and used, thereby changing the behavior. It keeps the code really clean and modular, which is important for something as complicated as a pick and place machine. OpenPnP comes with a set of reference files for a vanilla PnP implementation with TinyG motion control, a single head, single nozzle and actuator, drag tape feed, and a downward-looking camera. We've modified quite a lot of stuff in order to make it do all the crazy things that we needed.
Motion driver: We're using a custom motion controller board that was inspired from RepRap RAMPS 1.4 and Melzi boards, which runs modified Marlin firmware. I wrote an OpenPnP Marlin driver that sends the correct g-code to the motion controller. This works great at the moment, but we're finding that doing the delta calculations and multi-point Z-probe correction on an 8-bit arduino with limited memory and no floating point seems a bit dumb when we have all that computing power on the Pi. Furthermore, we want to use the camera and a custom XY calibration app to improve accuracy, and it's much easier and faster to do these calculations on the Pi. However, this code isn't a part of OpenPnP, since we plan on offering other apps down the road. This means that OpenPnP can't talk directly to the motion controller, it's got to go through a layer of software that does the delta calculations and XYZ correction offsets. We wrapped all that code up in FireFUSE (our file system in userspace mapper), which allows us to do a lot of neat things that we'll get into later. This is pretty transparent for the most part; rather than OpenPnP writing to ‘/dev/ttys0', you write to ‘/dev/firefuse/sync/cnc/marlin/gcode.fire'. FireFUSE will turn the Cartesian coordinates into delta coordinates, calculate the error offset using interpolated points from the machine auto-calibration process, and send this new g-code out to the Marlin driver. And, that code will be portable and can be used with 3D printing apps, solder paste dispense apps, etc. The only thing needed to get OpenPnP talking to FireFUSE is a FireFUSE driver, which is currently in being written.
Camera driver and Vision Framework: OpenPnP's camera support was a bit finicky and didn't support the wonderful 5-megapixel Raspberry Pi camera. Their computer vision was a thin shim on top of OpenCV code, that had implemented some really basic hole-finding, but not much else. Karl Lew, our software guy, saw this as a huge problem, and has spent the last year or two writing an amazing open-source vision library called FireSight. He wrote dozens of awesome vision routines that can be ganged together into a pipeline, in a very high-level manner that doesn't require higher-level math or lower-level C/C++ knowledge. For the camera, we're using the RasPi camera module as mentioned, with a custom version of the ‘raspistill‘ called FirePiCam. We take snapshot images and save them to the FUSE filesystem which keeps us from wearing out the bits on the SD card's FLASH memory. In order to get OpenPnP to see the images and perform computer vision operations, Karl wrote a java library called ‘firerest-client' that makes it all work.
GUI: The OpenPnP Java GUI is really clunky and unintuitive, and having a dedicated monitor hooked up to the Raspberry Pi seems a bit crazy in 2014, aka Dawn of the Internet of Things. We would like the user interface to be a custom web app that can be viewed from any HTML5 browser. This functionality is not directly supported via OpenPnP, but it can be done with a bit of work. Fortunately, Jason wrote OpenPnP to where you can call the constructor(s) for the machine and file config functions, which bypasses the GUI. We can use a node-java bridge to call java functions from javascript, and vice-versa, without much work, thanks to some code we found on github. All that leaves is for us to write a clever web app using node.js, Express, AngularJS, and Twitter Bootstrap. We're in the beginning stages of writing that app now. In the meantime, we can run OpenPNP normally and use the stock GUI, which allows us to debug other bits of the machine.
Hardware Topology and Theory of Operation
We use a standard Raspberry Pi Model B+. The B+ is the RPi we always wanted; they moved the connectors to a more logical place, and added a real set of mounting holes. Still has the crappy slow Broadcom 2835 but for $30 what do you expect. We often get the question, “Why did you use a BeagleBone Black?” or a dozen other single-board computers. The answer is pretty straightforward. We're shooting for a $300 machine, and that means we need to pick a CHEAP single-board computer. Raspberry Pi is the cheapest, therefore it wins. QED. 🙂 Actually, we do like the BeagleBone black quite a lot, and other platforms such as the Allwinner A4, Intel Galileo, and even more traditional setups like Mini ITX. All of our software and hardware should work on those platforms. But they're expensive, and Raspberry Pi gets the job done.
We've actually been surprised at the performance with the Pi so far. It's not lighting fast, but it does computer vision and serves up web pages with no issues.
ERPIHAT01 HAT Board
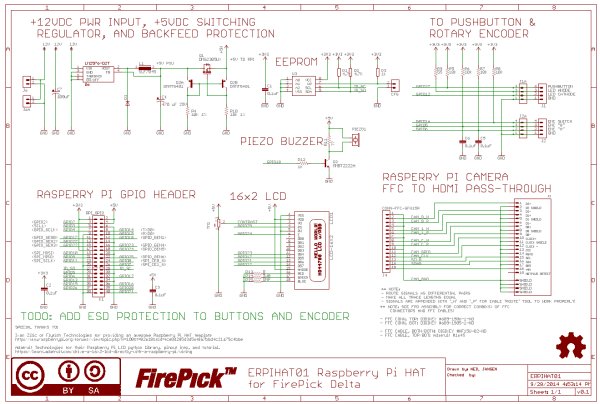
Shortly after the release of the Raspberry Pi Model B+, the RPi Foundation released a “HAT” specification, which is very similar to an Arduino Shield, or a BeagleBone cape. It's a custom-shaped mezzanine board that can be customized to add neat things to a Raspberry Pi without all sorts of cables and other nonsense. There were plugin modules before the HATs, but they weren't standardized. We're happy with the new HAT spec, and are proudly presenting our FirePick Delta HAT below:
Here's a list of things that our FirePick Delta HAT does:
- Provides a 16×2 character LCD connector, which is wired to the Raspberry Pi GPIO connector
- Provides connectors for a rotary encoder and pushbutton switch (with LED), which are wired to the Raspberry Pi GPIO connector
- Provides a 12V -> 5V step-down switching power supply to the Raspberry Pi.
- Provides a pass-through connector for the RasPi camera module, so that we can extend the camera to the delta mechanism's end effector.
- Provides a piezo buzzer, driven from the RasPi's only PWM pin on the GPIO connector. This was cheaper than using the Pi's audio jack.
- Per the official HAT spec, this board provides the necessary EEPROM chip and backfeed protection on the +5VDC input. Because we're feeding power in via the GPIO connector, we don't need to provide power via the micro-USB connector.
For more detail: A project log for FirePick Delta, the Open Source MicroFactory


