
AWS, Azure or GCP? Whatever.. sensors 1'st! Air quality CO2 and tVOC with temperature and humidity compensation algorithm – RPI how to.
About this tutorial
This tutorial address Raspberry PI 4, 3B+, 3B, 3A+, II, B, Zero and Zero W hardware and software integration with s-Sense itbrainpower.net CCS811 carbon dioxide and total volatile organic compound I2C air quality sensor
.This CCS811 software was tested on Linux Debian using Python 2.7 with python-smbus2 module loaded.
About CCS811 – CO2 and tVoC sensor
CCS811 manufactured by AMS it's an digital CO2 and tVoC air quality sensor. Main measurement characteristics: – equivalent carbon dioxide range is 400ppm up to 29206ppm – equivalent Total Volatile Organic Compounds output range is from 0ppb up to 32768ppb. – internal compensation algorithm using external ambient temperature and humidity data source – temperature range for operation -40C to +80C
More info on: CCS811 datasheetIn June 2019 we've released 6 new environmental and air quality sensors, including CCS811 I2C sensor breakout and HDC2010+CCS811 I2C combo sensors breakout, all being part of the s-Sense I2C sensor breakout family.
s-Sense CCS811 sensor breakout by itbrainpower.net

PN: SS-CCS811#I2C SKU: ITBP-6004
CCS811 I2C sensor breakout info
s-Sense HDC2010+CCS811 sensor breakout by itbrainpower.net

PN: SS-HDC2010+CCS811#I2C SKU: ITBP-6006
HDC2010+CCS811 I2C combo sensor breakout info
Next, let's kickstart with CCS811 sensor I2C breakout – around 15-20 minutes. Same hardware and software approach may be used for CCS811 + HDC2010 bundle sensors I2C breakout.
RaspberryPI [Debian based Linux] setup, preamble software and hardware preparation
A. Enable I2C channel 1 on Raspberry PI
a. sudo raspi-config
menu F5 => select enable I2C option
save, exit.
sudo reboot now
b. edit /boot/config.txt and add/enable following directives:
dtparam=i2c_arm=on
dtparam=i2c_arm_baudrate=10000
save, then reboot RPI
B. Check i2c is loaded using command: ls /dev/*i2c*. This should list something like: /dev/i2c-1
C. Check sensor I2C communication [CCS811 should be connected, see wiring in next chapter].
Run: i2cdetect -y 1.
In command output you should see listed the s-Sense CCS811 I2C default address 0x5A.
D. Install required python packages
a. sudo apt-get install python-setuptools
c. Expand downloaded tar.gz archive. tar -xf smbus2-0.3.0.tar.gz command will do the job.
d. chdir smbus2-0.3.0
e. sudo python setup.py install
* python-smbus2 package is also available here: https://itbrainpower.net/downloadables/smbus2-0.3.0.tar.gz
.
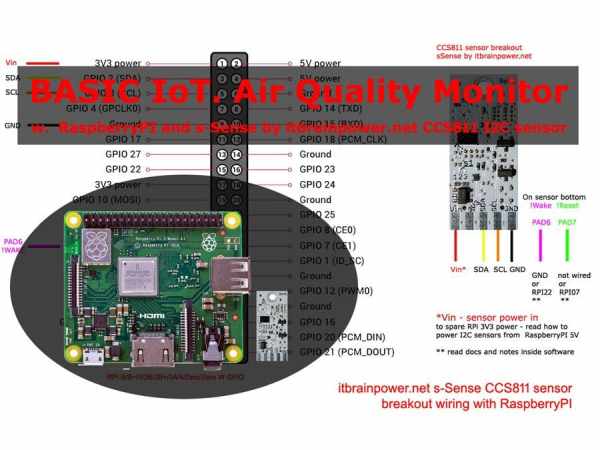
RaspberryPI CCS811 sensor hardware integration (basic wiring)
s-Sense by itbrainpower.net CCS811 sensor is compatible with all Raspberry PI versions! Next, all wiring directives are exemplified for Raspberry PI 4, 3B+, 3B, 3A+, II, B, Zero and Zero W.
GPIO naming convention used in wiring description and in software is “GPIO pin number” – GPIO.setmode(GPIO.BOARD). In a nut shell, wire as bellow:
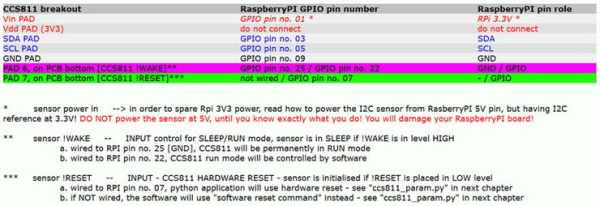
Bellow, basic CCS811 sensor wiring to RaspberryPI with safe sensor powering from RaspberryPI 3.3V pin:
Python CCS811 sensor software
a. download CCS811 RaspberryPI Python library from: here.b. expand tar.gz archive. Go inside new created folder.c. Save the file CCS811 – RaspberryPI read sensor data Python code as “ccs811_simple.py” in the python library folder.
d. Check CCS811 params in “ccs811_param.py” file. Run CCS811 code with command “python ccs811_simple.py”.
HINTS:
– if you update the code inside ccs811_param.py file, before run it, just run “./clean” utility in order to delete Python pre-compiled files.
– if you choose NOT to wire the CCS811 !RESET signal, verify inside ccs811_param.py for line beginning with CCS811_RESET_PIN to be commented
– if you choose to have CCS811 !RESET signal wired, verify inside ccs811_param.py for line beginning with CCS811_RESET_PIN NOT being commented (and check for appropriate CCS811_RESET_PIN RPI pin no.)
– if you choose to NOT control CCS811 SLEEP/RUN mode – wire the CCS811 !WAKE signal to RPI GND, verify inside ccs811_param.py for line beginning with CCS811_WAKE_PIN to be commented
– if you choose to have CCS811 !WAKE signal wired to RPI GPIO – CCS811 SLEEP/RUN controlled by software, verify inside ccs811_param.py for line beginning with CCS811_WAKE_PIN NOT being commented (and check for appropriate CCS811_RESET_PIN RPI pin no.)
Advanced CCS811 RaspberryPI feature [read CO2 and tVoC compensated data – using external temperature and humidity data source]
CCS811 have some interesting features (read datasheet) – one of them being the temperature and humidity drift compensation. In a nut shell, the CCS811 firmware use external temperature and humidity as data source for reading compensation algorithm. In order to implement this feature, just use in line 99 data supplied by external THS sensor. I suppose you may like to have our CCS811 + HDC2010 combo sensor.
Source: Basic IoT – RaspberryPI CCS811 air quality monitoring