
Story
Earlier this year, we showcased our Raspberry Pi Future Home, a fully connected LEGO smart house model with LEDs, weather sensors, and a realtime control dashboard.
And now, we’ll show you exactly how to build one (and give you all the code you need as well!).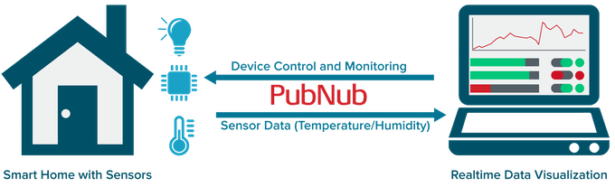
We promised that we’d dig deeper into the individual hardware and software components of the Raspberry Pi smart home model. The house was constructed out of LEGO, and runs on a Raspberry Pi Model B+. It includes LEDs, temperature and humidity sensors, and a remote controlled door.
First, we’ll focus on the temperature and humidity sensors. We’ll walk through setting up the hardware, hooking it up with PubNub, and viewing the readings in realtime from our web UI. Then, we’ll show you how to remotely turn on and off the house LEDs, as well as control their brightness.
In our diagram, the house represents the Raspberry Pi house with the lights, sensors and door. Using PubNub, you can power bidirectional communication between the devices at home and your mobile/browser:
- Read the sensor values such as temperature and humidity on a realtime web UI.
(SENSOR/LIGHT —-> BROWSER/MOBILE DEVICE)
- Monitor the same devices, and send control messages to them, to turn them on/off, to check their state and to take any action on them.
(BROWSER/MOBILE DEVICE —-> SENSOR/LIGHT)
This information is sent from one device to the other, without having to open any ports on the devices, through firewalls and irrespective of the network they are on. PubNub is the key communication component between all the things in the Internet of Things, and in this case, our Pi house.
Hardware: Sensor 101
The DHT22 is a basic, low-cost digital temperature and humidity sensor. It uses a capacitive humidity sensor and a thermistor to measure the surrounding air, and spits out a digital signal on the data pin.
- 3 jumper wires
- Breadboard
- 4.7kΩ (or 10kΩ) resistor 5.Raspberry Pi B+ loaded with the Raspbian OS.
Connect to the GPIO4 (pin7), pin 1 for the voltage (3v3) and pin 6 for ground. The resistor goes between the first two pins of the sensor. The third pin of the sensor doesn’t need to be connected to anything.
How do you read values from it?
We need to use Adafruit’s DHT library to be able to read the temperature values from the sensor.
Open LXTerminal, and download and install the followings:
Install Python:
pi@raspberrypi ~$ sudo apt-get install python-dev
Install pip:
pi@raspberrypi ~$ sudo apt-get install python-pip
Downloading the Adafruit DHT library:
pi@raspberrypi ~$ git clone https://github.com/adafruit/Adafruit_Python_DHT.git
pi@raspberrypi ~$ cd Adafruit_Python_DHT
Installing the library
pi@raspberrypi ~$ sudo python setup.py install
This should compile the code for the library and install it on your device so any Python program can access the Adafruit_DHT python module.
Software: PubNub 101
What is PubNub doing here?
The Raspberry Pi smart home is all about IoT, and IoT is all about the devices communicating with each other in realtime. PubNub powers that communication between devices. Whether it’s a mobile device or a web browser talking to embedded devices, sensors or any other device, PubNub glues them together.
In this specific example, we’ll use a web browser to communicate with the sensors and the Raspberry Pi, to collect and receive temperature and humidity values. The sensor measures them, and sends it back over PubNub, allowing you to visualize it on your browser in realtime.
Hardware Code Walkthrough
Step 1: Reading the sensor values
The code snippet below makes the Pi read the humidity and temperature values from the sensor and print it out.
At this point, our sensor is collecting temperature and humidity data, but not doing anything with it. We want to stream this data to a web browser and display it in realtime, reflecting changes as they happen.
Step 2: Installing PubNub
Install PubNub:
pi@raspberrypi ~$ sudo pip install pubnub
For an indepth tutorial on setting up PubNub with a Raspberry Pi, check out Raspberry Pi 101. Also, to get your unique publish/subscribe keys, you’ll first need to sign up for a PubNub account. Once you sign up, you can get your unique PubNub keys in the PubNub Developer Dashboard. Our free Sandbox tier should give you all the bandwidth you need to build and test your app with the PubNub API.
Make sure you import the right libraries needed for this program. You initialize an instance of PubNub by inputting your publish/subscribe keys. Your channel is where you publish the message to, so choose a unique name for that.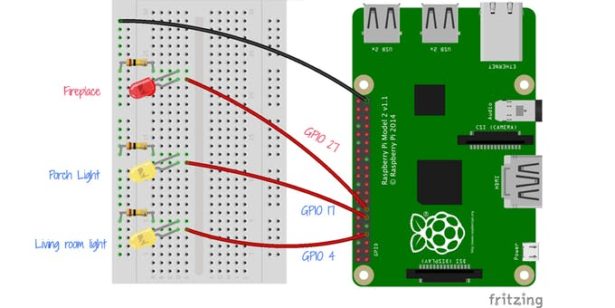
PubNub Publish/Subscribe
In order to view these readings on your web UI, you will need to publish them on a specific channel using PubNub. The browser will subscribe to the same channel, and hence receive the message.
Here we are formatting the data to two decimal places, forming a message to be sent over PubNub, and finally publish the message.
For more detail: Building a Raspberry Pi Smart Home