
The use case of the GPIO pins on the Raspberry Pi are rather limited and since I have an Arduino Mega 2560 lying around I can easily connect the two. In the next couple of weeks I’ll explain my process of connecting the Arduino with the Raspberry Pi and creating some sort of Library so the Arduino can be controlled from a web browser using a Raspberry Pi.
Connection options for and Arduino to Raspberry Pi connection
There are a couple of options for connecting an Arduino with a Raspberry Pi. The first and obvious one is of course plugging the USB port in the Raspberry Pi. As easy as it sound there are some disadvantages. First you sacrifice a precious USB port and second you now need to do your Arduino development on your Raspberry Pi. Not that easy or handy after all.
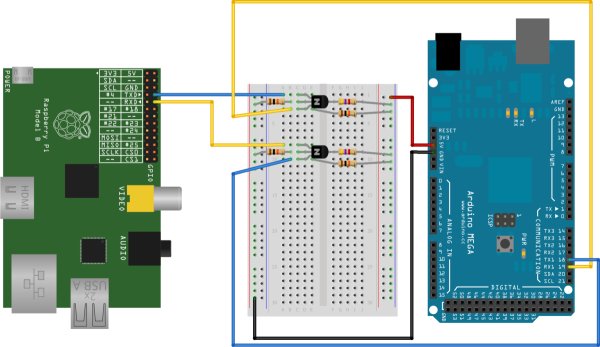
There are also bridge boards like Ponte (most popular one) that allow to connect Arduino shields with a Raspberry Pi. There are also extension board for the Raspberry Pi that actually include an Arduino chip (forgot the name). ## Say hello to my little friend UART The Raspberry Pi has a UART port and the Arduino has a Serial port, match made in heaven! My Arduino works with 5V logic and the Raspberry Pi with 3.3V, whatever you do, never and never connect the two without a logic level conversion circuit!
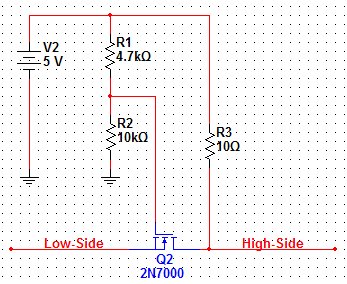
I decided to build a circuit (its more fun!), Sparkfun Logic Level Converter is another option. I used a Bi-Directional MOSFET Level Converter, based on the 2N7000. The schematics are really easy. Edit: thanks Scott for pointing out that R3 should be 10k instead of 10.
When the low side (3.3V) transmits a logic one the MOSFET is tied high (off) and the high side sees 5V through the pull-up resistor. When the low side transmits a logic zero the MOSFET source pin is grounded and the MOSFET is switched on and the high side is pulled down to 0V.
When the high side (5V) transmits a logic one the MOSFET substrate diode conducts pulling the low side down 0.7V, which in turns the MOSFET on. And so on. This circuit can also be used with I2C. We need two level converting circuits, one for RX and the other for TX.
For more detail: Connecting an Arduino and Raspberry Pi