Creating a system in order to detect wildfire using deep learning programmation on a Raspberry Pi 4 and a Wisol module by Sigfox.
Hello everyone !
Before explaining in details our project and its setup, we wanted to tell you that it is a student project carried out in a shot relatively short time. So we didn’t had enough time to complete our project and to do everything we wanted to. Therefore, our design is incomplete and does not directly answered our problematic. The main purpose of this article is to provide all the resources to anybody who would rebuild our project or continue it and finish it.
Let’s now talk about our project! Like I mentioned before it is a student project for our second year of engineering school in electronics, computer science and embedded systems. Our project’s problematic is:
Design an embedded system, autonomous in energy, user friendly in order to detect wildfires.
To fully answer this issue, we chose to consult an organization expert in wildfire, in order to understand the issues. We’ve contacted “L’Entente Valabre.”
“L’Entente Valabre” is french organism, a clustering of 14 districts (mostly in South of France) which is related to government to help it in protection of forest against fire. They manage formation, prevention, research and development of new way to detect wildfire.
After contacting and discussing with them about needed and restrictions of our problematic. We decided to focus on a system using image processing with deep learning in order to detect wildfire.
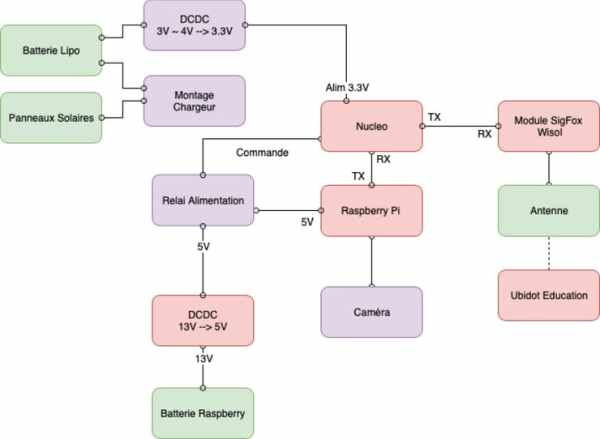
Here you have a very simple schema of our system to let you understand better our approach :
Part I : Setting up the Raspberry Pi 4
As you read, this project requires the use of a micro-computer on a board, the Raspberry Pi 4. You have to know that this board is provided without Operating System (like Linux or Windows) and you have to settle one on it. To do this, you will have to use the micro-SD card provide with the Raspberry that you will connect on your computer and download an Operating System on the internet specially designed for a Raspberry Pi, it name is Raspbian. To know in details how to achieve this part, we advise to follow this tutorial on the link below :
(NB : This tutorial is realised on 2, 3 and B+ Raspberry Pi design but perfectly work for the Raspberry PI 4 as well)
How to install Raspbian on the Raspberry Pi
Once this step achieve, our aim is now to implement a deep learning code which is able to detect wildfire. Unfortunately, the conception and the writing of this kind of programmation take time and require very specials skills. So we’ve decided to use a test code already implemented and verified by others, this test code allow you to detect movements with a deep learning process. To implement this code on your Raspberry Pi 4, please follow the tutorial on the link below :
Machine Learning on Arm | Teach your Raspberry Pi – Yeah world – single page
In our project we modified the code a little of machine learning. Indeed we have to implement a way of communicating between the raspberry and the nucelo. So we thought about a communication through GPIO using PWM (pulse width modulation). If we detect a hand rising we send a PWM with a certain frequency in a GPIO pin, else, we send another PWM with another frequency. To send PWM when there is hand rising you have to add the following code in the beginning :
import RPi.GPIO as IO
import time
IO.setwarnings(False)
IO.setmode (IO.BCM)
IO.setup(19,IO.OUT)
p = IO.PWM(19,100)
p.start(0)
Anf then below the line : “if (selected == 0):” add the following line :
p.ChangeDutyCycle(50)And add outside the if :
p.ChangeDutyCycle(20)If you want to run the code when the raspberry boots follow this tuto :
https://www.raspberrypi.org/documentation/linux/usage/rc-local.md
So we tried at first a test code but the main goal is to detect Wilde fire so we changed the code to make it detects wild fire.
Part II : Setting up the Nucelo
Now we are going to focus on the Nucleo. To program the Nucleo we are going to use Mbed. The Nucleo is the central part of our system, in deed the Nucleo is the part that will command the Raspberry Pi to start or to shut down, moreover it will also send the message of fire detection to a platform that we will talk about more later.
This is our code but it's free to you to modifie it :
Let's see how this code works. At the beginning we initialise every GPIO pin that we need. For example :
- The D3 pin of the Nucelo is used to read the Raspberry PWM
- The D13 pin is used to turn on or to turn off the Raspberry Pi
- The D5 and D4 pins are used to transmit to the antenna a message
- The SERIAL_TX and SERIAL_RX pins are used to debug your program by printing on a terminal using serial communication.
- The D9 pin is optional, indeed we use this pin to switch between the demo mode and the normal mode.
- The A3 and A2 pins are used to read the value of our two batteries
So our code is divided in two part, the demo mode and the normal mode. The demo mode allows us to test our system, without waiting every 10 min the raspberry to turn on.
I am only going to explain the normal mode. To explain simply our code every 10 min we turn on the Raspberry Pi to detect if there is fire or not, if there is no fire after 20 seconds of detection the raspberry will turn off. However if it detects fire, the Raspberry Pi will send a certain PWM signal that will be interpreted by the code and detected as a fire. Thus an alert will be triggered by sending a message to Sigfox thanks to the antenna module.

We also add the battery level to the message that we send to Sigfox. To go further we can manage the data that we send to Sigfox with Ubidots. For example, with Ubido
ts, it can call by cell phone, send a message or an email.
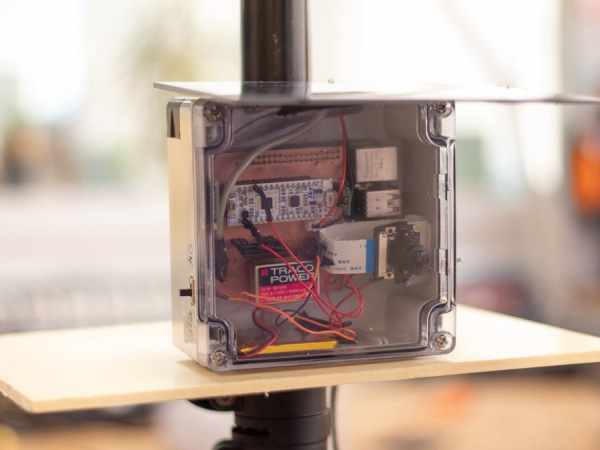
Part III : Breadboard Prototype
As we mentioned before in the list of components you have to buy to rebuilt this system, there’s two way to do this. One first prototype on a breadboard and another complete version on a printed circuit board (PCB). As you suppose, we are going to start with the breadboard version then if you want a more mature device, we will give some KiCad resources to print your own PCB for the project.
For the Breadboard prototype, please reproduce the electronic schematic bellow: