
I know what you're thinking: “How cool would it be if I had my own Google Drive/SkyDrive/Dropbox that I can use whenever I like?” Or maybe you are just getting into the Maker movement and you think it's the greatest thing since canned bread. You've probably seen quite a few Raspberry Pi projects already, or maybe you've even done a couple and want to try something a little more advanced.
This Instructable is all about how to make a small, simple, and affordable server with attached storage to download anything you need. The server will keep a bulk of it's data on an external hard drive. The server will also run various FTP services that will allow you to download anything you might need on the fly.
Goals of the FerretPi project:
Primary Objectives:
– Run an FTP server on a Raspberry Pi with full functionality
– Set up automation for file and log management
– Apply basic Linux security best practices (such as no root login from SSH, etc)
– Construct a reporting system to notify of system changes via SMS or e-mail
Related Content:[box fontsize=”16″ radius=”10″]Papertrail makes log management easy[/box]
Secondary Objectives:
– Compile a custom hardened Linux OS to run off the Raspberry Pi
– Encrypt the storage device with strong non-RSA algorithms
– Build a simple self-destructive intrusion detection system (e.g. if hard drive is unexpectedly removed and remains removed for five minutes, then format upon remount).
– “Teach” the Pi to automatically avoid detection (e.g. intentionally change max bandwidth per day, spoof MAC addresses, conceal hostnames)
Secondary objectives are for those of you that really want to make something crazy.
Step 1: Acquire the Basics
These are the most basic components you'll need to build your own FerretPi. You can use many variants of what I use, but matching the basic concepts will be best for beginners. You can get these products from any retailer you want, but I have had an intellectual crush on Limor Fried and what she does, so I strongly recommend you go through Adafruit Industries for as much as you can!
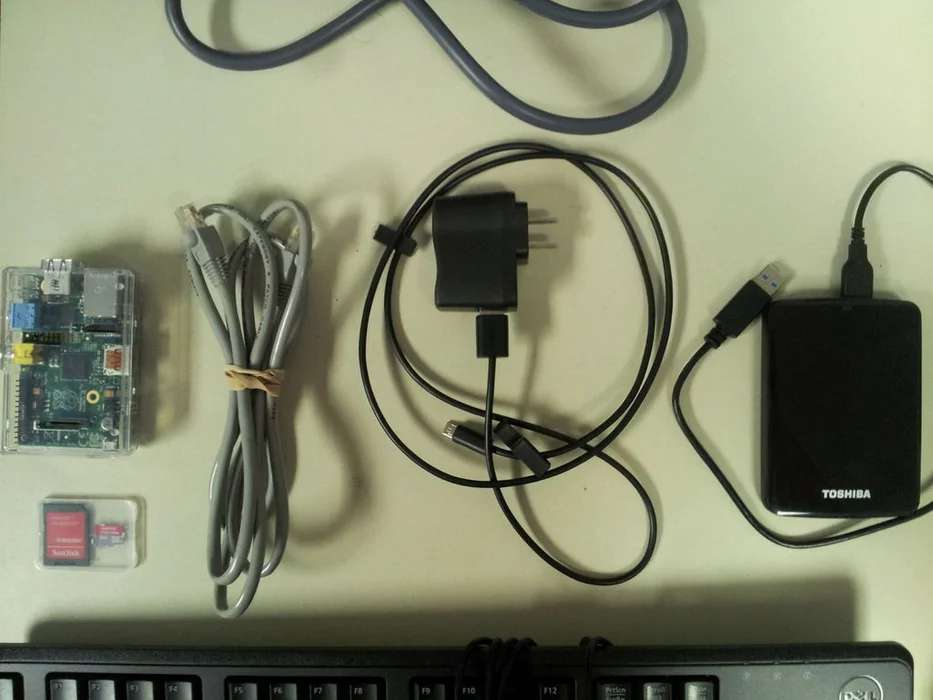
What You're Gonna Need (for the final product):
– A Raspberry Pi
– I strongly recommend using the Raspberry Pi Model B. Theoretically, you can use the Model A, but here's the thing. You're going to want all the RAM you can get for large file operations, you're going to want the extra USB port for wireless connectivity, and there is an Ethernet port.
– You can pick one up here for about $40
– A 4GB SD/microSD card
– This is where your operating system is going to be, so get something you're happy with. I chose an 8GB card because I wanted the ability to create a swap partition in the event I run out of RAM during operations. It will also allow you to use more applications.
– You can save yourself time by purchasing a card with Raspbian Wheezy already on it.
– Pick one up from the fantastic Ladyada here for $10
–REMEMBER: If you get a microSD card, you will need an adapter to work with your Pi!
– Either a CAT5/6 Ethernet cable, or a Pi-compatible Wi-Fi dongle.
– For my project, I had some CAT5 laying around, so I didn't go through great lengths to get some. You can find them virtually anywhere, and you may have friends or co-workers that can give you some.
– I would recommend picking up a Wi-Fi dongle since it will allow you to put your Pi where you want it.
– If radio waves are your thing, snag one here for about $10
– An external storage device (preferably 1TB or greater)
– This is where you have the most freedom. Pick any brand, any size you want, but keep in mind that the Pi cannot power a portable hard drive with USB power. If you do use a portable drive, see the next step for info on the extra components required.
– I chose this model because I wanted to be able to move the Pi more easily. I picked it up on sale for about $60.
– A micro USB cable and power adapter
– Unless you have built a machine uses Tesla coils to power computers, you're going to need this.
– If you have an Android phone, you might have a micro USB cable around. If not, get one here.
– Same deal applies for the power adapter. Check it out. You're looking at about $15 for both.
– A decent knowledge of Linux and the Raspberry Pi
– You don't have to be a guru, but you should at least understand how the terminal works, what FTP is, basic network configuration (hostnames, IP addresses, etc) to get started. If you don't, feel free to try anway! What better way to learn than by doing?
So, all in all, you're looking at spending about $150 (approx. tax etc) for the basic stuff on the project. Go to the next step to read about what other stuff you need to get the project done!
Step 2: Some Assembly Required
Since the FerretPi is going to be a server, most of the following components are only needed for the initial setup. You may want to keep them handy for doing fun stuff with the server, or for convenience.
– A USB Mouse and Keyboard
– You might have these lying around like me, but if you don't, try borrowing some from a friend. Check out Radioshack to pick these up for cheap. Should run you anywhere between $15-$20.
– The peripherals become unnecessary after you have set up SSH, but they're good to have around in case you need them.
– HDMI (or HDMI to DVI) cable
– Most servers don't have monitors hooked up to them, but you'll need it for the initial setup.
– Despite what a lot of media companies tell you, cheap HDMI cables work just as well as a good ones. If one meter is long enough for you, get a good deal here.
– You can also use a composite video cable here, but configuration is different so you are on your own with that.
– A display that uses HDMI, DVI, or Composite Video
– This goes without saying. However, you might be interested in getting something that you can use for future projects, like this.
Optional Things You Probably Want
– A surge protector
– A POWERED USB hub
– This is most important if you plan on using a portable hard drive. The Pi only consumes about 5W of power, and honestly can't supply enough amperage to spin up hard disks over USB. Getting a powered USB hub allows you to use these hard drives, and additional peripherals as well. Ladyada has a good cheap one here.
– A Case for Your Pi
– Having an enclosure for your Pi will help it last longer and look better. There are a lot of options and you can check out some particularly awesome and stylish ones here.
Step 3: Get Your OS on the SD
If you want to follow along with the steps I took, you're going to want to download a few utilities. The only computer I have that can read SD cards is a Windows 7 PC. I may add instructions for Mac OSX and Linux distros later. But for now, I'll give you the Windows instructions.
Download the latest STABLE version of Raspbian (usually referred to as Wheezy). You can download it as a .zip or as a .torrent here.
After the download completes, you'll need to extract the .img out of the archive. I prefer to use 7-zip for this, but I'm sure you have a favorite too.
You need to make sure your SD is formatted with NTFS, as Raspbian supports NTFS file systems, and it will let you read it on a Windows machine as well. Right-click the drive, and select “Format”. BE CAREFUL THAT YOU SELECT THE CORRECT DRIVE. This should only take a minute or two.
Now, you need to burn the .img to your SD card. Some burning programs throw a fit over .img files, so you can pick up Win32DiskImager at SourceForgefor free! I love embedded links if you can't tell.
Run the Win32DiskImager .exe and you will be prompted to select a .img file to burn. Locate the Raspbian image, and click “Open”. Next, select the drive letter Windows has assigned to your SD (make sure it's mounted). **EXTREMELY IMPORTANT: Be 100% sure you are selecting the correct drive, as selecting the wrong one can DELETE ALL YOUR PRECIOUS DATA! INCLUDING YOUR OS IF YOU AREN'T CAREFUL!**
Kick back, drink some coffee, smoke 'em if you got 'em, because this will take anywhere between 5-20 minutes depending on the speed of your computer.
Last, but certainly not lease, ALWAYS properly eject your SD from Windows before pulling it out of your reader. Failure to do this can easily lead to a corrupt SD card. I burnt through one doing this, and you probably will, too.
Step 4: Preconfigure Your FerretPi
Insert your freshly installed Raspbian SD card into your Raspberry Pi before you plug anything in. Plug in all your peripherals (except the USB hub or external HDD), and power up your Pi by plugging in the micro USB cable. You should see the Pi start to light up. If you only see a red PWR light, and nothing happens, consult this page.
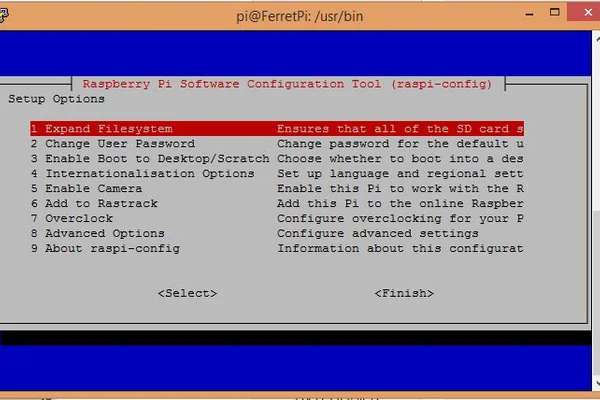
If you did everything right, Raspbian should begin booting. You'll be greeted with a stunning blue background where you can begin configuring you FerretPi. Log in using the default username and password (username: pi, password: raspberry).
– Start by expanding your filesystem (#1). Doing this will allow you to download more stuff onto the SD including updates and software.
– Take this opportunity to change your user password from the default (#2). We will probably change the username later to provide better security, but we'll stick with “pi” for now.
– Go to Advanced Options (#8) to start playing with some of the deeper settings
– Option A2 changes your hostname. It's a good idea to do this early on, and I chose “FerretPi”
– Option A4 enables SSH. We're going to be using SSH to access the device, so enable this now.
– Option A7 performs an auto-update of the rasp-config utility. This is not mandatory, but is a good idea.
There are lots of other cool things you can do with the rasp-config. I chose to boot into the console, overclock to the “Modest” setting, and make a couple other tweaks. A good rule of thumb is to avoid excessive overclocking and don't tweak options that you don't understand. When you're all done, select “Finish” and reboot your Pi.
This is a very important moment. If your Pi doesn't reboot, don't sweat! This could mean a lot of things, but you might have screwed something up (it happens). Refer to the troubleshooting page and try again.
If the stars are aligned, your Pi will reboot with no problems, and you can proceed to actually using it!
Step 5: Change Your Hostname
Time to edit some config files! You can use Vi if you like, but I have found people are more familiar with Nano, so I'll be using that for this step.
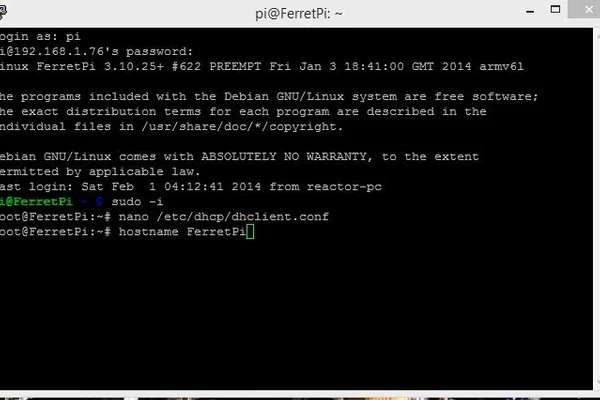
Log into your Pi again, and become root. The easiest way to do that is to just type “sudo -i” and hit enter.
Next, type “nano /etc/dhcp/dhclient.conf” and hit enter again. We're going to edit just a couple of lines here to make things work a little smoother for us. Later, we'll be accessing the Pi from over the internet, so we'll have to edit our hosts file on our client computer, but I'll save that for later.
Find the line that says “#send host-name “andare.fugue.com”;” and remove the octothorpe (#) from this line. Change “andare.fugue.com” to the hostname you want (again, I chose “FerretPi”). Exit Nano by typing “Ctrl-x“. Type “Y” and then hit enter to save your changes. You'll probably have to hit enter one more time to actually save.
To send this new hostname to your DHCP server (probably your router/modem), type “hostname FerretPi” at your bash prompt.
For safe measure, let's flush and restart your ethernet interface. Type “ifdown eth0” and hit enter. When that action has completed, type “ifup eth0” to restart your interface.
This is a good point to reboot. Since you're root, just type “shutdown -r now” to perform a restart.
Step 6: Connect Using SSH
SSH is made of pure awesome. To get it rolling, you'll need client software for your computer. Most Linux distributions include SSH, but if you don't have it, type “sudo apt-get install SSH” in a Terminal. You'll know it's installed if you get a description of SSH options when you type “ssh” into the terminal.

For Windows users, there are a few different SSH clients out there, but my favorite by far is PuTTY. You can grab it here.
PuTTY doesn't require an install, so just run the .exe and you're ready to go. If you configured your hostname properly, you should be able to type it into the “hostname” box and select port 22. Click “Open” and you should be prompted to login to your Pi. If you get a message saying “no host exists” try typing in the IP address of your Pi.
You may be prompted with a security warning, you can ignore that for now, and just continue into your Pi.
Now, for safety, try a few basic bash commands (such as cd, ls, mkdir) and confirm you can become root. If all is well, and you feel comfortable doing so, disconnect the monitor and keyboard. This is also a good time to plug in your external HDD or USB hub. Personally, I prefer to keep my monitor and keyboard plugged in for ease of use.
Step 7: Install an FTP Server and Client
For file transfers, which is the bulk of what we are trying to do, you are going to need to install an FTP server on the FerretPi and an FTP client on any computer you would like to access from. You can use any server/client combination you like, but I'll give you one to use if you want to follow along.
I chose to go with VSFTPD for the FTP server. It's a secure and lightweight option, and installation is a breeze.
– Open up an SSH session with your FerretPi, and type “sudo -i” to gain root permissions.
– Start by installing VSFTPD using the command “apt-get install vsftpd“, and hit enter.
– We need to edit a configuration file to get rolling, so type “nano /etc/vsftpd.conf” and hit enter again.
– In Nano, you'll need to look for a few lines. Change them as shown.
– anonymouse_enable=YES –> anonymous_enable=NO
– #local_enable=YES –> local_enable=YES (you are uncommenting this line by removing the “#”)
– #write_enable=YES –> write_enable=YES (you are uncommenting this line by removing the “#”)
– Go to the bottom of to document and add the line “force_dot_files=YES”
– When you're done configuring in Nano, restart the VSFTPD daemon by typing “service vsftpd restart“.
Serious thanks to drcurzon here at Instructables for good info on configuring VSFTPD.
Your FTP server is now running on your FerretPi. Now we have to install a client for your computer so you can upload/download content to the server. If your client computer has Linux, check out this list for options. For a Mac, I would highly recommend FileZilla. But pay attention to where you download, as counterfeit versions of FileZilla that are loaded with malware have been found on the internet recently (as of 02/01/2014).
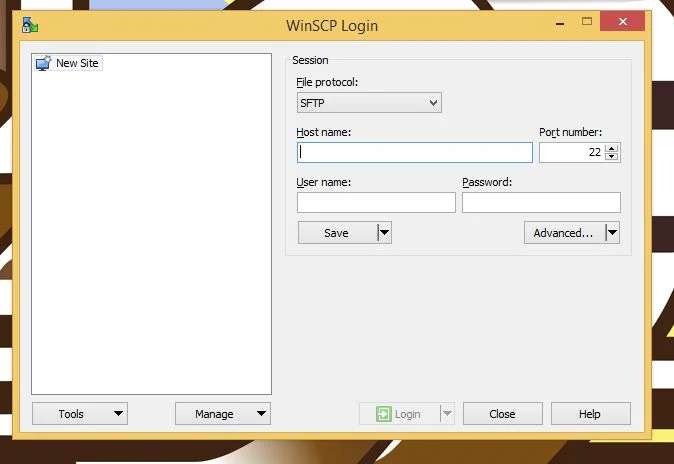
Since so far I've used a Windows computer, I'll tell you about using WinSCP, which is a lightweight, simple, and useful FTP GUI application.
– Download the WinSCP application, which you can find here.
– After the file has finished downloading, run the .exe and install the program.
– You'll be presented with a login page. We'll configure a saved session for your local network, and we can make new save for over the internet.
– Change “File Protocol” to “FTP“. This should also automatically change the port number to 21.
– Type in your hostname (FerretPi). After we set up DNS, you'll be able to type in the address (e.g. www.ferretpi.com)
– Enter “pi” for the username, and then your password.
– Before you hit “Login”, click “Save” and save it as “FerretPi – Local“. This way you don't have to redo that configuration.
Since we didn't change the default directory for the FTP, you'll arrive at the home directory for the user “pi”. Awesome! You might be interested in adding an entirely separate user that does not have sudo privileges, and use that exclusively for your FTP. This is a good idea for security, because at some point you may connect over an unencrypted connection, and if your credentials are stolen, you don't want any major damage.
Step 8: Mount Your External Drive and Automate
This step is more or less straightforward. Connect your compatible hard drive to the FerretPi either directly, or by using a powered USB hub (what I did).
![]()
In your SSH shell, type “sudo mount“. This will list all the storage devices connected to your Pi. If the list is daunting, feel free to disconnect any storage except the hard drive and SD card. For me, it was sda2, which is located at /dev/sda2
Let's mount the filesystem at a point that is simple to get to. I chose /home/pi/HDDMount. Use “sudo mkdir -v ~/HDDMount” to make the directory. Now type “sudo mount /dev/sda2 ~/HDDMount“. This will tell the Pi to mount your external hard drive at that directory. Now, any documents or folders saved to ~/HDDMount will be put on the hard drive.
I'm sure you don't want to do this every time, so we can add a small bash script to the init.d directory. If this sounds like something you want to do, I'll challenge you to learn how to write the simple script, and put it in the directory so it will run on startup. It's easy, and you'll learn a bit!
In case you want to skip all that, here's a really basic script I made (you'll need to change sda2 to the drive name for you.) http://pastebin.com/GHUv34HU Put that into /etc/init.d as well.
Step 9: Router? I Hardly Know ‘er!
In order to access your FerretPi from anywhere, allowing you to SSH in, retreive documents off the FTP, and other functions, you'll have to allow connections to pass through your firewall or set up port forwarding. I chose to forward ports 22, 31, and 80 to my Pi. Port 22 is SSH, port 31 is FTP, and port 80 is HTML. How you do this is completely based on your router and network configuration. Rather than go over something that has been discussed exhaustively on the internet, check out these articles for help:
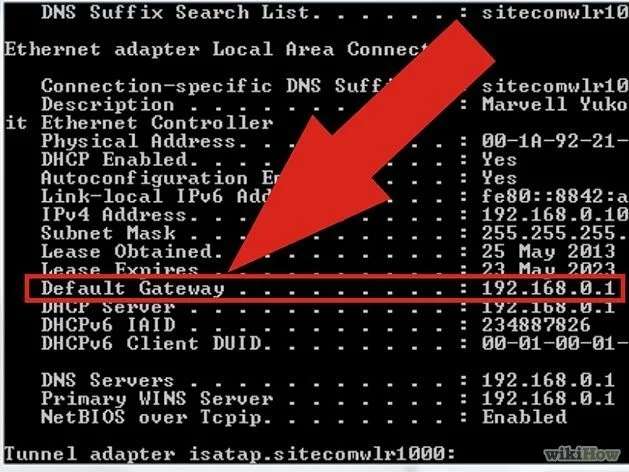
http://www.wikihow.com/Set-Up-Port-Forwarding-on-a-Router
http://www.howtogeek.com/66214/how-to-forward-ports-on-your-router/
Image courtesy of wikiHow
Step 10: Configure a Dynamic DNS Service
This is probably one of my favorite steps, only because I've never done it before. We need to set up a Dynamic DNS service so that we don't have to type in the IP address of our Pi when we want to connect to it over the internet. This is handy because a lot of ISPs will change your IP automatically over periods of time. Setting up Dynamic DNS will allow that IP to change, but still have your Pi accessible!
I don't like to pay for things, and this project was already on a tight budget. So I chose a free option, which is the No-IP service.
You are going to have to set up an account with no-ip, choose a hostname for instance “myferrets.no-ip.org“. Once you have created the account and chosen the free options, you're going to need to install the Dynamic Update Client. Follow the instructions here and you'll be done in no time.
Once it is all installed, get it running and continue to follow instructions by typing “sudo noip2“. The service should start. Go ahead and use “touch /home/pi/autonoip” to change the date on the files.
Now you'll want to use nano to open the README and make any changes there that you like. We are going to do the same thing we did for the external drive to force noip2 to run at startup. Type “nano /usr/local/src/noip-2.1.9-1/README.FIRST” to open the README. Copy the script that is contained in the file, and exit nano. Now, create a new file I chose to call “autonoip” by typing “nano /home/pi/autonoip“. Paste the script into this file, save changes, and exit nano.
Now all we have to do is move the script into our init directory by typing “mv -v /home/pi/autonoip /etc/init.d/autonoip“.
We still need to tweak our startup scripts a little, so run these commands:
sudo chmod 755 /etc/init.d/autonoip
sudo chmod 755 /etc/init.d/mounthdd
sudo update-rc.d autonoip defaults
sudo update-rc.d mounthdd defaults
This instructs the Pi that the two scripts are executable, and to run them on startup.
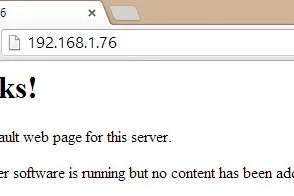
Test this by going to a browser on a different machine, and navigate to “myferrets.no-ip.org” or whatever your hostname is.
Step 11: Test Your Connection
For this step, you'll want to connect to the FerretPi from outside your network. That's right outside your network. I know it's bright and scary out there, but if you want true “cloud” storage you'll need to.
Let's start by just pinging the device. If you have disabled ping scanning, which I recommend for security purposes, you can skip this step. Go into either a Windows command line or Linux/Unix and type: ping <address>. You should receive a response. If you don't, then you may not have configured the port forwarding correctly, your FerretPi is not configured properly, or your public IP is not correct. Go back to step 10 and 11 and try again.
Now, let's login to the server. From a Unix terminal, type: ssh pi@<address> and wait a few seconds. Eventually, you'll be greeted with a security warning. If you're sure you typed in the IP correctly, type “yes” and you're in!
Finally, verify that your FTP server is up and can connect. Open up WinSCP and use your address. You should be able to see everything in your Pi.
Step 12: CONGRATULATIONS!
You have successfully built a very basic FTP server that can function as a personal cloud!