
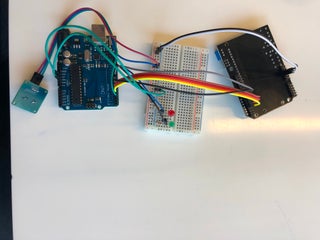
The Life Saver is a product that helps to eliminate the problem of leaving your kids in the car and them getting heat stroke. The Life Saver is a product that displays the temperature on the lcd display and when the temperature is over 35 degrees celsius the light goes red and the buzzer makes a noise to notify people nearby.

Step 1: Purchase Products
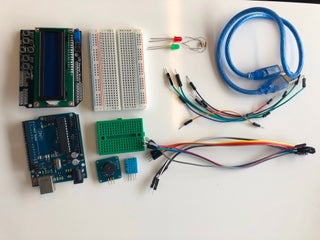
Item List:
– Arduino Uno
– LCD Keypad Shield
– 11 male to female wires
– 7 male to male wires
– DHT temperature sensor
– Large Breadboard
– Small Breadboard
– Passive Buzzer (5V)
– A Green LED
– A Red LED
– 2 resistors (330 Ohms)
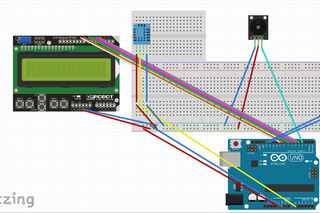
Step 2: Assembly of LCD Keypad
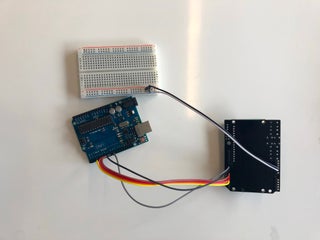
Place the Orange wire into the LCD Keypad (5 from the top right) and the other side into the port 4 in the Arduino board.
Place the Red wire into the LCD Keypad (6 from the top right) and the other side into the port 5 in the Arduino board.
Place the Blue wire into the LCD Keypad (7 from the top right) and the other side into the port 6 in the Arduino board.
Place the Pink wire into the LCD Keypad (8 from the top right) and the other side into the port 7 in the Arduino board.
Place the Grey wire into the LCD Keypad (9 from the top right) and the other side into the port 8 in the Arduino board.
Place the White wire into the LCD Keypad (10 from the top right) and the other side into the port 9 in the Arduino board.
Place the White wire into the LCD Keypad (9 from the bottom right) and the other side into the negative of the Breadboard.
Place the Grey wire into the LCD Keypad (10 from the bottom right) and the other side into the positive of the Breadboard.
Step 3: Assembly of the Passive Buzzer
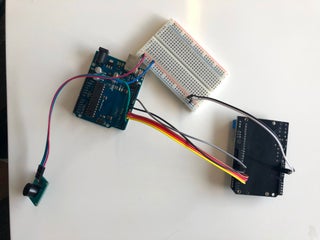
Place the Grey wire into the ‘SIG' port of the passive buzzer and the other end into port 3 of the Arduino board.
Place the Blue wire into the ‘UCC' port of the passive buzzer and the other side into the positive of the Breadboard.
Place the Purple wire into the ‘GND' port of the passive buzzer and the other side into the negative of the Breadboard.
Step 4: Assembly DHT Temperature Sensor
Place the DHT Temperature sensor into points H14-H17.
Place the Orange wire into the Breadboard in position J14 and the other end in the Breadboard in the negative row.
Place the White wire into the Breadboard in position J16 and the other end in the port A0.
Place the Grey wire into the Breadboard in position J17 and the other end in the Breadboard in the positive row.
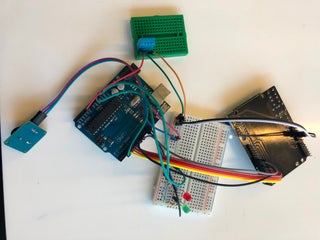
Step 5: Assembly of the LEDs
Place the Green LED's Positive wire into D28 and the Negative wire into D29 into the Breadboard.
Place the Red LED's Positive wire into D25 and the Negative wire into D26 into the Breadboard.
Place one side of the resistor in position B29 (For Green LED) and the other side in the negative row.
Place one side of the resistor in position B26 (For Red LED) and the other side in the negative row.
Place the Grey wire in the Breadboard position B28 and the other side into port 13 of the Arduino board.
Place the Green wire in the Breadboard position B25 and the other side into port 12 of the Arduino board.
Step 6: Assembly of the Ground and 5V Ports
Place the Yellow wire into the Breadboard positive row and the other side in ‘GND' in the Arduino board.
Place the Yellow wire into the Breadboard negative row and the other side in ‘5V' in the Arduino board.
Step 7: Insert Code and Print Box
#include <LiquidCrystal.h> // Include the library 'LiquidCrystal.h'#include <dht.h>  // Include the library 'dht.h'#define TempSen A0 // Define 'TempSen' as A0
#define redLED 12 // Define 'redLED' as 12
#define greenLED 13 // Define 'greenLED' as 13
#define speakerPin 3 // Define 'speakerPin' as 3
dht DHT;const int rs = 8, en = 9, d4 = 4, d5 = 5, d6 = 6, d7 = 7; // Defines the pins for LCD
LiquidCrystal lcd(rs, en, d4, d5, d6, d7); // Creates LCD as an objectvoid setup() {
  pinMode(redLED, OUTPUT); // Define 'redLED' as an output
  pinMode(greenLED, OUTPUT); // Define 'greenLED' as an output
  pinMode(speakerPin, OUTPUT); // Define 'speakerPin' as an output
  Serial.begin(9600); // Start the Serial monitor connection
  lcd.begin(16, 2); // Define the amount of coloums(16) and rows(2)

}void loop() {
  DHT.read11(TempSen); // Read the temperature sensor
  Serial.println(DHT.temperature); // Print the temperature in the serial monitor
  lcd.setCursor(0, 0); // set the cursor to column 0, line 1
  lcd.print("Temp = "); // Print 'Temp=' on the LCD display
  lcd.print(DHT.temperature); // Print the temperature on the LCD display
  lcd.println("C  "); // Print 'C' after the temperature on the LCD display
  delay(50); // Delay for 50 milliseconds

  if (int(DHT.temperature) >= 35.00){ // Take the temperature and create an int that when its more than 35 degrees the following happens
    digitalWrite(redLED, HIGH); // Turn the 'redLED' on
    digitalWrite(greenLED, LOW); // Turn the 'greeenLED' off
    int temp = analogRead(DHT.temperature); // Deifne the 'temp' as the 'DHT.temperature'
  tone(speakerPin, 1*temp); // Play a tone at the tempreature level and play it out of the speaker
  delay(50); // Delay for 50 milliseconds
  noTone(speakerPin); // Play no tone out of the speaker  }
  else{
    digitalWrite(redLED, LOW); // Turn the 'redLED' off
    digitalWrite(greenLED, HIGH); // Turn the 'greenLED' on
  }
    }
Source: Life Saver