
Introduction
I want my daughter to use the Raspberry Pi for her school work and learn programming. I could buy her a Raspberry Pi or I could share my Raspberry Pi with her. I chose to share the Raspberry Pi with her. After completing this instructable, you may be interested in my instructable on modifying the login screen.
Problem
We cannot use the same account (i.e. as user “pi”)
Scope
This instructable will show:
How to show login screen to greet user
How to lock screen for privacy
Prerequisite
A raspberry pi running Raspbian OS
Step 1: Enable and test login screen
Open terminal emulator
cd /etc/lightdm
vi lightdm.conf
Disable auto login:
#auto-login-user=pi
Show list of user(s) in login screen
greet-hide-users=false
Save the file
Reboot
sudo reboot
Raspberry Pi will display a login screen
Step 2: Implement and test Screen Lock
Open terminal emulator in Raspberry Pi
sudo apt-get update
sudo apt-get install xscreensaver
Click on Start Button -> Preferences -> Screensaver
If there is a dialog box asking to start the daemon, click on Yes button
If not, click on menu File -> Restart Daemon
In terminal emulator:
Navigate to lxpanel system-wide configuration
cd /etc/xdg/lxpanel/profile/LXDE/panels
Edit panel file as shown in the screenshot by adding or modifying the last plugin to what is shown in the screenshot
sudo vi panel
Modify screen lock desktop file to be the same as the one in the screenshot
cd /usr/share/applications
sudo vi lxde-screenlock.desktop
Modify logout desktop file to be the same as the one in the screenshot
cd /usr/share/applications
sudo vi lxde-logout.desktop
Reboot Raspberry Pi
Login by entering user id and password into login greeter box
A screen lock icon should be seen in the bottom right of the screen as shown in the screenshot.
Click on the lock icon. (Warning: Before doing this, make sure you know the password)
Raspberry Pi display a screensaver in the background and a login screen in the foreground as shown in the screenshot, effectively locking the screen.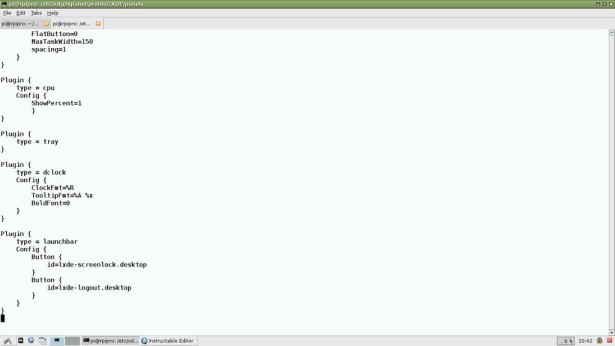
Step 3: Add User and test login screen
Open terminal emulator in Raspberry Pi
sudo useradd -m daughter
sudo passwd daughter
Enable new user to watch video by adding user to audio and video group
sudo usermod -a -G video,audio daughter
Reboot
sudo reboot
Display manager will show a list of users with daughter being one of them
For more detail: Make Raspberry Pi a Multi-User Desktop