
Well, when I say “portable” I wouldn't want to lug it around London on a site-seeing trip.
Maybe transportable is a better description. At least I can move it around the garden and film the wildlife.
This post provides more technical detail on this system, and a few more video clips.
Description
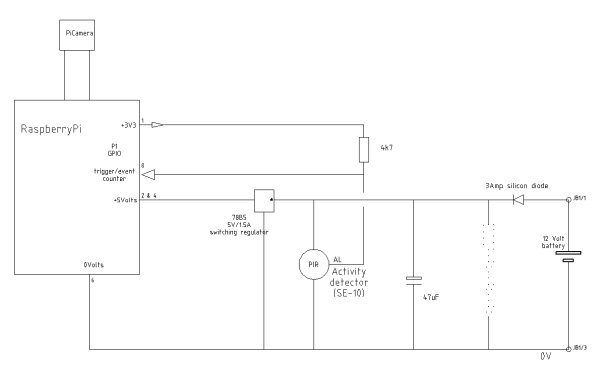
This unit is basically a RaspberryPi + RaspiCamera. It includes a PIR to trigger capture and a regulator circuit for operation with a 12Volt battery.
In the circuit the 3A diode is just to prevent melt-down, if the battery is ever accidentally connected the wrong way around.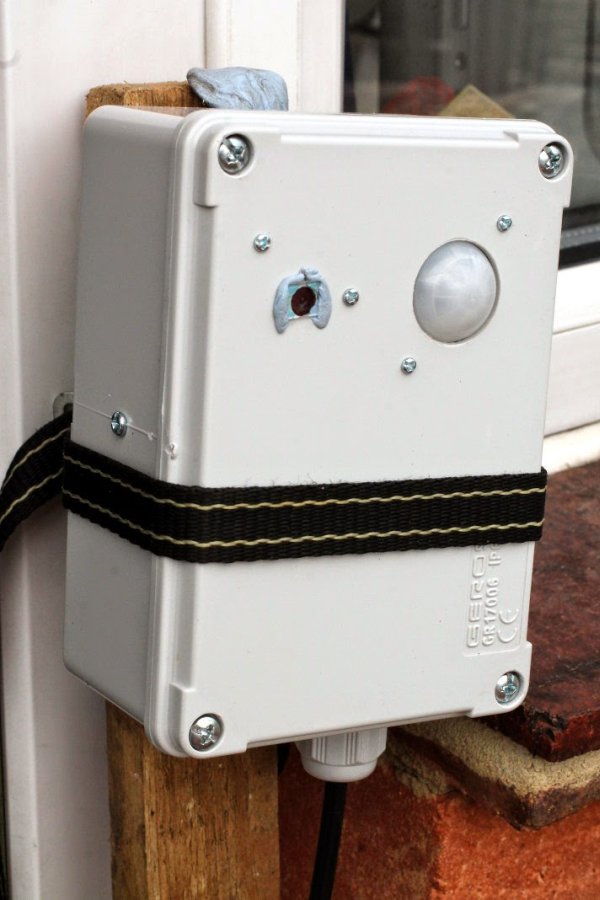
As previously mentioned the SE-10 PIR was rather unstable when operated from 5Volts with the RaspberryPi. Electrical noise on the supply was responsible for false triggering. But running the unit from 12Volts results in much better performance.
As the SE-10 has an open-collector output (AL), I have connected this to the RaspberryPi 3.3Volt supply via a 4.7kOhm resistor. Do not connect 12Volts to your RapberryPi.
I have used an ABS box from Maplin to house the components. This box had a good environmental spec, until I started cutting it about.
But I may be able to make this good again by applying silicone sealant around the PIR and camera lens (although my iR filter might be a problem).
I'm quite happy with the results, but for daylight only use it may be better to use a standard RaspiCam, rather than the NoIR + external iR filter that I've used.
However, I may add a few iR LEDs and use this as a hedgehog cam.
There is another commonly available PIR which has a couple of potentiometers to adjust sensitivity. This may give better performance, but a small bird does not generate much heat. And I'm pretty sure that a bird seed-feeder swinging in the sunshine probably represents a larger, moving, warm body.
The software is just a horrible hack (a software hack is where you just sit at a keyboard and make it up as you go along….no written notes or plans to work from). This hack is particularly horrible because I've just taken my bird box Gambas code, blocked out great chunks of code, and tacked on new bits here and there.
But the basics are just about reading the PIR input every (say) 200ms using some kind of timer (Gambas) or some kind of loop (Python). Once a change in PIR state has been detected, you can then run a standard Raspivid command like this:-
raspivid -w 640 -h 480 -fps 90 -t 120000 -o strFileID
…where strFileID (the output file path + name) can be generated something like this:-
strFileID = “/home/pi/RaspiCam/Video90fps” & CStr(Day(Now)) & “-” & CStr(Hour(Now)) & “-” & CStr(Minute(Now)) & “.h264”
…and -t sets the length of the video in milliseconds.
Some video
I can use this system to take regular video, but I'm still experimenting with 90fps at the moment. This produces a kind of slow motion video, where the result is about 28% of normal speed. The quality is not as good as running in a regular 30fps mode (especially after being uploaded to this blog), but the results are quite interesting.
For more detail: My Portable Pi-Cam