
Description
This project is an APRS iGate for ARISS program‘s digipeater aboard the International Space Station. I have a 2m FM radio tuned to 145.825 MHz. As the ISS passes over my location, the radio passes the received signal from the ISS to a Terminal Node Controller (TNC) that resides atop the Raspberry Pi. The TNC decodes the audio tones and creates data packets the Raspberry Pi can receive, process and pass along to the APRS Internet Service (APRS-IS) network. By documenting the setup and allowing others to more easily create iGates for the ISS digipeater, this ensures coast-to-coast and around-the-world coverage for the ISS APRS-listening network. You do not have to have a satellite tracking system to receive APRS packets from the ISS. If you have an antenna and the resources, consider building an ISS iGate.
I created my first Raspberry Pi iGate in the Spring of 2014. I hope the wider ham community enjoys my iGate and inspires others to build their own. I have also built a Raspberry Pi WebSDR and I'm working on a 20m WebSDR receiver as well as an amateur radio satellite tracker. Click here for a list of my other amateur radio related Raspberry Pi projects.
You can see packets I (and other ISS iGates) have reported here: http://www.arris.net
Parts Used
My ISS iGate setup consists of:
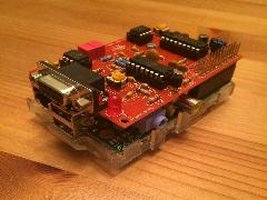
- Raspberry Pi Model B and power, 8Gb+ SD card & case (I just use the bottom half as a base)
- TNC-X TNC-Pi Kit – My build notes are on my blog. (TNCPi Manual – 643kb)
- 802.11b/g/n wireless USB adapter (RTL 8188 chipset)
- An old Alinco 2m mobile radio from a hamfest (cheap)
- A cobbled-together cable with DB9-to-RJ45 connectors to interface the TNC and radio (see manual or blog post)
- 2m mag mount whip antenna – nothing special
Software
- Raspbian has been my OS of choice for the Raspi, for no particular reason
- aprx is the main program that takes the serial data coming off the TNC and routes them to APRS-IS
- logrotate is setup to manage the log files via a cron job
Documentation
- aprx Manual
- TNCPi Manual
Configuration
Note: Before we begin, note that many of the files you're editing will need to be edited through sudo. Use your favorite editor (vi, nano, pico) like this: sudo vi filename.
- The first step after getting a basic Raspberry Pi setup is to disable SPI, I2C and Serial from raspi-config. We do not need any of these connections if we're only wanting to setup an iGate with the TNCPi.
- The next step is to disable the Raspi from using the GPIO pins, specifically the serial port, for anything else before we can attach the TNCPi to them. To accomplish this we need to edit 2 files: /boot/cmdline.txt and /etc/inittab
In /boot/cmdline.txt, locate and edit the line reads like thisdwc_otg.lpm_enable=0 console=ttyAMA0,115200 kgdboc=ttyAMA0,115200 console=tty1 root=/dev/mmcblk0p2 rootfstype=ext4 elevator=deadline rootwaitand remove the console=... and kgdboc=... parts so it looks like this:
dwc_otg.lpm_enable=0 root=/dev/mmcblk0p2 rootfstype=ext4 elevator=deadline rootwait - The next file to edit is /etc/inittab. Because this file is in /etc, we will need to use sudo to make changes. We need to comment out the line below.
T0:23:respawn:/sbin/getty .L ttyAMA0 115200 vt100
To comment out the line, simply put a # in front of the line.
- Reboot the Raspberry Pi for the changes to take effect.
- With the console available for our TNCPi, we now need to install aprx if you have not done so already. We first need to download the software from the project page, here. I've found the easiest way to get it on the pi is to use wget.
(Be sure to download the most recent .deb version for the armhf architecture.) - Once the file is downloaded, you need to use dpkg to install the .deb file. (You can compile from source if you wish, but then you probably don't need my help for that either.) To install using the debian package manager, run the following command:
sudo dpkg -i aprx_2.08.593-1_armhf.deb
(…or whatever your filename is.)
- During the debian package install you may notice a few uninstalled required packages. To download and install those, we need to run the following:
sudo apt-get install -f
- To post content on the APRS-IS, we need to generate a passcode. This is done from this page or any of the dozens of others available on the web. Write down the passcode the webpage gives you, we'll use that in the next step.
- Now with the APRX software installed and our APRS-IS key created, we need to edit the aprx.conf file in /etc. Again, this will require sudo to make changes. Much of the configuration file is documented, but it may be helpful to review a “simplied” version without as much visual clutter. The APRX manual also has a few examples as well.
Below is a snapshot of my aprx.conf file.aprx.conf
mycall N5DUX-10
myloc lat 3233.46N lon 09444.90W

<aprsis>
   #login     N5DUX-10  # login defaults to $mycall
   passcode 8888
   server    rotate.aprs2.net
   #server   noam.aprs2.net
   #heartbeat-timeout   0    # Disabler of heartbeat timeout
</aprsis>

<logging>
   pidfile /var/run/aprx.pid
   rflog /var/log/aprx/aprx-rf.log
   aprxlog /var/log/aprx/aprx.log
</logging>

<interface>
   serial-device /dev/ttyAMA0  19200 8n1   KISS
   callsign     $mycall  # callsign defaults to $mycall
   tx-ok        false # TNC2 monitor can not have transmitter
   telem-to-is  false
</interface>
- Once the aprx.conf file is configurd, you will need to restart the aprx service to apply your changes. Restart aprx through this command:
sudo service aprx restart
- You should now be able to see your iGate showing up online at sites like aprs.fi and you can also see any traffic received by your igate by viewing the file aprx-rf.log
cat /var/log/aprx/aprx-rf.log
Networking
My shack is detached from my house, in the Fall of 2015 I ran a (relatively) short run of fiber to the shack in a buried conduit to provide solid network capability. In the shack I have a multi-port switch for my computer and other Raspberry Pi projects I have running. In the past I have use wireless so if you want to create a set-it-and-forget-it type setup in the back of your garage, storage shed, shack or attic, wireless is an option.
Future Expansion/Refinement
I hope to tweak/modify my setup in the future. A couple ideas I have:
- Listen for and respond locally (somehow) to MAREA packets. (One idea, make a perl/python script to trigger from the exec phrase in aprx.conf.)