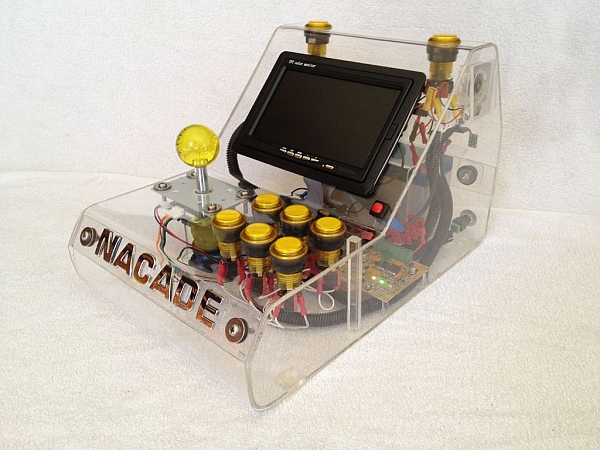
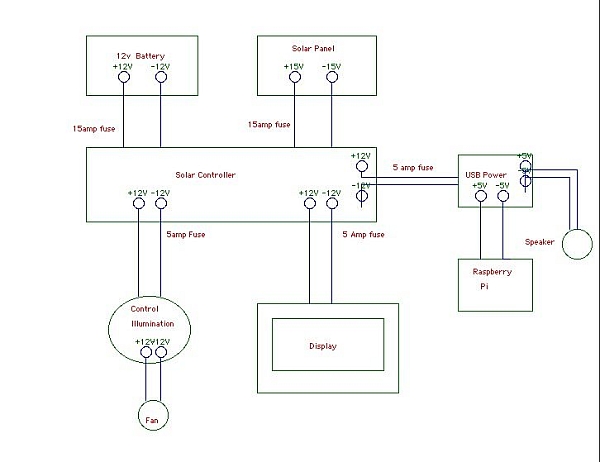
The brains of this setup is the Raspberry Pi computer. It's not overly powerful by today's standards but it can run early style games and systems pretty well. It's small size and low power consumption makes it ideal for many different uses. Best of all it's cheap to buy. The software comes courtesy of Shea Silverman's PiMAME It has a bunch of great gaming emulators built in.
The display is an ordinary 7″ LCD (car reversing monitor) which is sufficient enough for these low resolution games although the menus can be a bit too small to read. I had to use a larger monitor when I set it up initially. Working with scripts on this screen was impossible though a 9″ screen would be a better option if I had to do it over.
The AV input on the screen is connected into the yellow RCA port on the Raspberry Pi.
I used an arcade quality joystick and illuminated buttons which are wired directly into the Pi. Power is supplied through an 9 amp hour AGM battery which is charged by an inbuilt 15amp solar controller. The solar controller regulates voltage from an external source which in this case is a solar panel. Yes, its powered by the sun!
Sound comes from a portable USB speaker that has its own internal battery.
The box itself is made from 3mm clear acrylic and as it was my first attempt working with plastics, I spent a lot of time researching how to cut and bend acrylic sheets with the helpful guides available here on Instructables.
Step 2: Parts
Parts Used :-
- 3mm Acrylic Sheet 1200mm x 1200mm – $50 (Local plastics supplier)
- 7″ LCD screen (car reversing display) – $40 (http://www.ebay.com.au/itm/300881733887?ssPageName=STRK:MEWAX:IT&_trksid=p3984.m1423.l2649) – but I would recommend using a 9″ screen or a better quality (http://www.ebay.com.au/itm/9-TFT-16-9-Car-Rear-View-Reverse-Camera-DVR-LCD-Screen-Color-Monitor-Display-/400554061185?pt=AU_Car_Parts_Accessories&hash=item5d42e1ed81&_uhb=1)
- Raspberry Pi model B – $40 (http://au.element14.com/jsp/displayProduct.jsp?sku=2191863&CMP=KNC-GOO-COM-RPI&mckv=svFQl3BNG%7Cpcrid%7C24644018808)
- 16gb SD card – $15 (http://www.ebay.com.au/itm/SanDisk-16GB-Ultra-UHS-I-SD-HD-Video-16G-SDHC-Memory-Card-Extreme-Fast-Class-10-/230950599191?pt=AU_Electronics_Memory_Cards&hash=item35c5ba7a17&_uhb=1)
- 15 Amp solar controller – $15 (http://www.ebay.com.au/itm/15A-12V-24V-Solar-Panel-Battery-Charger-Controller-Regulator-/190893022116?pt=AU_Solar&hash=item2c721c5ba4&_uhb=1)
- 9 AH 12V AGM battery – $35 (http://www.ebay.com.au/itm/9AH-ALARM-BATTERY-AGM-SLA-DEEP-CYCLE-UPS-12-VOLT-POWER-SUPPLY-SPOT-LIGHT-7AH-/300859124528?pt=AU_Electronics_Batteries_Chargers&hash=item460c99eb30&_uhb=1)
- 12V USB converter (Kensington PowerBolt Duo) – $20 (http://www.ebay.com.au/itm/A51-New-Kensington-PowerBolt-Duo-USB-2-1-Amps-Car-Charger-for-iPhone-iPod-iPad-/231038512927?pt=US_Tablet_eReader_Chargers_Sync_Cables&hash=item35caf7ef1f&_uhb=1
- USB powered speaker – $35 (http://www.ebay.com.au/itm/MOSHI-tm-BASSBURGER-BASS-BURGER-MINI-SPEAKER-BLACK-BRAND-NEW-/171101015097?pt=AU_Electronics_Portable_Audio_Accessories&hash=item27d66a4c39&_uhb=1)
- Arcade joystick and illuminated buttons – $50 (http://www.austinamusements.com.au/joysticks/yellow-illuminate-joystick-12v/prod_275.html)
- assorted switches – $10
- wiring and socket – $10
- GPIO breakout board and cable – $9 (http://www.ebay.com.au/itm/GPiO-Breakout-for-Raspberry-Pi-Breadboard-Cobbler-/171104007671?pt=UK_BOI_Electrical_Components_Supplies_ET&hash=item27d697f5f7&_uhb=1)
- 20w mono solar panel – $40 (http://www.ebay.com.au/itm/New-20-Watt-12v-Monocrystalline-Solar-Panel-20W-/330976676829?pt=AU_Solar&hash=item4d0fbf4bdd&_uhb=1)
- Another 12v USB charger for the speaker – $1 (https://www.aliexpress.com/item/1005002879604441.html?spm=a2g0o.productlist.0.0.79745055Aiy8SL&algo_pvid=22865fa9-0ef8-4d27-ae59-fcd625e8e714&aem_p4p_detail=202109030014017715795775957740006005181&algo_exp_id=22865fa9-0ef8-4d27-ae59-fcd625e8e714-0 )
- Assorted bolts and nuts
- clear rubber adhesive feet for the base (Local hardware store)
All prices are Australian Dollars
Step 3: Tools Required
- Heat gun or a strip bender
- scroll saw
- holesaws and drill bits
- scoring knife, straight edge and a ruler
- soldering iron
- wire strippers
- clamps
- metal file and sandpaper
- screwdrivers
- masking tape
- acrylic glue
Step 4: Planning
I'm not good at sketching out designs so I used some cardboard to make a mockup box. I could get a feel for the spacing and layout of the controls much easier like this. The final width of the unit was determined by the controls and the screen. Everything else had plenty of room to fit in.
Step 5: Building the box
Once the cardboard mockup is sorted, its just a matter of pulling it apart again and using it as a template by laying it flat against the sheet of acrylic. All the bends are marked in their positions and the holes traced out. The mockup can be put back together for later reference. The important part is the main body (which holds the screen and controls) that wraps all the way round.
The two side panels can be marked out and cut once the main body has been shaped.
Step 6: Cutting the sheet
For the main body I needed a long strip of acrylic. To get a nice, straight cut I used the score and snap method. It involves using a straight edge and a scoring knife to mark the sheet deep enough so when downward pressure is applied it snaps exactly where it is needed.
The holes for the joystick and buttons are cut out with a holesaw. The trick is not to rush and allow the drill to gently cut through.
For more detail: NaCade – The Naked Raspberry Pi Arcade Machine


