
Everyone has their own holiday traditions. Mine is trying to make an LED menorah for Hanukkah, the Jewish Festival of Lights. This year, Hanukkah starts on the night of Tuesday, December 12, and, as always, I didn’t leave myself a lot of time to play around. But I wanted to update a prototype I made a few years ago, so I gave it a shot.
Hanukkah lasts for eight nights, and on each night a candle is added to the candelabra known as the menorah. A ninth “helper” candle, or shamash, is used to light the other candles. Menorahs come in all varieties, from simple to ornate and from elegant to playful. In the United States, it’s common for kids to make their own. Mine is similar to the simple soft circuit projects in my books Paper Inventions and Fabric and Fiber Inventions. Taking a cue from preschool-style felt boards, I decided to use felt as the base material, so I could just press an additional candle onto the menorah every night. And instead of wiring, it uses peel-and-stick conductive tape and Chibitronics Circuit Stickers, LEDs that adhere right onto the tape circuits. It’s easy enough for a child (or a non-techy adult) to make in an afternoon.
In my original version, I used the Twinkle stickers from the Circuit Stickers Effects kit to make the candles brighten and dim in random patterns. However, because all the LEDs were controlled by one sticker, they all twinkled at the same time. This year, I wanted to try out the new Chibitronics Love to Code Chibi Chip which lets you program up to six different patterns. I also went with conductive fabric tape instead of copper tape, which bonds better with the felt and doesn’t tear as easily when folded. The Chibi Chip fits into a plastic clip that you can clamp onto the felt, right over the conductive tape, which makes it super-easy to connect.
The directions below give you a basic idea of how to set up a menorah circuit. For details on soft circuits in general, check out my books or the Chibitronics website. If you don’t have a Chibi Chip, you can just light up your LEDs with an 3V coin battery. However, the Chibi Chip is a lot of fun and not hard to learn (especially if you use the drag-and-drop MakeCode platform to program it), so it’s worth getting one to give it a try! (My thanks to Circuit Stickers inventor Jie Qi for sending me the Love to Code Starter Kit to play with, and her partner Andrew “bunnie” Huang for advice on how to get it working.)
Cut the Felt Pieces
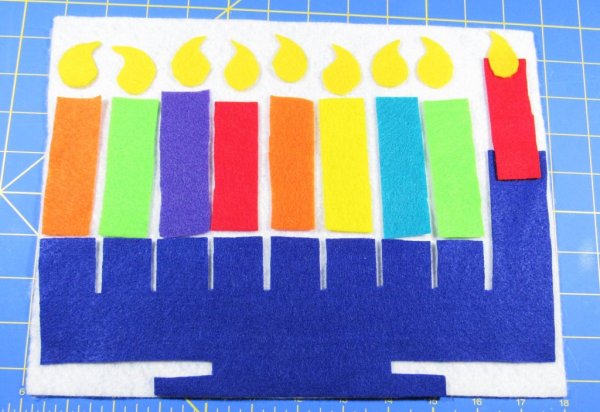
I sized the menorah to fit on a standard 9 X 12 inch sheet of felt from the craft store, which made for a tight fit, so feel free to scale it up using a different material. The shapes are simple to cut out by hand, and a nice mid-century graphic style.
Lay Out the Circuit on the Candles
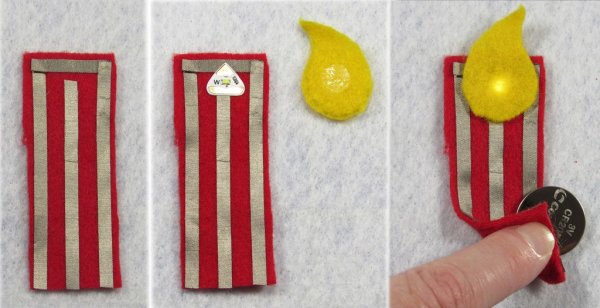
The conductive tape used to make the lines on your circuit are called “traces.” One set of traces carries electrical impulses from the Chibi Chip to positive end of each LED. The other set connects the negative end of one LED to the negative end of the next and eventually back to the Ground pin on the Chibi Chip to close the circuit. On the candles, the trace going up the middle is positive and the trace that goes around the edge of the candle is negative. You need to leave a gap between them for the LED. The Circuit Sticker adhesive is conductive, so all you have to do is press it onto the tape firmly, pointy side up. To add the flame, attach a glue dot to the back and then press the glue dot right over the LED. It helps hold the Circuit Sticker in place and diffuses the light to give the candle its “glow.”
Note: The tape comes on a roll and has a paper backing. To stick it on neatly, just peel off enough backing to anchor the end to the felt. Then slowly lay it down and press it firmly to the felt, peeling off the paper as you go. If you need to add a new piece, just overlap the end of a new piece of tape on top of the old piece. Press it down and it should make a good connection. I used Jie Qi’s method of folding neat corners, but I probably could have cut and overlaid the pieces instead.
Lay Out the Circuit on the Menorah

Each candle holder has a positive trace in the middle that goes to one of the pins on the Chibi Chip and two negative traces on either side. The trace on the extreme right is the only one that goes to the Ground pin on the Chibi Chip. The others go to the negative trace of the next candle (except for the leftmost candle holder). Although you can’t see it in this photo, the tape starts about half an inch down the back of each candle holder, then comes over the top as shown. This is so that it can make contact with the tape on the front of the candle.
Because there are nine candles and only six programmable pins, you’ll have to double or triple up on some of the pins. You can make any design with the tape you like, as long as it doesn’t touch any other traces, which can cause a short circuit. Just be sure the ends of the tape on the menorah match up with the tape on the candles on the top and with the pins on the Chibi Chip on the bottom. To help you line the tape up correctly, mark the position of the pins on the felt with pencil or chalk.
Use Z-Axis Tape to Help the Candles Connect with the Menorah
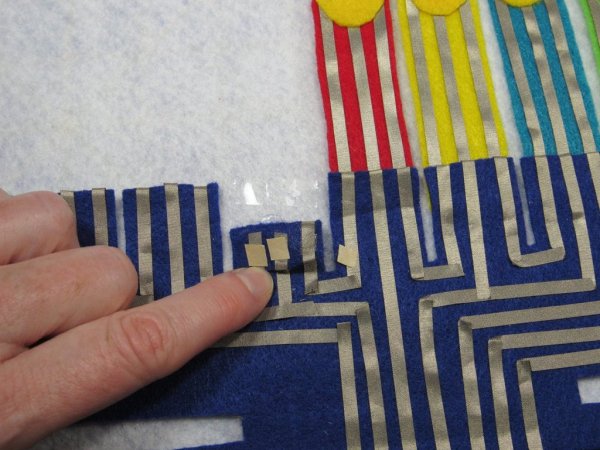
The trickiest part of this design is getting the tape on the candles to stay connected to the tape on the menorah. I wanted the candles to slip behind the candle holders, so I added small bits of conductive z-axis tape to the back of the candle holders. The z-axis tape works just like a glue dot — you peel off the backing paper on one side, press it where you want it to stick, and then peel the remaining backing paper off the other side. All that’s left is the conductive glue. To keep the glue from sticking to the felt behind the menorah, when there isn’t a candle in place, I put a strip of clear tape on the background felt. It’s not a perfect solution, but it works for a while if you remove the candle carefully.
Program the Chibi Chip with MakeCode
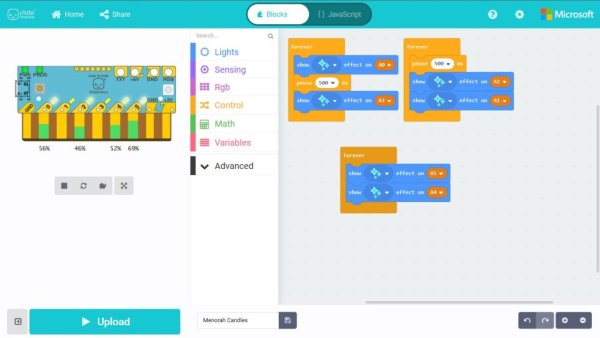
Telling your candles to flicker is simple using Microsoft MakeCode. It’s free and works online in your browser. You can upload the program I wrote, or create your own. For each pin, I just grabbed a “show effect” block and chose “Twinkle” and the pin number from the pull-down menus. Then I grouped the pins randomly in several “forever” loops. This seemed to avoid having the candles twinkle one after the other, down the line. I added a couple “pause” blocks into the loops for the same reason.
To upload your program to your Chibi Chip, follow the instructions in the Love to Code book or on the Chibitronics website to connect it to the MakeCode page on a computer, tablet, or smartphone. If you don’t have the hardware, you can still see how your program works with the online simulator. Play around with it to see what effects you can create.
Put It All Together

To assemble your menorah, put the menorah shape on a piece of background felt (if you haven’t already) with the bottom along the bottom edge. Tuck a candle behind the highest candle holder. This is your shamash.