
In my last post I’ve described the design and construction of my LED dimmer project. This project here is similar but a bit more involved. It controls RGB LEDs so it can not only change the brightness but also the color of the light. Instead of a simple pot it used a pair of rotary encoders with push buttons. One controls the brightness, pushing its button turns the light on or off. The other changes the color, pushing its button toggles between color and white.
There’s also a I2C interface included this time. I originally had the idea to hook this thing up to a Raspberry Pi and so be able to control the light from my computer or cell phone. I did establish an I2C connection to the RPi and it all works but it’s now installed as a stand-alone solution.
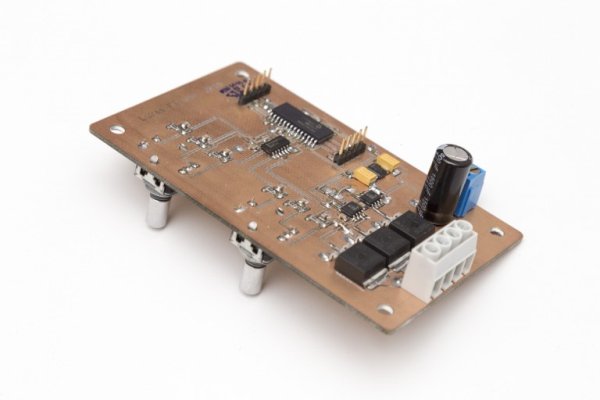
Since we’re now controlling RGB LEDs we obviously need three independant PWM outputs, one for each for red, green and blue. But let’s go through the circuit step by step.
Power Supply
The board is powered from a fairly powerful 12V supply that is always on. A LM2931 turns this into a microcontroller-friendly 5V. But if we want to connect this board to a Raspberry Pi we need to match the RPi’s 3.3 volts operating voltage. Apart from hobbyist projects there aren’t many microcontroller circuits running at 5V nowadays. Most of the PIC16Fxxx family of chips still handle 5 volts but this is becomming more and more of an exception. So in order to be compatible with the rest of the world this board will need a way to adapt it’s voltage.
What I’ve done here is the following: The board has it’s own 5V regulator and you can power from that using a jumper on the I2C header. On the other hand, if the board is connected to a Raspberry Pi over I2C, it will just freeride on the RPi’s 3.3V operating voltage. Since the board is only drawing a few milliamps at 3.3V this is perfectly fine. The RPi specs allow for 30mA or so to be drawn in this fashion.
Rotary Encoders
I’m using a pair of Bourns PEC11R-4215F-S0024. These are 24 steps-per-rotation encoders with a push button that I’ve used for other projects before. I’ve made it a habit to debounce switches and encoders in hardware rather than having to worry about it in software. There’s even an entire post just on that subject: https://soldernerd.com/2014/11/12/switch-debouncing-using-74hc14/.
So all 6 signals comming from the encoders are first RC filtered and then run through a 74HC14 schmitt-triggered inverter and reach the PIC nice and clean.
As I’ve mentioned I’m not using the I2C interface at the moment so the implementation is somewhat basic. Data can be sent to the board and it is stored in a recieve buffer but nothing is not processed. When asked for data it transmits up to 11 bytes indicating it’s current state of operation such as brightness of each color channel and some more data.
There is also nothing preventing the content of the buffer from being changed while a transmission is in progress. So if you’re planning to really use this I2C feature you probably want to improve it somewhat but the code (download link at the end of this post) gives a good, working starting point. If you need help, just ask.
Controlling the outputs is not that challenging. Its jus 3 10bit PWM modules running 120 degrees out-of-phase to smoothen the current seen at the input. Again, the LM7111 I’ve used are of the inverting type so the duty cycle has to be inverted in software.
For more detail: PWM dimmer for RGB LED