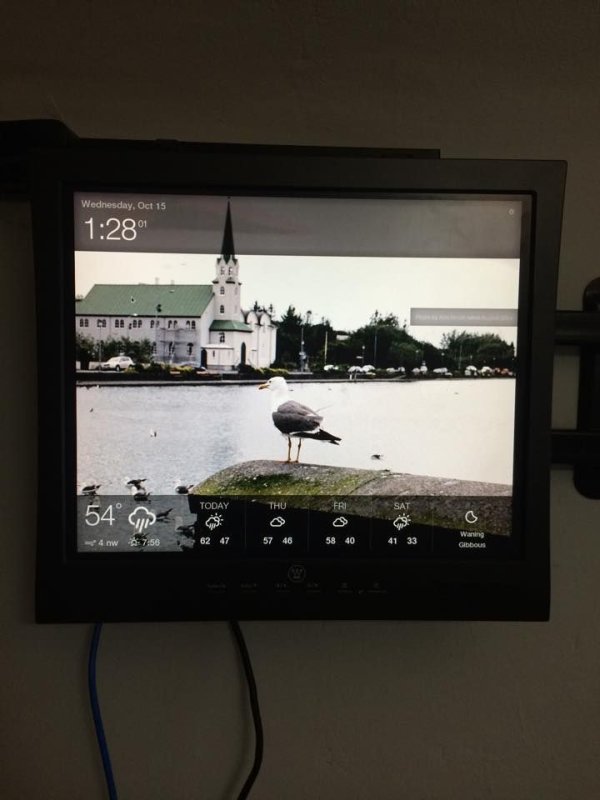
I wanted a simple yet elegant panel that would display the current weather, my photostream from Flickr, The time and my iCal feeds
Step 1: Configuring the Raspberry pi
First we'll setup the Raspberry Pi, to do this you'll need to have
Raspbian installed. You can buy a Pi with Raspbian pre-installed or you can use a 2GB or larger SD card that you already have. I am using an SD card I already have. Plug the SD card into your computer and download the latest Raspbian http://downloads.raspberrypi.org/raspbian_latest I'm using windows so I unzipped the file and used win32diskimager (http://sourceforge.net/projects/win32diskimager) to write the Raspbian image to the SD card. If you are still not sure there is a tutorial here http://elinux.org/RPi_Easy_SD_Card_Setup
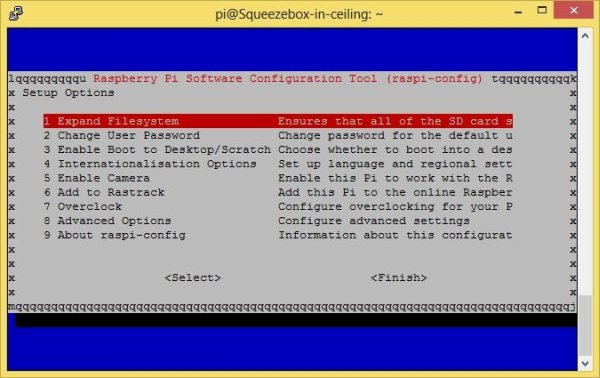
Ok now we have Raspbian installed it's time to get our Pi up and running, plug in your SD card, Wi-Fi dongle, USB keyboard, Ethernet cable to your router, HDMI to your monitor and lastly the micro USB cable to the power socket. The first time you boot up you'll end up with the configuration screen. The changes you need to make are: Expand the filesystem so Raspbian utilises the entire SD card Change your password Enable boot to desktop Set your language, region and time zone Go into advanced options Change your hostname so you can recognise your Pi on the network. Enable SSH so you can access your PI from a computer on your network. Select finish which should restart your Pi.
Step 2: Keyboard and Updates
If you are in the US or Australia like me you will want to change the keyboard layout to US.
To do this you’ll need to change a file by opening your terminal and entering the command: sudo nano /etc/default/keyboard Use the arrow keys to move the cursor and change the gb to us. Now save the file by pressing ctrl + X and Y to save changes Now to update your Pi, type the following commands: sudo apt-get update sudo apt-get upgrade Press y and hit enter to download updates (this will take ages so go have a coffee/beer).
Step 3: Wireless Configuration
If you just want to use Ethernet you can skip this step.
To get your Wi-Fi dongle working you may need to edit the wpa_supplicant.conf file by typing
sudo nano /etc/wpa_supplicant/wpa_supplicant.conf
Then make it look like this:
ctrl_interface=/var/run/wpa_supplicant
network={
proto=RSN
scan_ssid=1
key_mgmt=WPA-PSK
pairwise=CCMP TKIP
group=CCMP TKIP
ssid=”your network ID in quote marks”
psk=”your network password in quote marks”
}
update_config=1
To save the file press ctrl + x then Y and enter to save
Restart the Pi by entering:
sudo reboot
You should be able to see if your Wi-Fi dongle has an IP address with the command
sudo ifconfig
You should get something like this
wlan0 Link encap:Ethernet HWaddr 64:66:b3:06:43:1b
inet addr:10.0.0.75 Bcast:10.0.0.255 Mask:255.255.255.0
UP BROADCAST RUNNING MULTICAST MTU:1500 Metric:1
RX packets:912384 errors:0 dropped:121692 overruns:0 frame:0
TX packets:706463 errors:0 dropped:0 overruns:0 carrier:0
collisions:0 txqueuelen:1000
RX bytes:694114055 (661.9 MiB) TX bytes:71017681 (67.7 MiB)
Step 4: Iceweasel configuration
Now we will install a browser that will display mPanel Properly
Once complete Iceweasel should pop up in the menu under internet, open
it so we can start configuring
Type in about:config in the address field and hit enter.
Now find the “browser.sessionstore.resume_from_crash” line and double click to change it to false.
Step 5: MPanel & Autolaunch Configuration
Configuring the mPanel is relatively easy, It supports iCal Feeds, The weather, a flickr photostream and more.
Launch iceweasel
Visit
http://designelemental.net/mpanel/ and create an account, there in the settings you can configure your mPanel to your liking.
Be sure to set the homepage of Iceweasel to your mPanel Page by going the Edit Menu, Then preferences
Make sure http://designelemental.net/mpanel is set as the homepage.
Hit the F11 key to go fullscreen and hover your mouse at the very top of
the screen then close the browser with CTRL-Q . Re-open the browser and it should open to your mpanel and still be full screen.
We also want Iceweasel to start automatically
sudo nano /etc/xdg/lxsession/LXDE/autostart
add @iceweasel to the list
now press ctrl X then y and enter to save the changes
Step 6: Cursor and Powersave
The next step is to get rid of that pesky mouse cursor and stop the screen from going to powersave/sleep mode.
First we’ll install Unclutter to get rid of the cursor when it’s not in use.
sudo apt-get install unclutter
Now we need to edit the /etc/lightdm/lightdm.conf file to prevent powersave/sleep mode
sudo nano /etc/lightdm/lightdm.conf
Move down to: [SeatDefaults]
Change this line:
#xserver-command=X
to this:
xserver-command=X -s 0 –dpms
now press ctrl+x then Y and enter to save the changes
Step 7: You're Done 😀
Now it’s all setup you can plug it in to your wall mounted monitor and turn it all on.
If something stops working just unplug the pi then plug it back in, hey presto she starts again. Unfortunately my spare HDMI monitor does not have the screw holes for a wall mount bracket. I have decided to use an old VGA monitor I had laying around, just have to wait for the HDMI to VGA converter.
Source: Raspberry Pi Media Panel


