
In this post, you are going to learn about how to build a Raspberry Pi Pan Tilt Object Tracker using OpenCV.
To control the servos, I have used pigpio module instead of RPi.GPIO library (which is the most commonly used) because I find servos jittering while controlling them using RPi.GPIO.
Servos work smoothly while using the pigpio module and there is no jittering.
I used Raspbian Buster and OpenCV4.1. I installed OpenCV4 by following instruction at this github link. It will work fine on Raspbian Stretch and with OpenCV 3.4 as well.
Required Components
The components you are going to require for Raspberry Pi pan tilt object tracker using OpenCV are as follows
- Raspberry Pi (I have used Raspberry Pi 3B+)
- Power supply
- PiCamera V2 is recommended
- Pan tilt bracket
- 2 X Servos
- Touch Screen (Optional)
- Keyboard Mouse (Optional)
Pan Tilt Assembly
To assemble pan tilt bracket, watch following video by Amp Toad
After assembling it, place the camera on it using the mounting tape.
Circuit Diagram
The connections are very easier. Connect the black/ brown and red wire of servos to GND and 3.3V pin of Raspberry Pi respectively. Then connect the yellow wire of Pan servo to GPIO 2 of Raspberry Pi and yellow wire of Tilt servo to GPIO 3.
Now let’s move towards the code part.
Code
First of all, we included the packages required for this project.
# Importing required packages
import cv2
import time
import sys
import argparse
import pigpio
from numpy import interp
In the next lines, we initialized the pins for servos and moved the servos to centre position. minMov and maxMov is how much our servos will pan or tilt based on our far object is from the center.
panServo = 2
tiltServo = 3

panPos = 1250
tiltPos = 1250

servo = pigpio.pi()
servo.set_servo_pulsewidth(panServo, panPos)
servo.set_servo_pulsewidth(tiltServo, tiltPos)

minMov = 30
maxMov = 100
We parse our command line arguments which are optional. The first argument we need to pass is the tracker we want to use. There are eight trackers and the best one worked is CSRT. If you won’t pass any pass tracker, it will use the default one which is CSRT.
The second argument is the camera you want to use. If this argument is not passed, it will use the picamera.
if tracker_type == 'BOOSTING':
    tracker = cv2.TrackerBoosting_create()
elif tracker_type == 'MIL':
    tracker = cv2.TrackerMIL_create()
elif tracker_type == 'KCF':
    tracker = cv2.TrackerKCF_create()
elif tracker_type == 'TLD':
    tracker = cv2.TrackerTLD_create()
elif tracker_type == 'MEDIANFLOW':
    tracker = cv2.TrackerMedianFlow_create()
elif tracker_type == 'CSRT':
    tracker = cv2.TrackerCSRT_create()
elif tracker_type == 'MOSSE':
    tracker = cv2.TrackerMOSSE_create()
elif: tracker_type == 'GOTURN':
	tracker = cv2.TrackerGOTURN_create()
else:
	print('Incorrect Tracker')
	sys.exit()

if camera_type == 'picam':
	from picamera.array import PiRGBArray
	from picamera import PiCamera
	camera = PiCamera()
	camera.resolution = (640, 480)
	rawCapture = PiRGBArray(camera, size=(640, 480))
elif camera_type == 'usbcam':
	cap = cv2.VideoCapture(0)
OpenCV has a builtin function ‘selectROI’ that opens up a window when calling and allows us to select a region of interest (ROI). We need to pass the frame (from which we want to select the ROI) to this function. So we get the frame from the camera and passed it to the ‘selectROI’ function.
It will use the picam or usbcam depending upon the argument passed.
if camera_type == 'picam':
	for frame in camera.capture_continuous(rawCapture, format='bgr', use_video_port=True):
		frame = frame.array
		bbox = cv2.selectROI(frame)
		ok = tracker.init(frame, bbox)
		rawCapture.truncate(0)
		key = cv2.waitKey(1)
		break
elif camera_type == 'usbcam':
	while True:
		ret, frame = cap.read()
		bbox = cv2.selectROI(frame)
		ok = tracker.init(frame, bbox)
		key = cv2.waitKey(1)
		break
Next we call a continuous loop that will take frames from the picam or usbcam and will call the trackObject() function in which we are going to track the object.
if camera_type == 'picam':
	for frame in camera.capture_continuous(rawCapture, format='bgr', use_video_port=True):
		frame = frame.array
		asd = trackObject(frame)
		rawCapture.truncate(0)
		if asd == False:
			break

elif camera_type == 'usbcam':
	while True:
		ret, frame = cap.read()
		asd = trackObject(frame)
		if asd == False:
			cap.release()
			break
In the trackObject() function, we use the update method of the tracker that will find the object in the frame.
It returns a Boolean that tells us if the object is located or not and a list of box.
We then used this list to draw the rectangle.
The list we have got contains the starting points and width, height.
We then called the movePanTilt() function to move the servos according to the box detected.
def trackObject(frame):
	ret, bbox = tracker.update(frame)
	if ret:
		pt1 = (int(bbox[0]), int(bbox[1]))
		pt2 = (int(bbox[0]+ bbox[2]), int(bbox[1] + bbox[3]))
		cv2.rectangle(frame, pt1, pt2, (255,0,0), 2, 1)
		x, y, w, h = int(bbox[0]), int(bbox[1]), int(bbox[2]), int(bbox[3])
		movePanTilt(x, y, w, h)
	cv2.imshow('frame', frame)
	key = cv2.waitKey(1)
	if key == 27:
		return False
In the movePanTilt() function, we checked if the object is at the center of the frame or not.
int(x+(w/2)) > 360 means object is on the right side of the frame and int(x+(w/2)) < 280 means object is on the left side of the frame.
We calculated the distance that pan tilt servos will go for. Face far away from centre means servos will cover more distance and face near the centre means servos will go for less distance.
If the pan and tilt servos position will be in 0 to 180 degrees (500=0 degree and 2500=180 degree). Servos will move otherwise they will stay in the current position.
def movePanTilt(x, y, w, h):
	global panPos
	global tiltPos
	cv2.rectangle(frame, (x, y), (x+w, y+h), (0, 255, 0), 2)
	if int(x+(w/2)) > 360:
		panPos = int(panPos - interp(int(x+(w/2)), (360, 640), (minMov, maxMov)))
	elif int(x+(w/2)) < 280:
		panPos = int(panPos + interp(int(x+(w/2)), (280, 0), (minMov, maxMov)))

	if int(y+(h/2)) > 280:
		tiltPos = int(tiltPos + interp(int(y+(h/2)), (280, 480), (minMov, maxMov)))
	elif int(y+(h/2)) < 200:
		tiltPos = int(tiltPos - interp(int(y+(h/2)), (200, 0), (minMov, maxMov)))

	if not panPos > 2500 and not panPos < 500:
		servo.set_servo_pulsewidth(panServo, panPos)

	if not tiltPos > 2500 and not tiltPos < 500:
		servo.set_servo_pulsewidth(tiltServo, tiltPos)
Complete code for pan tilt face tracking is as follow
import cv2
import time
import samples
import os
import shutil
import pickle
import numpy as np
from threading import Thread

cap = cv2.VideoCapture(0)
cascade_classifier = cv2.CascadeClassifier("haarcascade_frontalface_default.xml")
gender_net = cv2.dnn.readNetFromCaffe('deploy_gender.prototxt' , 'gender_net.caffemodel')
MODEL_MEAN_VALUES = (78.4263377603, 87.7689143744, 114.895847746)
gender_list = ['Male', 'Female']
recognizer = cv2.face.LBPHFaceRecognizer_create()
def RemoveTrainingData():
    try:
        shutil.rmtree("images")
        if os.path.exists("trainer.yml"):
            os.remove("trainer.yml")
        if os.path.exists("labels"):
            os.remove("labels")
            pass
    except OSError as e:
        print("error while removing the data")
        pass
RemoveTrainingData()
def GenderDetection(face_crop):
    blob = cv2.dnn.blobFromImage(face_crop, 1, (227, 227), MODEL_MEAN_VALUES, swapRB=False)
    gender_net.setInput(blob)
    gender_preds = gender_net.forward()
    gender = gender_list[gender_preds[0].argmax()]
    print(gender)
face_roi = np.array([])
got_roi = False
timeDiction = {}
def drawFace():
    global face_roi , start_time
    i = 1
    if not face_detected():
        face_roi = np.zeros((250 , 250 , 3) , np.uint8)
    for (x, y, w, h) in face:
        cv2.rectangle(frame, (x, y), (x + w, y + h), (0, 0, 255), 3)
        face_roi = frame[y:y + h, x:x + w]
        if int(time.time() - start_time) == 3:
            samples.getSample(face_roi, str(i))
        i = i + 1


def predictPerson():
    global timeDiction , face_roi
    while True:
        if samples.trained_data:
            if os.path.exists("trainer.yml"):
                try:
                    recognizer.read("trainer.yml")
                except:
                    continue
                roi_gray = cv2.cvtColor(face_roi, cv2.COLOR_BGR2GRAY)
                id_, conf = recognizer.predict(roi_gray)
                print("the id is " ,  id_ , " with conf " , conf)
                if os.path.exists("labels"):
                    with open('labels', 'rb') as f:
                        labels = pickle.load(f)
                        f.close()
                    for name, value in labels.items():
                        if value == id_:
                            if conf <= 80:
                                for i in range(1, len(labels) + 1):
                                    if value == i:
                                        timeDiction[name] = time.time()
                                        print(timeDiction)
                    checkPersonTime()

def checkPersonTime():
    for key, i in timeDiction.items():
        if timeDiction[key] + 3 < time.time():
            print("person " , key , " is not looking")

t1 = Thread(target=predictPerson)
t1.start()
def readData():
    dic = {}
    with open("values.txt") as f:
        for line in f:
            line = line.split()
            key , value = line[0] , int(line[1])
            dic[key] = value
    return dic
dic = readData()
loop_time = dic["loop_time"]
switchon_delay = dic["switchon_delay"]
switchoff_delay = dic["switchoff_delay"]
loopon_time = dic["loopon_time"]
def face_detected():
    if len(face) > 0:
        return True
    else:
        return False

current_shape = 0
def found_face_time():
    global current_shape , start_time
    if face.shape[0] > current_shape:
        start_time = time.time()
    current_shape = face.shape[0]


got_start_time = False
start_time = 0
relay = False
relay_on_time = 0
def checkRelay():
    global got_start_time , start_time , relay , loopon_time , relay_on_time
    if int((loopon_time + switchoff_delay) / loop_time) == (loopon_time + switchoff_delay) / loop_time:
        loopon_time = 1
        relay = False
    elif face_detected():
        if int(time.time() - start_time) == switchon_delay / 1000:
            relay_on_time = time.time()
            relay = True
    else:
        start_time = time.time()
        loopon_time = int(time.time() - relay_on_time)

relayOpened = False
def openOrCloseRelay():
    global relayOpened
    if relay and not relayOpened:
        print("relay Open")
        relayOpened = True
    elif not relay and relayOpened:
        print("relay Closed")
        relayOpened = False

while cap.isOpened():
    _ , frame = cap.read()
    face = cascade_classifier.detectMultiScale(frame , scaleFactor=1.1 , minNeighbors=5)
    drawFace()
    if face_detected():
        found_face_time()
    checkRelay()
    openOrCloseRelay()
    cv2.imshow("frame" , frame)
    k = cv2.waitKey(1) & 0xff
    if k == 27:
        break

cap.release()
cv2.destroyAllWindows()
Before running the code, you need to turn the pigpio daemon.
sudo pigpiodType following command to run the code. By default, it will use the picam and CSRT tracker.
python3 main.pyPass the arguments to run it from usbcam and for other tracker. For example, following command will run it for usbcam and for KCF tracker
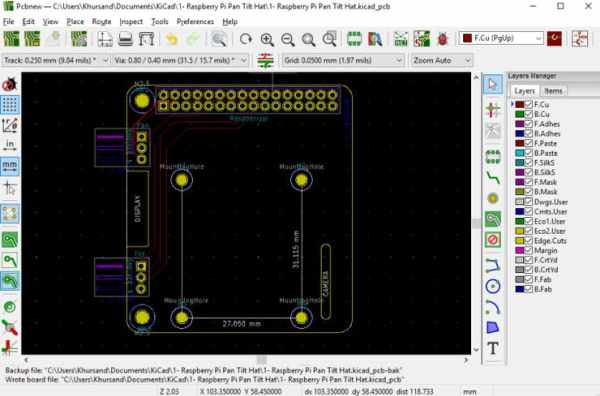
python3 main.py -t KCF -c usbcamPCB Design
After making sure everything works fine, I have designed the PCB on KiCad.
Following is a link to the project folder of this project.
Raspberry Pi Pan Tilt Hat Project FolderDownload
After designing the PCB’s, I generated the Gerber file needed for manufacturing of PCB.
You can download the Gerber file through following link
Raspberry Pi Pan Tilt Hat GerberDownload
Ordering the PCBs
Now we have got the Gerber file and it’s time to order the PCB’s. For that, you just have to go to JLCPCB.com, and click on “QUOTE NOW” button.

JLCPCB are also sponsor of this project. JLCPCB (Shenzhen JLC Electronics Co., Ltd.), is the largest PCB prototype enterprise in China and a high-tech manufacturer specializing in quick PCB prototype and small-batch PCB production. You can order a minimum of 5 PCBs for just $2.
To get the PCB manufactured, upload the gerber file you downloaded in the last step. Upload the .zip file or you can also drag and drop the gerber files.